首先先建立Vite專案 Vite 安裝 typescript
在專案根目錄安裝vitest @vue/test-utils jsdom
建立專案時要加入單元測試必須在Vitest 需要 Vite >=v5.0.0 和 Node >=v18.0.0
安裝測試工具
- vitest:單元測試框架(提供了執行測試的環境、斷言、隔離庫⋯⋯等等功能與 API)
- @vue/test-utils:測試 Vue 元件的工具
- jsdom:讓我們可以在 Node 環境模擬出瀏覽器中的 DOM 環境(方便測試)
1
2
| cd 到專案
npm install -D vitest @vue/test-utils jsdom
|
在專案根目錄安裝vitest @vue/test-utils jsdom
jsdom:是一個可以使用類似dom元件操作方式來操作html text的工具
在 ~專案根目錄/package.json
執行腳本指令新增單元測試所需要的指令
scripts加入
“test”: “vitest –environment jsdom”,(啟動單元測試指令時環境內的jsdom)
設定檔 package.json行腳本指令
1
2
3
4
5
6
7
8
9
10
11
12
13
14
15
16
17
18
19
| "scripts": {
"dev": "vite",
"build": "vue-tsc -b && vite build",
"preview": "vite preview",
"test": "vitest --environment jsdom"
},
"dependencies": {
"vue": "^3.5.17"
},
"devDependencies": {
"@vitejs/plugin-vue": "^6.0.0",
"@vue/test-utils": "^2.4.6",
"@vue/tsconfig": "^0.7.0",
"jsdom": "^26.1.0",
"typescript": "~5.8.3",
"vite": "^7.0.4",
"vitest": "^3.2.4",
"vue-tsc": "^2.2.12"
}
|
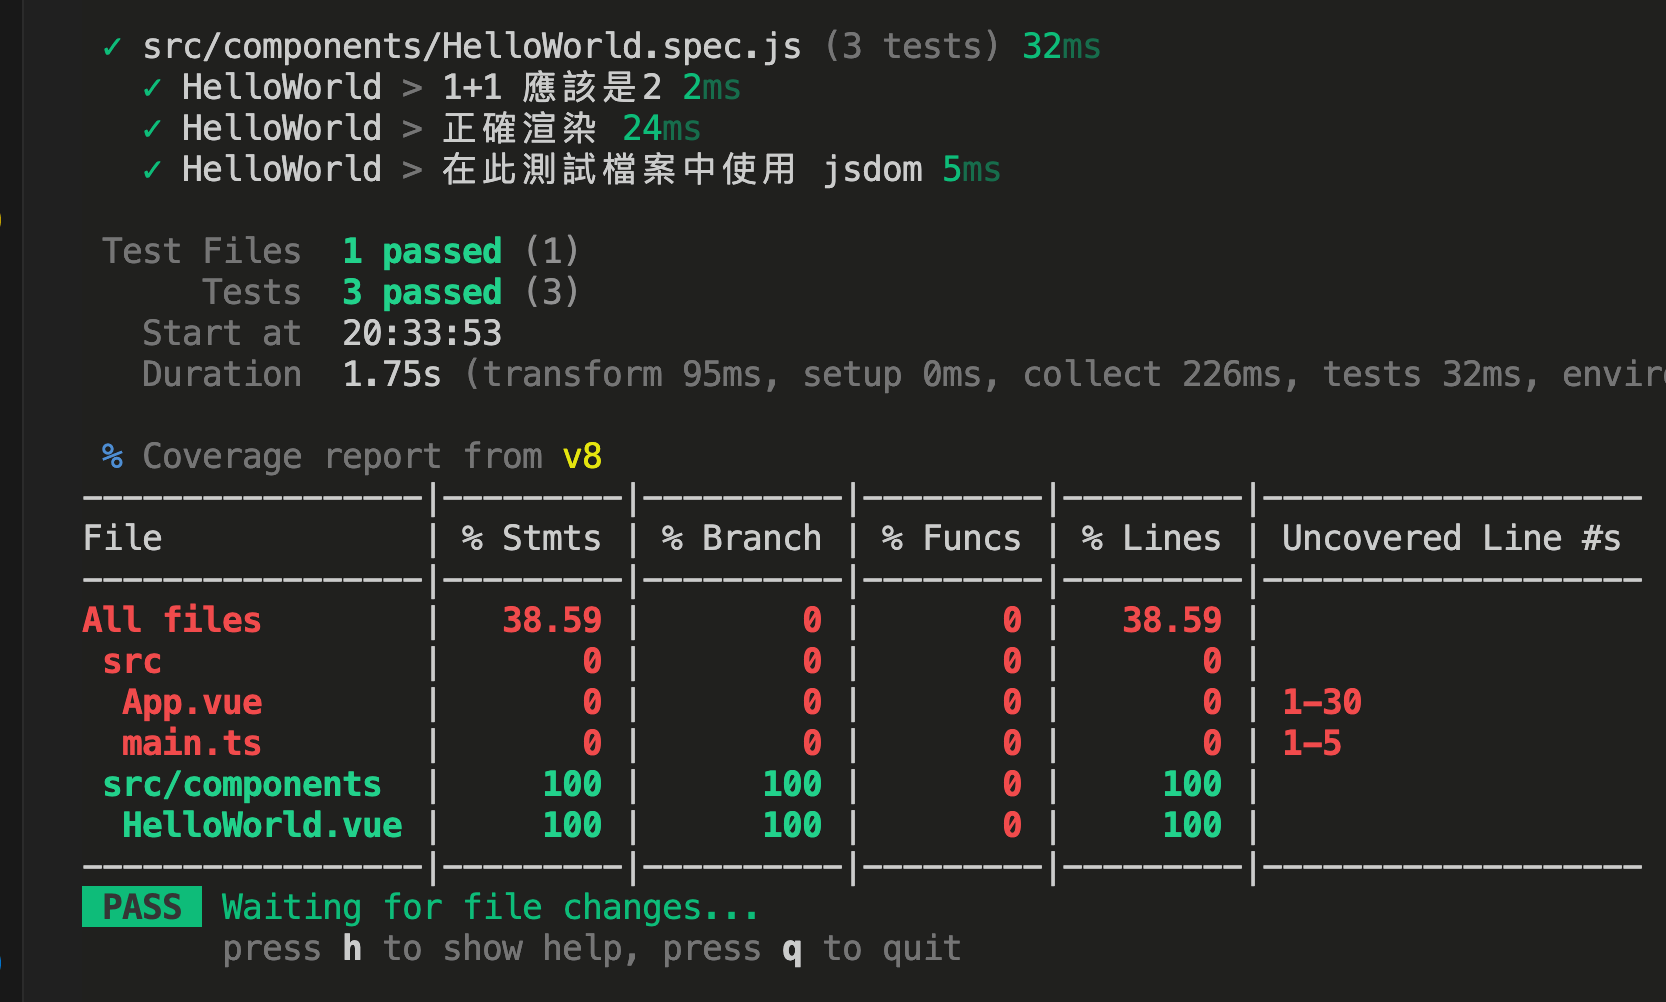
範例:子元件 mount,props
在 src/components/內新增HelloWorld.spec.js
解釋名詞:mount
mountVue 中的 Test Utils 是測試 Vue 元件的關鍵函數。 它是創建 Vue 應用程式的主要方法,該應用程式在測試環境中託管和渲染被測元件。

describe & it 輔助 API
準備 => 操作 => 斷言
1
2
3
4
5
6
7
8
9
10
11
12
13
14
15
16
17
18
19
20
21
22
23
24
| //引入描述、它、斷言 如果在使用
import { describe, it, expect } from 'vitest'
//引入測試實用程式
import { mount } from '@vue/test-utils'
//引入元件
import HelloWorld from './HelloWorld.vue'
describe('HelloWorld', () =>
{
it('1+1 應該是2', () => {
expect(1 + 1).toBe(2)
})
it('正確渲染', () => {
const wrapper = mount(HelloWorld, { props: { msg: 'Hello Vitest' } })
expect(wrapper.text()).toContain('Hello Vitest')
})
it('在此測試檔案中使用 jsdom', () => {
const element = document.createElement('div')
element.innerHTML = '<p>Hello, HTML!</p>'
expect(element.innerHTML).toBe('<p>Hello, HTML!</p>')
})
})
|
執行啟動單元測試指令
github安裝單元測試與執行啟動單元測試指令
得到以下

github
單元測試覆蓋
Vitest 支援兩種程式碼覆蓋率引擎,v8 和 Istanbul。
v8 使用Chrome v8 引擎中內建的程式碼覆蓋率測量。
v8 的一大優點是不需要預先檢測和轉譯。
v8 無法區分 if 語句、三元條件或 for 迴圈中的條件。它將它們全部突出顯示為條件表達式。
Istanbul是一個歷史悠久的 JavaScript 測試覆蓋率工具。
Istanbul檢測需要使用 Babel 插件實現轉譯過程。幸運的是,一切都由 Vitest 為您處理。
Istanbul的一大優勢是偵測發生在單行程式碼的層級。您應該得到非常精確的結果。只有您感興趣的程式碼才會被偵測。
安裝@vitest/coverage-v8 與vitest/coverage-istanbul指令
1
2
| npm install -D @vitest/coverage-v8
npm install -D @vitest/coverage-istanbul
|
維測試介面
1
| npm install -D @vitest/ui
|
vitest 在typescript vite.config 的設置
1
2
3
4
5
6
7
8
9
10
11
12
13
14
15
16
17
18
19
20
21
22
23
24
25
26
27
28
29
30
31
32
33
34
35
36
37
38
39
40
41
|
/// <reference types="vitest/config" />
import { defineConfig } from 'vite';
import vue from '@vitejs/plugin-vue'
//型別設置
interface vitestConfigType {
 include: string[],
  globals: boolean,
  environment: string,
  exclude:string[],
  coverage: object,
}
//定義vitestConfig
const vitestConfig: vitestConfigType = {
   //默认值: ['**/*.{test,spec}-d.?(c|m)[jt]s?(x)']
   // 在這裡加入測試設定:.spec.js類型都執行單元測試
  include:['**/*.spec.js'],
  globals: true,//全域:就不需要顯示引入 vitest 測試相關的 API,讓測試看起來更乾淨
  environment: "jsdom",
   //匹配排除测试文件,以下是預設
 exclude:['**/node_modules/**', '**/dist/**', '**/cypress/**', '**/.{idea,git,cache,output,temp}/**'],
  coverage: {
    all: true,
    //默認v8
    provider: 'v8',
    reporter: ['text', 'json', 'html'],
    include: ['src/**.{vue,ts}'],
    //排除
    exclude: ['**/utils/users.ts']
  }
};


export default defineConfig({
  plugins: [
    vue()
  ],
  //設置vitestConfig
  test:vitestConfig,
})
|
在package.json 修改以下
1
2
3
4
| "scripts": {
"test": "vitest",
"coverage": "vitest --coverage"
},
|
執行啟動單元測試指令
1
2
| npm run test
npm run coverage
|
執行啟動npm run coverage 後專案根目錄會產生了一個coverage 資料夾內index.html即是以下圖片
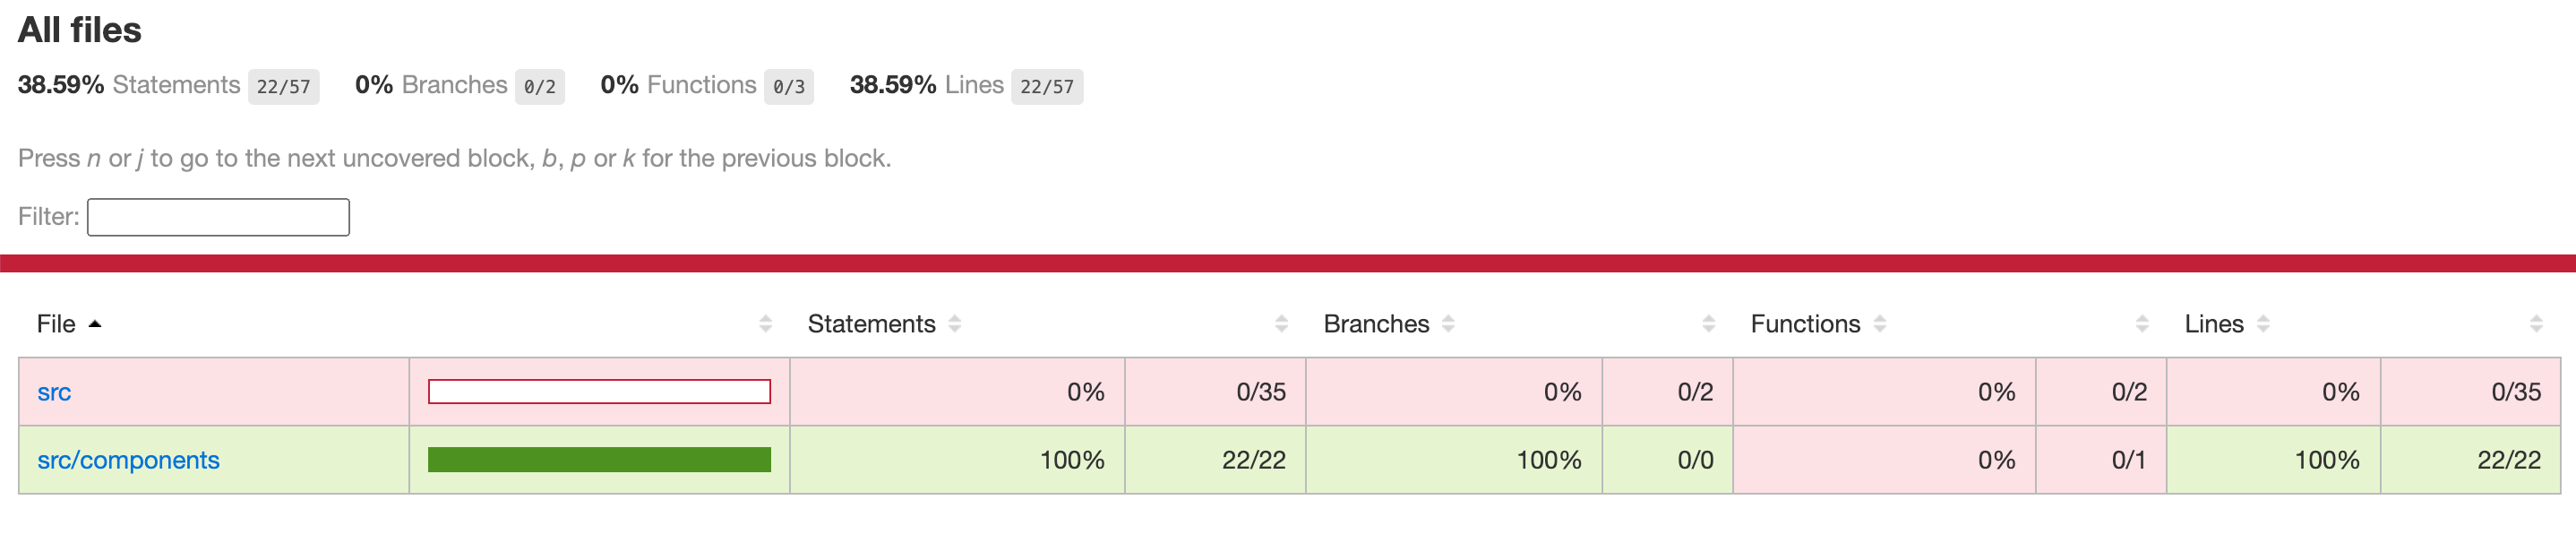
覆蓋率列表
所有文件
38.59% Statements(聲明) 22/570% Branches (分行) 0/20% Functions(函式) 0/338.59% Lines (行) 22/57
單元測試覆蓋率,維測試介面與 設置
使用data-* 作為選擇目標好處最主要在於顯著標記測試內容
在生產環境刪除 data-* attribute
若想在 vitest 中移除 data-* 也非常的簡單,我們只需要在 vite.config.js 設定中,針對 Vue 底下的編譯選項做一些調整即可(底下示範的版本為移除 data-test,若使用其他命名請自行調整囉):
vite.config.js
1
2
3
4
5
6
7
8
9
10
11
12
13
14
15
16
17
18
19
20
21
22
23
24
25
| const isProd = process.env.NODE_ENV === 'production'
const removeDataTestAttrs = (node) => {
const NodeTypes = Object.freeze({
ELEMENT: 1,
ATTRIBUTE: 6,
})
if (node.type === NodeTypes['ELEMENT']) {
node.props = node.props.filter((prop) => (prop.type === NodeTypes['ATTRIBUTE'] ? prop.name !== 'data-test' : true)) // 請自行替換命名 data-test
}
}
export default defineConfig(() => {
return {
plugins: [
vue({
template: {
compilerOptions: {
nodeTransforms: isProd ? [removeDataTestAttrs] : [],
},
},
}),
]
}
})
|
模擬 HTTP 請求
組件有串接Api時
1
2
3
4
5
6
7
8
9
10
11
12
13
14
15
16
17
18
19
20
21
22
23
24
25
26
27
28
29
30
31
32
33
34
35
36
37
38
| GuessAge.vue
<template>
<h1 data-test="title">{{ title }}</h1>
<div class="card">
<div style="width:400px;height:130px;margin-top:20px;border-style: dotted;" >
<br>
<span>Firsthand: {{firstname}}</span> <br>
<span>Age: {{age}}</span>
</div>
<label> Enter Firstname </label><br>
<input type="text" v-model="search" style="font-size:20px;border-radius:10px; border:2px solid red"/>
<a style="width:50px;height: 50px; background:red;"
data-test="getAge"
@click="getAge">Guess Age</a>
<input type="radio" value="pop"> <label>Save my data</label>
</div>
</template>
<script setup lang="ts">
import { ref,computed } from 'vue'
const props = defineProps({
title:{type:String},
})
const search = ref<string>('');
const age = ref<string>('');
const firstname = ref<string>('');
const getAge =() => {
fetch('https://api.agify.io/?name='+ search.value)
.then(response => response.json())
.then(data => {
age.value = data.age
firstname.value = data.name
search.value=""
})
}
</script>
|
安裝 msw
1
| npm install msw --save-dev
|
建立假資料
新增src/mocks/handlers.js
1
2
3
4
5
6
7
8
9
10
11
12
13
14
15
16
17
18
| // src/mocks/handlers.js
//模擬 HTTP 請求
import { http, HttpResponse } from 'msw'
const api = "https://api.agify.io/";
export const restHandlers = [
http.get(api, (req, res, ctx) =>
{
const query = {
age: 55,
name: "tope"
}
console.log('ctx.json',ctx.json([ query]))
return res(ctx.status(200), ctx.json([
query
]))
}),
]
|
攔截 http 請求
生成地方
1
2
3
4
| //
npx msw init 生成模擬Api資料夾 --save
//這時候就會在 public 資料夾下建立一個 mockServiceWorker.js 檔案,裏面就有攔截 http request 的程式碼了
npx msw init ./public --save
|
生成模擬Api資料夾
參考資料
GuessAge測試文件
GuessAge測試文件
1
2
3
4
5
6
7
8
9
10
11
12
13
14
15
16
17
18
19
20
21
22
23
24
25
26
27
28
29
30
31
32
33
34
35
36
37
38
39
40
41
42
43
44
45
46
47
48
49
50
51
52
53
54
55
56
57
58
59
60
61
62
63
| //GuessAge.spec.js
import { describe, it, expect, afterEach, beforeAll, afterAll, beforeEach } from 'vitest'
import { setupServer } from 'msw/node'
import { mount } from "@vue/test-utils";
import GuessAge from "../GuessAge.vue";
//引入Api模擬
import { restHandlers } from "../../mocks/handlers";
const server = setupServer(...restHandlers)
// 在所有測試之前啟動伺服器
beforeAll(() => server.listen({ onUnhandledRequest: 'error' }))
// 所有測試後關閉伺服器
afterAll(() => server.close())
// 每次測試後重置處理程序“對於測試隔離很重要”
afterEach(() => server.resetHandlers())
describe('GuessAge', () =>
{
let wrapper
const title = 'Guess User Age App'
if (typeof document !== 'undefined') {
beforeEach(() =>
{
wrapper = mount(GuessAge, {
props: {
title
}
})
})
}
it("測試 GuessAge 元件 props title", async () =>
{
if (typeof document !== 'undefined') {
expect(wrapper.find('[data-test="title"]').text()).toBe(title);
}
});
it("測試資料是否為函數", () =>
{
expect(typeof GuessAge.data).toBe("undefined");
});
it('快照 UI 測試', () =>
{
if (typeof document !== 'undefined') {
const wrapper = mount(GuessAge, {});
expect(wrapper.text()).toMatchSnapshot()
}
})
it("找到按鈕", () =>
{
if (typeof document !== 'undefined') {
expect(wrapper.find('[data-test="getAge"]').exists()).toBe(true);
}
});
it("按鈕點擊", async () =>
{
if (typeof document !== 'undefined') {
const ac = await wrapper.get('[data-test="getAge"]').trigger("click")
expect(wrapper.vm.search).toEqual("")
}
})
})
|
在元件測試中模擬 DOM API
安裝happy-dom
1
| npm install happy-dom@6.0.4
|
1
| npm i -D @vitest/coverage-istanbul
|
目錄
參考資料