javascript 將兩個陣列合併

Part1

1
2
3
4
5
6
7
8
9
10
11
12
13
14
15
16
17
18
19
20
21
22
23
24
25
let arr1 = [
{ id: "abdc1234", date: "2023-10-17" },
{ id: "abdc1235", date: "2023-10-18" }
];

let arr2 = [
{ id: "abdc1234", name: "lara" },
{ id: "abdc1235", name: "sara" }
];

let arr3 = arr1.map((item, i) => Object.assign({}, item, arr2[i]));
console.log(arr3);


[
{
"id": "abdc1234",
"date": "2023-10-17",
"name": "lara"
},
{
"id": "abdc1235",
"date": "2023-10-18",
"name": "sara"
}]

參考資料
javascrit map() 遍歷產生一個陣列
Object.assign() 枚舉

Part2 for迴圈與查找相同id 新增

1
2
3
4
5
6
7
8
9
10
11
12
13
14
15
16
17
18
19
20
21
22
23
24
25
26
27
28
29
30
31
32
33
let arr1 = [
{ id: "abdc1234", date: "2023-10-17" },
{ id: "abdc1235", date: "2023-10-18" }
];

let arr2 = [
{ id: "abdc1234", name: "lara" },
{ id: "abdc1235", name: "sara" }
];

let merged = [];

for(let i=0; i<arr1.length; i++) {
merged.push({
...arr1[i],
...(arr2.find((itmInner) => itmInner.id === arr1[i].id))}
);
}


console.log(merged);

[
{
"id": "abdc1234",
"date": "2023-10-17",
"name": "lara"
},
{
"id": "abdc1235",
"date": "2023-10-18",
"name": "sara"
}]

參考資料
javascrit map() for()
push() 添加一個或多個元素至陣列的末端
find()

Part3 for迴圈與擴展運算子的合併

1
2
3
4
5
6
7
8
9
10
11
12
13
14
15
16
17
18
19
20
21
22
23
24
25
26
27
28
29
30
let arr1 = [
{ id: "abdc1234", date: "2023-10-17" },
{ id: "abdc1235", date: "2023-10-18" }
];

let arr2 = [
{ id: "abdc1234", name: "lara" },
{ id: "abdc1235", name: "sara" }
];
let merged = [];

for(let i=0; i<arr1.length; i++) {
merged.push({
...arr1[i],
...arr2[i]
});
}

console.log(merged)
[
{
"id": "abdc1234",
"date": "2023-10-17",
"name": "lara"
},
{
"id": "abdc1235",
"date": "2023-10-18",
"name": "sara"
}]

參考資料
javascrit map() for()
javascript(ES6)擴展運算子 Spread Operator

Node express MongoDB 註冊與登出api

註冊使用到以下功能

  • cors 跨來源資源共用
  • bcryptjs密碼加密
  • jsonwebtoken用戶身份驗證

使用者定義Schema

請參閱
在models資料夾內新增 userModel.js

1
2
3
4
5
6
7
8
9
10
11
12
13
14
15
16
17
18
19
20
21
22
23
24
25
26
27
28
29
30
31
32
33
34
35
36
37
38
39
40
41
42
43
44
45
46
47
48
49
50
51
52
53
54
55
const mongoose = require('mongoose')
const bcrypt = require('bcryptjs')
const moment = require('moment')
moment().format();
const timezone = -(new Date().getTimezoneOffset() / 60) + 8;
const time = moment(Date.now() + (timezone * 60 * 60 * 1000)).format('YYYY-MM-DDT HH:mm').toString();
//console.log('timezone', timezone)

const userSchema = mongoose.Schema(
{
username: {
type: String,
required: [true, "請輸入使用者2~30字符"],
trim: true,
match: [
/^.{2,30}$/,
'Please add a valid name 2~30字符',
],
},
email: {
type: String,
required: true,
match: [
/^\w+([\.-]?\w+)*@\w+([\.-]?\w+)*(\.\w{2,3})+$/,
'Please add a valid email',
],
},
password: {
type: String,
required: [true],
trim: true,
},
created:
{
type: String,
default: time
},
token: {
type: String,
}
},

)
//findByEmail 函式
userSchema.statics.findByEmail =async (email) =>{
//查找User 是否有該email
const user = await User.findOne({ email })
//如果有
if (user) { throw new Error('已經有該用戶!') }
return user
}

const User = mongoose.model('User', userSchema);

module.exports = User;

註冊與登入

驗證的路由必須要 middleware

1
2
3
4
5
6
7
8
9
10
11
12
13
14
15
//verifyToken
const verifyToken = (req, res, next) =>
{
const bearerHeader = req.headers.authorization;
if (typeof bearerHeader !== 'undefined') {
const bearer = bearerHeader.split(' ');
const bearerToken = bearer[1];
req.token = bearerToken;
next();
}
else {
req.send({result:'令牌無效!'})
}
}
module.exports = verifyToken;

註冊與登入& 驗證

引入 userModel.js
引入jwt,bcrypt,verifyToken
bcrypt.hashSync :bcrypt加密
bcrypt.compare() :bcrypt驗證密碼
引入 jwt sign()驗證 token
jwt & bcrypt 筆記

1
2
3
4
5
6
7
8
9
10
11
12
13
14
15
16
17
18
19
20
21
22
23
24
25
26
27
28
29
30
31
32
33
34
35
36
37
38
39
40
41
42
43
44
45
46
47
48
49
50
51
52
53
54
55
56
57
58
59
60
61
62
63
64
65
66
67
68
69
70
71
72
73
74
75
76
77
78
79
80
81
82
83
84
85
86
87
88
89
90
91
92
93
94
95
96
97
98
99
100
101
102
103
104
105
106
107
108
109
110
111
112
113
114
115
116
117
118
119
120
121
122
123
const express = require('express')
const verifyToken = require('../middleware/token')
const User = require('../models/userModel')
const jwt = require('jsonwebtoken')
const bcrypt = require('bcryptjs')
const router = express.Router()

//註冊
router.post('/register', async(req, res) =>
{
try {
/*
#swagger.summary='註冊',
#swagger.description = '' */
/* #swagger.parameters['body'] = {
in: 'body',
description: '',
required: true,
schema: { $ref: "#/definitions/AddUser" }
} */

/* #swagger.security = [{
"apiKeyAuth": []
}] */
const data = new User(req.body);
//註冊時,Email使用 findByEmail 函式驗證
const email = await User.findByEmail(req.body.email)
data.password = bcrypt.hashSync(req.body.password, 12);

const token = jwt.sign({ _id: data._id ,username: data.username,email: data.email}, 'RESTFULAPI',{expiresIn: "24h"}).toString();
let userArr = {
username: data.username,
email: data.email,
password: data.password,
created: data.created,
token:token
}

const user = await User.create(userArr);
res.status(200).json(user);
}
catch (error) {
res.status(500).json({message: error.message})
}
})


//登入
router.post('/login',async (req, res) =>{
const { email, password } = req.body;
try {
/*
#swagger.summary='登入',
#swagger.description = '' */

/* #swagger.parameters['body'] = {
in: 'body',
description: '',
required: true,
schema: { $ref: "#/definitions/Login" }
} */

/* #swagger.security = [{
"apiKeyAuth": []
}] */
let user = await User.findOne({email});
if (!user)
return res.status(400).json({message: "用戶不存在"});

const isMatch = await bcrypt.compare(password, user.password);
if (!isMatch)
return res.status(400).json({message: "密碼錯誤 !"});

const payload = {
user: {id: user.id}
};

jwt.sign(payload,user.email,{expiresIn: 3600},(err, token) => {
if (err) throw err;
res.status(200).json({token});
}
);
}
catch (e) {
console.error(e);
res.status(500).json({
message: "伺服器錯誤!"
});
}
})


//users驗證
router.delete('/users/:id', verifyToken,async(req, res) =>{
try {
/*
#swagger.tags = ['以下請先登入'],
#swagger.summary='刪除使用者',
#swagger.description = '' */
const {id} = req.params;
const user = await User.findByIdAndDelete(id);
if(!user){
return res.status(404).json({message: `沒有發現任何使用者 ${id}`})
}
res.status(200).json(user );

} catch (error) {
res.status(500).json({message: error.message})
}
})


router.post("/welcome", verifyToken, (req, res) =>
{
/*
#swagger.tags = ['以下請先登入'],
#swagger.summary='歡迎畫面',
#swagger.description = '' */
console.log('req.body', req.body)
res.status(200).send("Welcome 🙌 ");
});

module.exports = router;

node express jwt 註冊與登出
bcrypt
bcrypt筆記本
Node 實作 jwt 驗證 API
How To Implement API Authentication with JSON Web Tokens and Passport
OAuth 2.0
OAuth 2.0

關於HTTP

什麼是HTTP

HTTP 全名是Hypertext Transfer Protocol,中文是超文本傳輸協定,是一個網路應用層的協定,讓電腦之間可以互相傳輸資訊。

HTTP如何運作

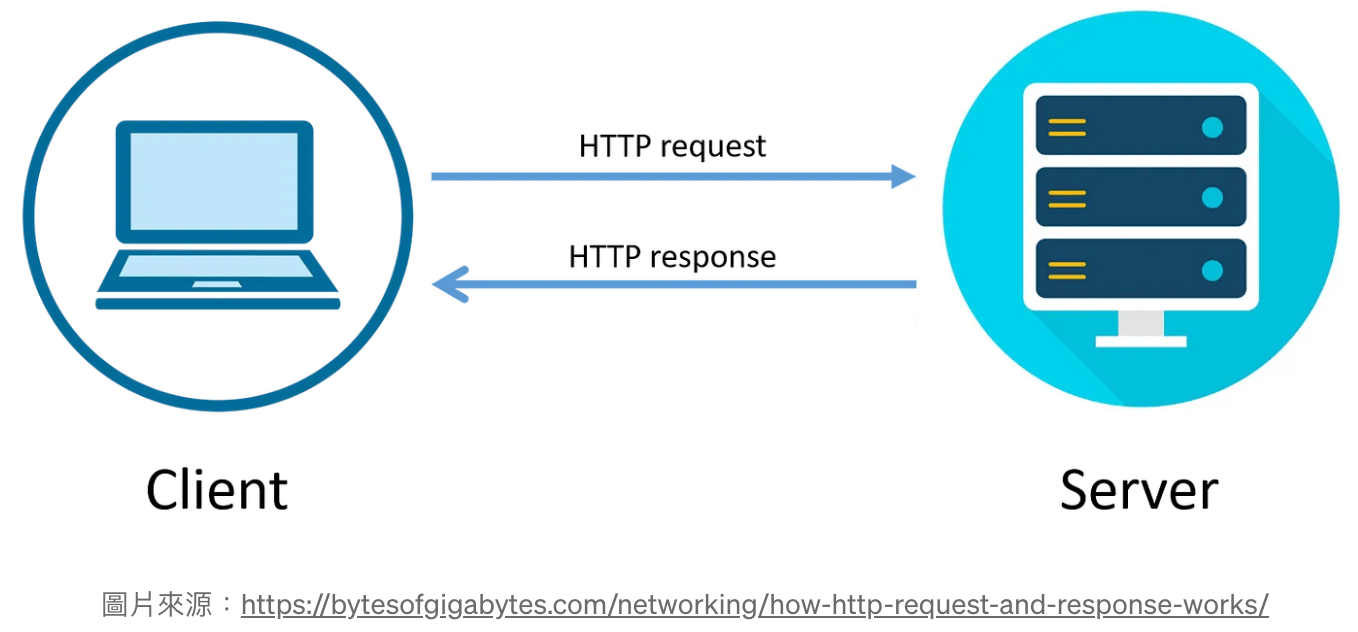
HTTP遵循客戶端(client)-伺服器端(server)的模式
client =>(發送請求,request) => server(根據請求內容) =>(發送回應,response)=>client

圖片來源https://bytesofgigabytes.com/networking/how-http-request-and-response-works/

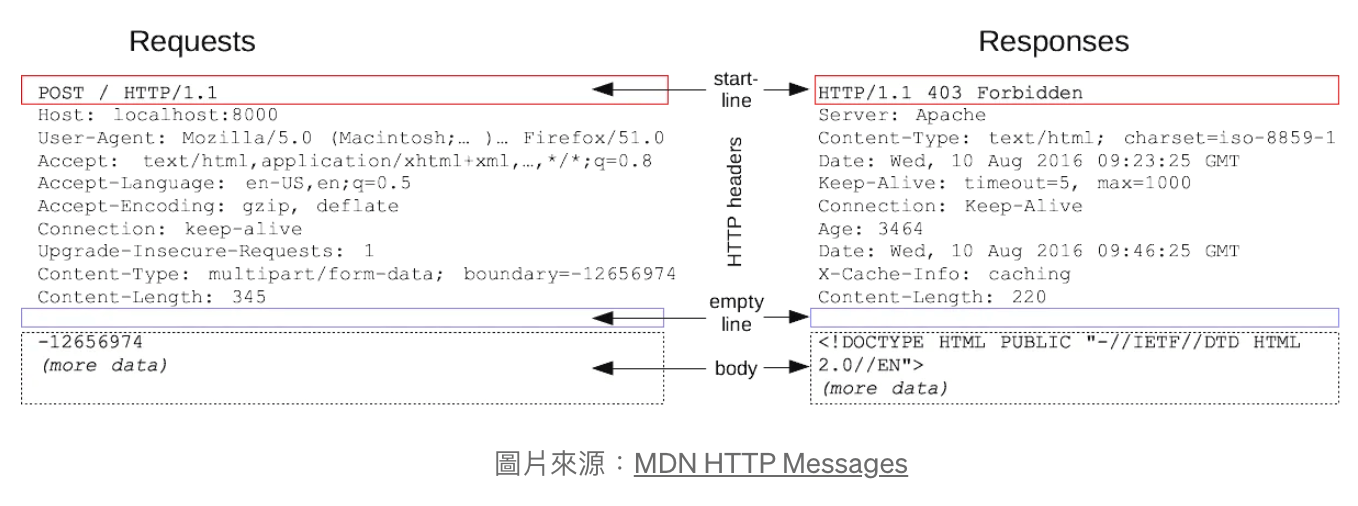
### HTTP的內容 擷取MDN針對這四個部分的概覽:
  • Start Line: A start-line describing the requests to be implemented, or its status of whether successful or a failure. This start-line is always a single line.
    Start Line:描述要實現的請求或其成功或失敗狀態的起始行。 此起始線始終是單行。
  • HTTP headers: An optional set of HTTP headers specifying the request, or describing the body included in the message. Empty Line: A blank line indicating all meta-information for the request has been sent.
    HTTP 標頭:一組可選的 HTTP 標頭,用於指定請求或描述訊息中包含的正文。 空白行:空白行指示請求的所有元資訊已發送。
  • Body: An optional body containing data associated with the request (like content of an HTML form), or the document associated with a response. The presence of the body and its size is specified by the start-line and HTTP headers.
    Body:包含與請求關聯的資料(如 HTML 表單的內容)或與回應關聯的文件的可選正文。 正文的存在及其大小由起始行和 HTTP 標頭指定。

圖片來源:MDN HTTP Messages

Request發送請求

  1. Start Line:包含三個部分
    • Method: 請求的方法,是GET, PUT, POST等等的動詞,不同的動詞有不同的使用場景
    • Request target: 請求的目標 請求的目標,通常是網址,也就是網路資源存放的地方,根據不同的method,會有不同的格式,可以看我之前寫的GET vs. POST的不同。
    • HTTP version request使用的http版本
  2. HTTP headers
    資料來源MDN
    • host: 這個request是send給誰的(server的網址)
    • accept:這個request是要接受哪些類型(content-types)的資料 比方說text或是json檔案
    • cookie:瀏覽器存放的cookie字串
  3. Body: Request的Body一樣會根據不同的method而有所不同,一般來說GET、DELETE不會帶有body,POST則會把資訊放入body裡面。在使用HTML表單時,如果用表單送一個POST request,就會把表單內容放入body。

Response發送回應

  1. Start Line: 一樣包含三個部分,需要注意的是並沒有method和URL
    • HTTP version
    • Status Code: 這是response start line最重要的部分,server利用status code來告訴client這個request到底是成功還是失敗。status code根據不同 資料來源
      1
      2
      3
      4
      5
      - Informational responses (100–199)
      - Successful responses (200–299)
      - Redirects (300–399)
      - Client errors (400–499)
      - Server errors (500–599)
      一般使用者最常看到的就是404:頁面不存在,除了4xx,在開發時常用的還有200 (OK)、3xx (Redirect)、5xx (Server error)。
    • Status text:簡短的和使用者說明status code是什麼意思,比方說404 Not Found。
  2. HTTP headers:列出一些常見的
    • Status: 就是status code,例如200
    • Server: 透過什麼web server來回應的,比方說Apache
    • content-type: 這個response檔案是什麼類型
    • set-cookie: server端要設定在client端的cookie
  3. Body: response的body會帶著server要回傳給client的資料。對前端開發者來說,通常是json檔案,前端開發者要處理的邏輯就是把接收的json檔案轉換成畫面,渲染給終端使用者看

Node cookie-session的驗證機制

什麼是HTTP & HTTP如何運作

HTTP遵循客戶端(client)-伺服器端(server)的模式
client =>(發送請求,request) => server(根據請求內容) =>(發送回應,response)=>client

圖片來源https://bytesofgigabytes.com/networking/how-http-request-and-response-works/

圖片來源:MDN HTTP Messages

安裝cookie-session

將客戶端的會話資料儲存在 cookie 中
透過npm安裝
npm cookie-session

1
2
nvm use 16.14.0
npm install cookie-session --save

在Node express使用

1
2
3
4
5
6
7
8
9
10
11
12
var cookieSession = require('cookie-session')
var express = require('express')

var app = express()

app.use(cookieSession({
name: 'session',
keys: [/* secret keys */],

// Cookie Options
maxAge: 24 * 60 * 60 * 1000 // 24 hours
}))

cookieSession(options)

使用提供的選項建立新的 cookie 會話中間件。 該中間件會將屬性 session 附加到 req,它提供了一個表示已載入會話的物件。 如果請求中未提供有效會話,則該會話是新會話,或是從請求載入的會話。

如果 req.session 的內容被更改,中間件將自動向回應添加 Set-Cookie 標頭。 請注意,除非會話中有內容,否則響應中不會出現 Set-Cookie 標頭(因此不會為特定用戶創建會​​話),因此一旦您有要存儲的標識信息,請務必向 req.session 添加一些內容會議。

Options

Cookie 會話接受選項物件中的這些屬性。
name:要設定的 cookie 的名稱,預設為 session。
keys用於簽署和驗證 cookie 值的金鑰列表,或配置的 Keygrip 實例。 設定 cookie 始終使用 key[0] 進行簽名,而其他金鑰對於驗證有效,從而允許金鑰輪換。 如果提供了 Keygrip 實例,則可以使用它來變更簽章參數,例如簽章演算法。
secret如果未提供鍵,則將用作單一鍵的字串。
Cookie Options
其他選項傳遞給 cookies.get() 和 cookies.set() ,可讓您控制安全性、網域、路徑和簽名等設定。

這些選項還可以包含以下任何內容(有關完整列表,請參閱 cookies 模組文件:

  • maxAge: a number representing the milliseconds from Date.now() for expiry
    最大年齡::代表 Date.now() 到期時間的毫秒數的數字
  • expires: a Date object indicating the cookie's expiration date (expires at the end of session by default).
    過期時間:指示 cookie 過期日期的 Date 物件(預設在會話結束時過期)。
  • path: a string indicating the path of the cookie (/ by default).
    指示 cookie 路徑的字串(預設為 /)。
  • domain: a string indicating the domain of the cookie (no default).
    指示 cookie domain的字串(無預設值)。
  • sameSite: a boolean or string indicating whether the cookie is a "same site" cookie (false by default). This can be set to 'strict', 'lax', 'none', or true (which maps to 'strict').
    一個布林值或字串,指示 cookie 是否是「同一網站」cookie(預設為 false)。 可以將其設定為“strict”、“lax”、“none”或 true(映射到“strict”)。
  • secure: a boolean indicating whether the cookie is only to be sent over HTTPS (false by default for HTTP, true by default for HTTPS). If this is set to true and Node.js is not directly over a TLS connection, be sure to read how to setup Express behind proxies or the cookie may not ever set correctly.
    安全的:一個布林值,指示 cookie 是否僅透過 HTTPS 發送(HTTP 預設為 false,HTTPS 預設為 true)。 如果將此設為 true 並且 Node.js 不是直接透過 TLS 連接,請務必閱讀如何在代理程式後面設定 Express,否則 cookie 可能無法正確設定。
  • httpOnly: a boolean indicating whether the cookie is only to be sent over HTTP(S), and not made available to client JavaScript (true by default).
    僅http:一個布林值,指示 cookie 是否僅透過 HTTP(S) 發送,而不可供客戶端 JavaScript 使用(預設為 true)。
  • signed: a boolean indicating whether the cookie is to be signed (true by default).
    簽署:一個布林值,指示 cookie 是否要簽署(預設為 true)。
  • overwrite: a boolean indicating whether to overwrite previously set cookies of the same name (true by default).
    覆蓋:一個布林值,指示是否覆蓋先前設定的同名 cookie(預設為 true)。

req.session

.isChanged

.isNew

.isPopulated

req.sessionOptions

Destroying a session

Saving a session

參考資料

Node express bcryptjs 加密與驗證

bcryptjs密碼加密

安裝bcryptjs bcryptjs
密碼加密,此套件的加密是不可逆的,所以沒有辦法從加密後的結果回推原始密碼,相對安全性提高非常多

1
npm install bcryptjs --save

異步

1
2
3
4
const bcrypt = require('bcrypt');
const saltRounds = 10;
const myPlaintextPassword = 's0/\/\P4$$w0rD';
const someOtherPlaintextPassword = 'not_bacon';

技術 1(在單獨的函數呼叫上產生鹽和雜湊值):
bcrypt.hash()

1
2
3
4
5
bcrypt.genSalt(saltRounds, function(err, salt) {
bcrypt.hash(myPlaintextPassword, salt, function(err, hash) {
// Store hash in your password DB.
});
});

技術 2(自動產生鹽和雜湊值):
bcrypt.hash()

1
2
3
bcrypt.hash(myPlaintextPassword, saltRounds, function(err, hash) {
// Store hash in your password DB.
});

這兩種技術達到相同的最終結果。

要檢查密碼:

1
2
3
4
5
6
7
// Load hash from your password DB.
bcrypt.compare(myPlaintextPassword, hash, function(err, result) {
// result == true
});
bcrypt.compare(someOtherPlaintextPassword, hash, function(err, result) {
// result == false
});

bcryptjs npm
nodejs中的bcryptjs密码加密
使用 bcryptjs加密

Vue3 TypeScript 的 Vue-i18n mulitional languages

在Vue3 TypeScript專案內安裝 Vue-i18n

安裝指令

1
npm install vue-i18n@next --save

在 src/ 目錄底下,新增 lang資料夾,並新增zh-TW.json,en-US.json 檔案

1
2
3
4
5
6
7
8
9
10
11
12
13
14
//en-US.json
{
"nav_menu":{
"home":"Home",
"login":"Login"
}
}
//zh-TW.json
{
"nav_menu":{
"home":"首頁",
"login":"登入"
}
}

在 src/ 目錄底下,新增 languages/i18n.ts,並設定語系

1
2
3
4
5
6
7
8
9
10
11
12
13
14
15
16
17
18
import { createI18n } from 'vue-i18n'
import zh from '../lang/zh-TW.json'
import en from '../lang/en-US.json'

type MessageSchema = typeof zh

const i18n = createI18n<[MessageSchema], 'zh-TW' | 'en-US'>({
legacy: false, // 要把 legacy 設為 false,才可以使用 Composition API
locale: 'zh-TW',
fallbackLocale: 'zh-TW',
globalInjection: true,
messages: {
'zh-TW': zh,
'en-US': en
}
})

export default i18n

在 main.ts 引入 Vue-i18n

1
2
3
4
5
6
7
//引入plugins/i18n
import i18n from './plugins/i18n'

const app = createApp(App)
//使用use i18n
app.use(i18n)
app.mount('#app')

在App.vue 載入語系測試使用

1
2
3
4
5
6
7
8
9
10
11
12
13
14
15
16
17
18
19
20
21
22
23
24
<template>
<div>
<div>切換語言:</div>
<select @change="changeLang">
<option value="zh-TW">中文</option>
<option value="en-US">English</option>
</select>
</div>
<p>
{{ $t('nav_menu.home') }}
</p>
</div>
</template>

<script setup lang="ts">
//載入vue-i18n
import { useI18n } from 'vue-i18n'
const { locale } = useI18n()
//改變語系切換
const changeLang = (e) => {
locale.value = e.target.value
}
</script>

另一種寫法:pinia

在sores新增nav.ts

  • pinia載入
  • vue 方法 ref, computed 載入
  • vue-i18n載入
  • 數據的Ts撰寫homeMenuType 與載入
1
2
3
4
import { defineStore } from 'pinia';
import { ref, computed } from 'vue';
import { useI18n } from "vue-i18n";
import { homeMenuType } from "../types/all";

在types新增all.ts
轉寫
homeMenuType

1
2
3
4
5
export interface homeMenuType{
name?: string |null |any,
id?: string |null |any,
link: string | null | any,
}
  • 使用computed 解析nav_menu.home
  • 放入陣列homeMenu
  • 寫函式 changeLang改變語系
  • return homeMenu,changeLang
1
2
3
4
5
6
7
8
9
10
11
12
13
14
15
16
17
18
19
20
21
22
23
24
25
26
27
28
//useNavbarStore 
export const useNavbarStore = defineStore('navbar', () => {
const { locale } = useI18n();
const i18n = useI18n();

const i18nPlatform = computed(() => i18n.t("nav_menu.home"))
const i18nCompany = computed(() => i18n.t("nav_menu.login"))

const homeMenu=ref<homeMenuType[]>([
{ name: i18nPlatform, id: '001', link: '/index' },
{ name: i18nCompany, id: '002', link: '/aboutus' }
])


const changeLang = (e: any) => {
console.log(e)
locale.value = e.target.value
console.log(locale.value)
}
watch(locale, newlocale => {
localStorage.setItem("locale", newlocale);
});

return {
homeMenu, changeLang
}
})

在頁面使用
  • 載入pinia storeToRefs
  • 宣告store = useNavbarStore()
  • 解構
1
2
3
4
5
6
7
8
9
10
11
12
13
14
15
16
17
18
19
20
21
22
23
24
25
26
27
28
29
30
31
32
33
34
35
36
37
38
39
40
41
42
43
44
45
46
47
48
49
50
51
52
53
54
55
56
57
<template>
<div>
<div>
切換語言:
<select @change="changeLang">
<option value="zh-TW">
中文
</option>
<option value="en-US">
English
</option>
</select>
</div>
<ul>
<li v-for="(item, id) in homeMenu"
:key="id">
{{ item.name }}
</li>
</ul>
<router-view />
</div>
</template>

<script setup lang="ts">
//載入pinia storeToRefs
import { storeToRefs } from 'pinia';
import { useNavbarStore } from './stores/nav';
//宣告store = useNavbarStore()
const store = useNavbarStore();
//解構
const { homeMenu } = storeToRefs(store);
const { changeLang } = store;
</script>

<style lang="scss" scoped>
ul{
display: flex;
li {
display : flex;
padding:10px;

}
}
.logo {
height: 6em;
padding: 1.5em;
will-change: filter;
transition: filter 300ms;
}
.logo:hover {
filter: drop-shadow(0 0 2em #646cffaa);
}
.logo.vue:hover {
filter: drop-shadow(0 0 2em #42b883aa);
}
</style>

MySql CHECK 檢查限制 (SQL CHECK Constraint)

CHECK 檢查限制 (SQL CHECK Constraint)

CHECK 限制用來約束欄位中的可用值,以保證該欄位中的資料值都會符合您設定的條件。

1
2
3
4
5
6
7
8
9
10
11
12
13
CREATE TABLE customer (
C_Id INT NOT NULL CHECK (C_Id>0),
Name VARCHAR(50) NOT NULL,
Address VARCHAR(255),
Phone VARCHAR(20)
);
CREATE TABLE customer (
C_Id INT NOT NULL,
Name VARCHAR(50) NOT NULL,
Address VARCHAR(255),
Phone VARCHAR(20),
CHECK (C_Id>0)
);

在 MySQL 增加 CHECK 限制不會有錯誤,但是沒有用,CHECK 並不會被執行喔!

1
2
3
4
5
6
7
CREATE TABLE customer (
C_Id INT NOT NULL,
Name VARCHAR(50) NOT NULL,
Address VARCHAR(255),
Phone VARCHAR(20),
CONSTRAINT chk_Customer CHECK (C_Id>0 AND Name!='XXX')
);

更改資料表限制 ALTER TABLE…

1
ALTER TABLE customer ADD CHECK (C_Id>0);

替主鍵命名與多欄位的組合鍵:

1
2
ALTER TABLE customer
ADD CONSTRAINT chk_Customer CHECK (C_Id>0 AND Name!='XXX');

移除資料表限制 ALTER TABLE…

1
ALTER TABLE customer DROP CONSTRAINT chk_Customer;

MySql DEFAULT 預設值限制 (SQL DEFAULT Constraint)

DEFAULT 預設值限制 (SQL DEFAULT Constraint)

DEFAULT 限制用來設定欄位的預設值。當你在 INSERT 資料時若該欄位沒指定值則會採用預設值。

1
2
3
4
5
6
CREATE TABLE customer (
C_Id INT NOT NULL,
Name VARCHAR(50) NOT NULL,
Address VARCHAR(255) DEFAULT '未知',
Phone VARCHAR(20)
);

更改資料表限制 ALTER TABLE…

1
ALTER TABLE customer ALTER COLUMN Address SET DEFAULT '未知';

SQL Server

1
ALTER TABLE customer ADD DEFAULT '未知' FOR Address;

移除資料表限制 ALTER TABLE…

1
ALTER TABLE customer ALTER COLUMN Address DROP DEFAULT;

SQL Server

1
ALTER TABLE table_name DROP constrain_name;

Oracle

1
ALTER TABLE table_name MODIFY column_name DEFAULT NULL;