Vue Slot

Slot: Web組件占位符

通過插槽,妥展組件

默認Slot

1
2
3
4
5
6
7
8
9
10
11
12
13
14
15
16
17
18
19
20
21
22
23
//父元件
<template>
<BaseLayout>
<template #header> <!-- 等同於 v-slot:header -->
<h1>頁面標題</h1>
</template>
<template #default>
<p>主要內容...</p>
</template>
</BaseLayout>
</template>

//子元件
<template>
<div>
<header>
<slot name="header"></slot>
</header>
<main>
<slot></slot>
</main>
</div>
</template>

默認Slot

1
2
3
4
5
6
7
8
9
10
11
12
13
14
15
16
17
18
19
20
21
22
23
24
25
26
27
// 子元件 <ChildComponemt></ChildComponemt>

<template>
<herder>
<slot name="header"></slot>
</herder>
<div>
<main>
<slot name="main"></slot>
</main>
</div>
</template>

// 父元件
//<ChildComponemt><template #header> ...</template> or <template v-slot="main"> ...</template></ChildComponemt>
<template>
<ChildComponemt>
<template #header>
<div>Header Menu</div>
</template>
<main>
<template v-slot="main">
內容
</template>
</main>
</ChildComponemt>
</template>

Vite 導出Excel 使用SheetJs Part 1 (語法糖)

開發EIP系統時需要將數據導出Excel ,所以使用了 Sheetjs套件,
在剛開始的測試階段全部都定義全部都導出設定,

一 安裝Sheetjs
二 引入 xlsx
三 寫導出功能

遍歷=>使用函式utils.json_to_sheet(數據)=>utils.book_new() =>附加 utils.book_append_sheet(workbook, worksheet, "Dates")=>寫檔XLSX writeFileXLSX(workbook, "出勤列表.xlsx")就導出了出勤列表.xlsx

四 點擊綁定@click="exportExcel"

sheetjs官網

一 Vite 安裝 Sheetjs

1
2
3
4
5
6
7
// npm
npm i --save https://cdn.sheetjs.com/xlsx-0.20.0/xlsx-0.20.0.tgz
// pnpm
pnpm install https://cdn.sheetjs.com/xlsx-0.20.0/xlsx-0.20.0.tgz
// yarn
yarn add https://cdn.sheetjs.com/xlsx-0.20.0/xlsx-0.20.0.tgz

二 在使用中的組件引入 xlsx
三 寫導出功能exportExcel 函式 參閱Sheet Export Tutorial
1
2
3
4
5
6
7
8
9
10
11
12
13
14
15
16
17
18
19
20
21
22
23
24
25
26
27
28
29
30
31
32
33
34
35
36
37
38
39
40
41
42
43
44
45
46
47
48
49
50
51
52
53
54
55
56
57
58
59
<template>
<!----點擊導出Excel-->
<el-button @click="exportExcel" type="primary">導出Excel</el-button>
</template>

<script setup lang="ts">
import { ref, onMounted } from "vue";
import { utils, writeFileXLSX } from "xlsx"; // 引入導出 Excel 套件
interface listType {
UID?: string;
version?: string;
category?: string;
comment?: string;
descriptionFilterHtml?: string;
editModifyDate?: string;
hitRate?: number;
imageUrl?: string;
masterUnit?: object;
title?: string | any;
sourceWebName?: string | any;
startDate?: string | any;
discountInfo?: string | any;
}
// 輸出 Excel的內容
const excelXlsContent = ref<any[]>([]);
// 三 寫導出功能 輸出 現有表格數據
const exportExcel = () => {
// 設定Excel Header
excelXlsContent.value= lists.value.map((row: listType, index:number) => (
{
'項目': Number(index + 1),
'主題': row.title,
'來源': row.sourceWebName,
'開始': row.startDate,
'地點': row.discountInfo,
}
));

const worksheet = utils.json_to_sheet(excelXlsContent.value);
const workbook = utils.book_new();
utils.book_append_sheet(workbook, worksheet, "Dates");
writeFileXLSX(workbook, "出勤列表.xlsx");
}
const getItems = async () => {
try {
const api = 'https://cloud.culture.tw/frontsite/trans/SearchShowAction.do?method=doFindTypeJ&category=200';
const res = await axios.get(api);
console.log('culture', res.data, typeof res.data[0].masterUnit
);
lists.value = res.data;
}
catch (err) {
console.log('err', err);
}
}
onMounted(() => {
getItems()
})
</script>

讓使用者可以選擇要輸出的項目

要有表單讓使用選擇
使用跳出框,下期補件

Vite element-plus ts Dialog父子間的通訊

Vite element-plus ts Dialog 父傳子

父組件

v-model 的參數語法不會直接修改 props 的值 , 如何修改=>使用父組件 showDialog 父傳給子,@update:showDialog="showDialog = $event", 當 el-dialog 组件觸發 update:showDialog 事件時,子組件会觸發 update:showDialog 的自定義事件,並將新值作為参数傳遞給父組件

1
2
3
4
5
6
7
8
9
10
11
12
13
14
<template>
<!--點擊打開Dialog跳出框-->
<el-button @click="showDialog = true" type="primary">導出Excel</el-button>
<!--父組件 showDialogt父傳給子,@update:showDialog="showDialog = $event" -->
<Dialog
:showDialog="showDialog" @update:showDialog="showDialog = $event"/>
</template>

<script setup lang="ts">
import { ref, onMounted, computed } from 'vue';
const showDialog = ref(false);

</script>

子組件

子組件 :model-value="showDialog" @update:model-value="$emit('update:showDialog', $event)"

設定子組件關閉Dialog =>40 並需使用 let localShowDialog = ref(props.showDialog);
1
2
3
4
5
6
7
8
9
10
11
12
13
14
15
16
17
18
19
20
21
22
23
24
25
26
27
28
29
30
31
32
33
34
35
36
37
38
39
40
41
42
43
44
45
46
47
48
49
50
51
52
53
54
55
56
57
58
59
<template>
<!--子組件 :model-value="showDialog" @update:model-value="$emit('update:showDialog', $event)"-->
<el-dialog
:model-value="showDialog"
@update:model-value="$emit('update:showDialog', $event)"
title="Notice"
width="30%"
destroy-on-close
center
>
<span>
Notice: before dialog gets opened for the first time this node and the one
bellow will not be rendered
</span>
<div>
<strong>Extra content (Not rendered)</strong>
</div>
<template #footer>
<span class="dialog-footer">
<!----試過這個方式可以註解A-->
<el-button @click="cancel">Cancel</el-button>
<el-button type="primary" @click="update">
Confirm
</el-button>
</span>
</template>
</el-dialog>
</template>

<script setup lang="ts">
import { ref, watch } from "vue";
interface showDialogType {
readonly showDialog: boolean;
}
const props: showDialogType = defineProps({
showDialog: {
type: Boolean,
default: false,
},
})

// 設定子組件關閉Dialog
let localShowDialog = ref(props.showDialog);
//監控
watch(() => props.showDialog, (newVal:boolean) => {
console.log('newVal',newVal)
localShowDialog.value = newVal;
})
// 子對父傳值
const emits = defineEmits(['update:showDialog']);
const update = () => {
emits('update:showDialog', false)
}
const cancel = () => {
localShowDialog.value = false;
emits('update:showDialog', false)
}
</script>

js addEventListener事件監聽

addEventListener語法解析

1
target.addEventListener(event, function, useCapture)

target: 元素
event:事件名稱
function:事件運行函式
useCapture:事件是否應該補獲或是冒泡,默認為false

Ex.新增class,刪除class,toggle

綁定點擊按鈕元件 => 執行事件函式
新增clss, Visible
刪除clss, Visible
toggle, Visible
1
2
3
4
5
6
7
8
9
10
11
12
13
14
15
16
17
18
19
20
21
22
23
24
25
26
27
28
29
30
31
32
33
34
35
36
37
38
39
40
41
42
43
44
45
46
47
48
49
50
51
52
53
54
55
56
57
58
59
60
61
62
63
64
65
66
html
<a class="addBtn">Add</a>
<a class="removeBtn">Remove</a>
<a class="toggleBtn">Toggle</a>
<div class="menu-list">
<ul>
<li>One</li>
<li>Two</li>
<li>Three</li>
</ul>
</div>
Scss
body{
padding:20px;
}
a {
padding:6px 22px;
color:white;
border-radius: 8px 8px 0px 0px;
}
.addBtn{
background-color:green;
}
.removeBtn{
background-color:red;
}
.toggleBtn{
background-color:#009688;
}
.menu-list{
display:none;
background-color:#eee;
margin-top:8px;
padding:15px;
ul{
padding-inline-start: 30px;
margin-block-start: 0em;
list-style-type: none;
li{
list-style-type: none;
padding-inline-start: 0px;
}
}
}
.Visible{
display:flex;
}

js
const addBtn = document.querySelector(".addBtn");
addBtn.addEventListener('click',() => {
const menuList = document.querySelector(".menu-list");
menuList.classList.add("Visible")
})

const removeBtn = document.querySelector(".removeBtn");
removeBtn.addEventListener('click',() => {
const menuList = document.querySelector(".menu-list");
menuList.classList.remove("Visible")
})

const toggleBtn = document.querySelector(".toggleBtn");
toggleBtn.addEventListener('click',() => {
const menuList = document.querySelector(".menu-list");
menuList.classList.toggle("Visible")
})

Ex.新增動態表單

1
2
3
4
5
6
7
8
9
10
11
12
<div class='app'>
<div>
<button class="add-btn">新增聯絡人</button>
</div>
<div class="contacts">
<div class="row">
姓名:<input name="name"/>
電話:<input name="phone"/>
<button class="delete-btn">刪除</button>
</div>
</div>
</div>
1
2
3
4
5
6
7
8
9
10
11
12
13
14
15
16
17
18
19
20
21
22
23
24
25
26
27
28
js
// 綁定按鈕
const btn= document.querySelector(".add-btn");
//addEventListener 監聽
btn.addEventListener('click',function () {
//建立一個 div
const div = document.createElement("div");
div.classList.add("row");
div.innerHTML = `
姓名:<input name="name" />
電話:<input name="phone" />
<button class="delete-btn">刪除</button>
`;
//插入div
document.querySelector(".contacts").appendChild(div);
})
//綁定刪除列
const contacts= document.querySelector(".contacts");
//addEventListener 監聽
contacts.addEventListener('click',function (e) {
console.log(e.target)
//e.target包含刪除按鈕
const deleteBtn= e.target.classList.contains('delete-btn');
if(deleteBtn){
// closest.js方法用於檢索該元素的父節點,或者元素的父級與選擇器匹配
contacts.removeChild(e.target.closest('.row'))
}
})
參考資料

Element classList

Element classList add (新增class)

1
2
classList.add('新增名稱')
classList.add('新增名稱', '新增名稱', '新增名稱')

Element classList remove (刪除class)

1
2
.classList.remove("移除名稱");
classList.remove('移除名稱', '移除名稱', '移除名稱')

Element toggle remove (切換class)

1
2
.classList.toggle("切換名稱");

Element classList contains (判斷 class 是否存在)

1
Element.classList.contains('className')

Ex.新增class,刪除class,toggle

綁定點擊按鈕元件 => 執行事件函式
新增clss, Visible
刪除clss, Visible
toggle, Visible
1
2
3
4
5
6
7
8
9
10
11
12
13
14
15
16
17
18
19
20
21
22
23
24
25
26
27
28
29
30
31
32
33
34
35
36
37
38
39
40
41
42
43
44
45
46
47
48
49
50
51
52
53
54
55
56
57
58
59
60
61
62
63
64
65
66
html
<a class="addBtn">Add</a>
<a class="removeBtn">Remove</a>
<a class="toggleBtn">Toggle</a>
<div class="menu-list">
<ul>
<li>One</li>
<li>Two</li>
<li>Three</li>
</ul>
</div>
Scss
body{
padding:20px;
}
a {
padding:6px 22px;
color:white;
border-radius: 8px 8px 0px 0px;
}
.addBtn{
background-color:green;
}
.removeBtn{
background-color:red;
}
.toggleBtn{
background-color:#009688;
}
.menu-list{
display:none;
background-color:#eee;
margin-top:8px;
padding:15px;
ul{
padding-inline-start: 30px;
margin-block-start: 0em;
list-style-type: none;
li{
list-style-type: none;
padding-inline-start: 0px;
}
}
}
.Visible{
display:flex;
}

js
const addBtn = document.querySelector(".addBtn");
addBtn.addEventListener('click',() => {
const menuList = document.querySelector(".menu-list");
menuList.classList.add("Visible")
})

const removeBtn = document.querySelector(".removeBtn");
removeBtn.addEventListener('click',() => {
const menuList = document.querySelector(".menu-list");
menuList.classList.remove("Visible")
})

const toggleBtn = document.querySelector(".toggleBtn");
toggleBtn.addEventListener('click',() => {
const menuList = document.querySelector(".menu-list");
menuList.classList.toggle("Visible")
})

pnpm & yarn安裝

pnpm安裝

使用 npm 來安裝
我們提供了兩個 pnpm CLI 包裝, pnpm 和 @pnpm/exe。

一般版本的 pnpm 需要 Node.js 才能執行。
@pnpm/exe 則與 Node.js 一起包成一個可執行檔,所以可以用於沒有安裝 Node.js 的系統上。
這裡用node v20.15.1

1
npm install -g pnpm@latest-10

安裝後

1
pnpm -v

9.15.3

參考資料
npm 安裝參考

yarn安裝

依賴npm 安裝

1
2
3
sudo npm install -g yarn

yarn -v
1
yarn install

參考資料
为什么现在我更推荐 pnpm 而不是 npm/yarn?

JavaScript 初探

JavaScript(簡稱 JS)

具有一級函數 (First-class functions) 的輕量級、直譯式或即時編譯(JIT-compiled)的程式語言。
網頁的腳本語言而大為知名,但也用於許多非瀏覽器的環境,像是 Node.js、Apache CouchDB。
JavaScript 是一個的基於原型的、多範型的、動態語言,支援『物件導向』、指令式以及宣告式(如函數式程式設計)風格。

別搞混了 JavaScript 和 Java 程式語言。雖然「Java」和「JavaScript」都是 Oracle 公司在美國和其他國家的商標或註冊商標,但兩個語言有著非常不同的語法、語意和用途。

JavaScript 初探

JavaScript 是一種腳本,也能稱它為程式語言,可以讓你在網頁中實現出複雜的功能。當網頁不只呈現靜態的內容,另外提供了像是:內容即時更新、地圖交動、繪製 2D/3D 圖形,影片播放控制……等,你就可以大膽地認為 JavaScript 已經參與其中。它是標準網頁技術蛋糕的第三層,而其他兩層(HTML 和 CSS)我們在其他學習單元中有更多詳細的介紹。

Web包含以下:

html是一種標記語言,我們使用它組織網頁裡的內容並給予定義, 例如:定義段落、標題、資料表格,或是在頁面嵌入圖片和影片。.
1
<p>Lara</p>
css是一種樣式規則的語言,用來幫我們的 HTML 內容上套用樣式,例如:設置背景顏色、字型,或讓內容以多欄的方式呈現。
1
2
3
4
5
6
7
8
9
10
11
12
13
14
p {
font-family: "helvetica neue", helvetica, sans-serif;
letter-spacing: 1px;
text-transform: uppercase;
text-align: center;
border: 2px solid rgba(0, 0, 200, 0.6);
background: rgba(0, 0, 200, 0.3);
color: rgba(0, 0, 200, 0.6);
box-shadow: 1px 1px 2px rgba(0, 0, 200, 0.4);
border-radius: 10px;
padding: 3px 10px;
display: inline-block;
cursor: pointer;
}
javascript是一種腳本語言,它使你能夠動態的更新內容、控制多媒體、動畫……幾乎所有事。(好吧,不是所有事情,但神奇的是你可以通過短短幾行 JavaScript 程式碼實現。)
1
2
3
4
5
6
7
8
9
10
//綁定p元件
const para = document.querySelector("p");

para.addEventListener("click", updateName);

function updateName() {
let name = prompt("輸入新的名字");
para.textContent = "Player 1: " + name;
}

JavaScript 語言的核心包含了很多常用的程式功能供你使用
DOM (文件物件模型Document Object Model) API 讓你能操作 HTML 和 CSS,像是建立、移除或改變 HTML 元素,或動態地將新樣式套用到頁面…等等。每當你看到彈出視窗,或有新的內容出現在畫面上(就像上面的範例所展示的), 那就是 DOM 在動作。
### DOM節點 DOM會形成一個樹狀的結構且擁有各個節點,而其節點通常分為四種,包括 Document、Element、Text 與 Attribute。
  • Document(文件)
    Document是HTML文件的開端,所有標籤都會由此向下延伸。
  • Element(元素)
    Element是文件的各種標籤,像是<head>、<body>、<p>或是<div>等,都屬於Element元素節點。
  • Text(文本)
    指的是被標籤包起來的文字。 像是本節點標題「DOM節點」的後端語法是<h3>DOM節點</h3>,而其中被Element元素包起來的文字就是Text文本。
  • Attribute(屬性)
    指的是各個標籤內的相關屬性,用來敘述Element元素的相關性質,這種附加在 Element元素上的東西就稱為Attribute屬性。

表單密碼的顯示與隱藏

javaScript 表單密碼的顯示與隱藏

流程綁定按鈕 =>切換表單type 與icon 圖示

1
2
3
4
5
6
7
8
9
10
11
12
13
14
15
16
17
18
19
20
21
22
23
24
25
26
27
//html
<div class="app">
<div class="login">
<div class="item">
<input>
</div>

<div class="item pad">
<input type="password" class="input password">
<i class="togglePassword fa-solid fa-eye not-eye" ></i>
</div>
</div>
</div>


//js
//綁定按鈕
const eyeIcon = document.querySelector("i");
const password = document.querySelector(".password");

eyeIcon.addEventListener("click", function () {
const vm = this;
const type = password.getAttribute("type") === "password" ? "text" : "password";
password.setAttribute("type", type);
vm.classList.toggle("not-eye");
});

Vue3表單密碼的顯示與隱藏

流程綁定按鈕 =>切換表單type 與icon 圖示(class)

1
2
3
4
5
6
7
8
9
10
11
12
13
14
15
16
17
18
19
20
21
22
23
24
25
<template>
<div class="login">
<div class="item">
<input>
</div>
<div class="item pad">
<input :type="passwordVisible === false ? 'password' : 'input'" class="input">
<i class="fa-solid"
@click="passwordVisible = !passwordVisible" :class="passwordVisible === false ? 'not-eye' : 'fa-eye'">
</i>
</div>
</div>
</template>


<script setup lang="ts">
/* const store = useAuthStore()
const { formRef, loginForms, rulesLogin, validatorMessage, passwordVisible } = storeToRefs(store)
const { submitForm, resetForm } = store*/


import { ref } from 'vue';
const passwordVisible = ref(false);
</script>

SourceTree & github Clone

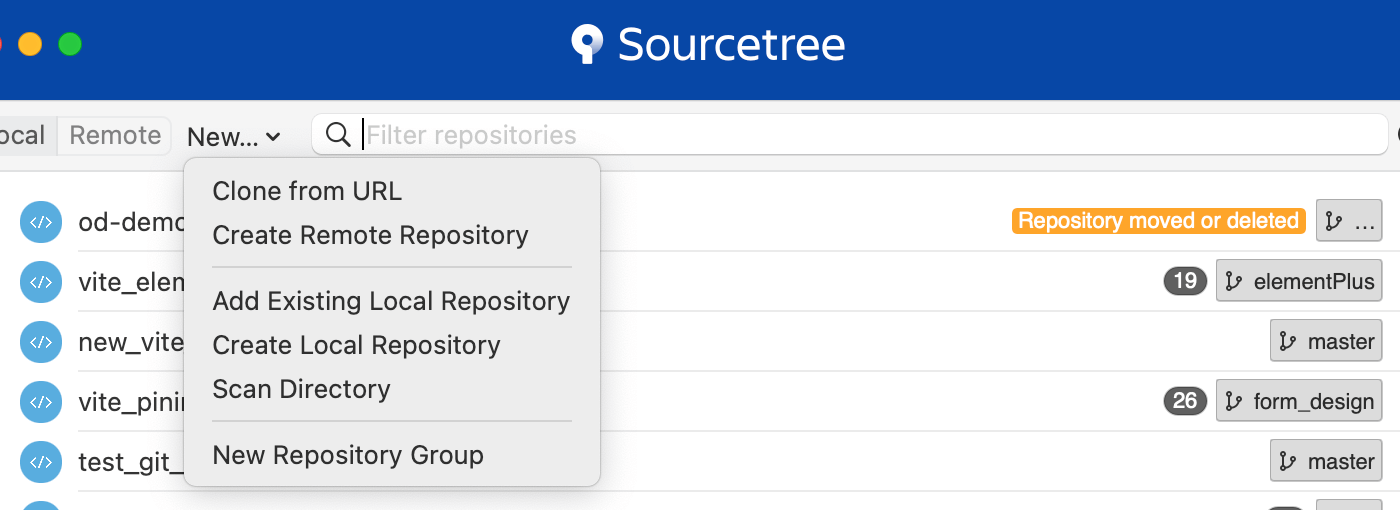
Sourcetree Clone from URL(克隆儲存庫)

打開Sourcetree 點擊New下拉Select =>Clone from URL

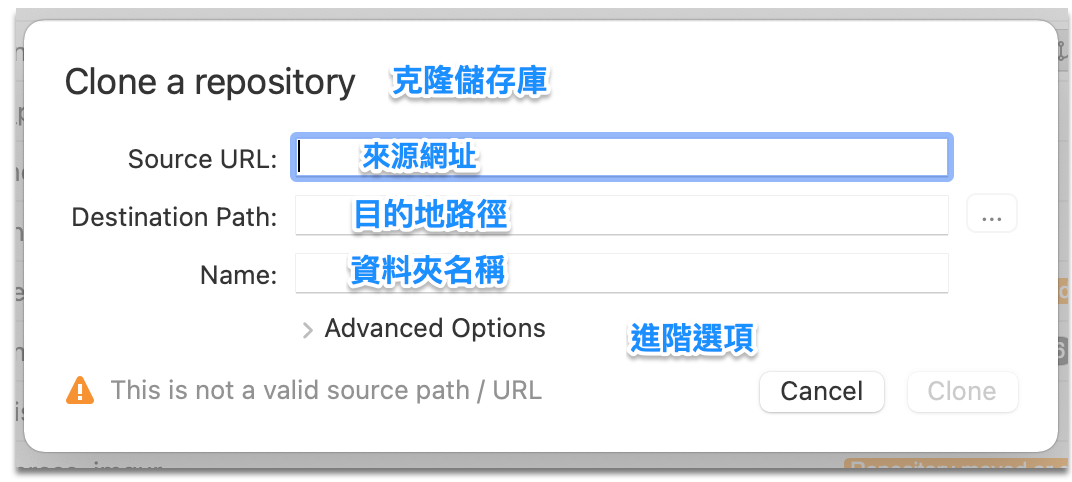
Clone a repository 克隆儲存庫
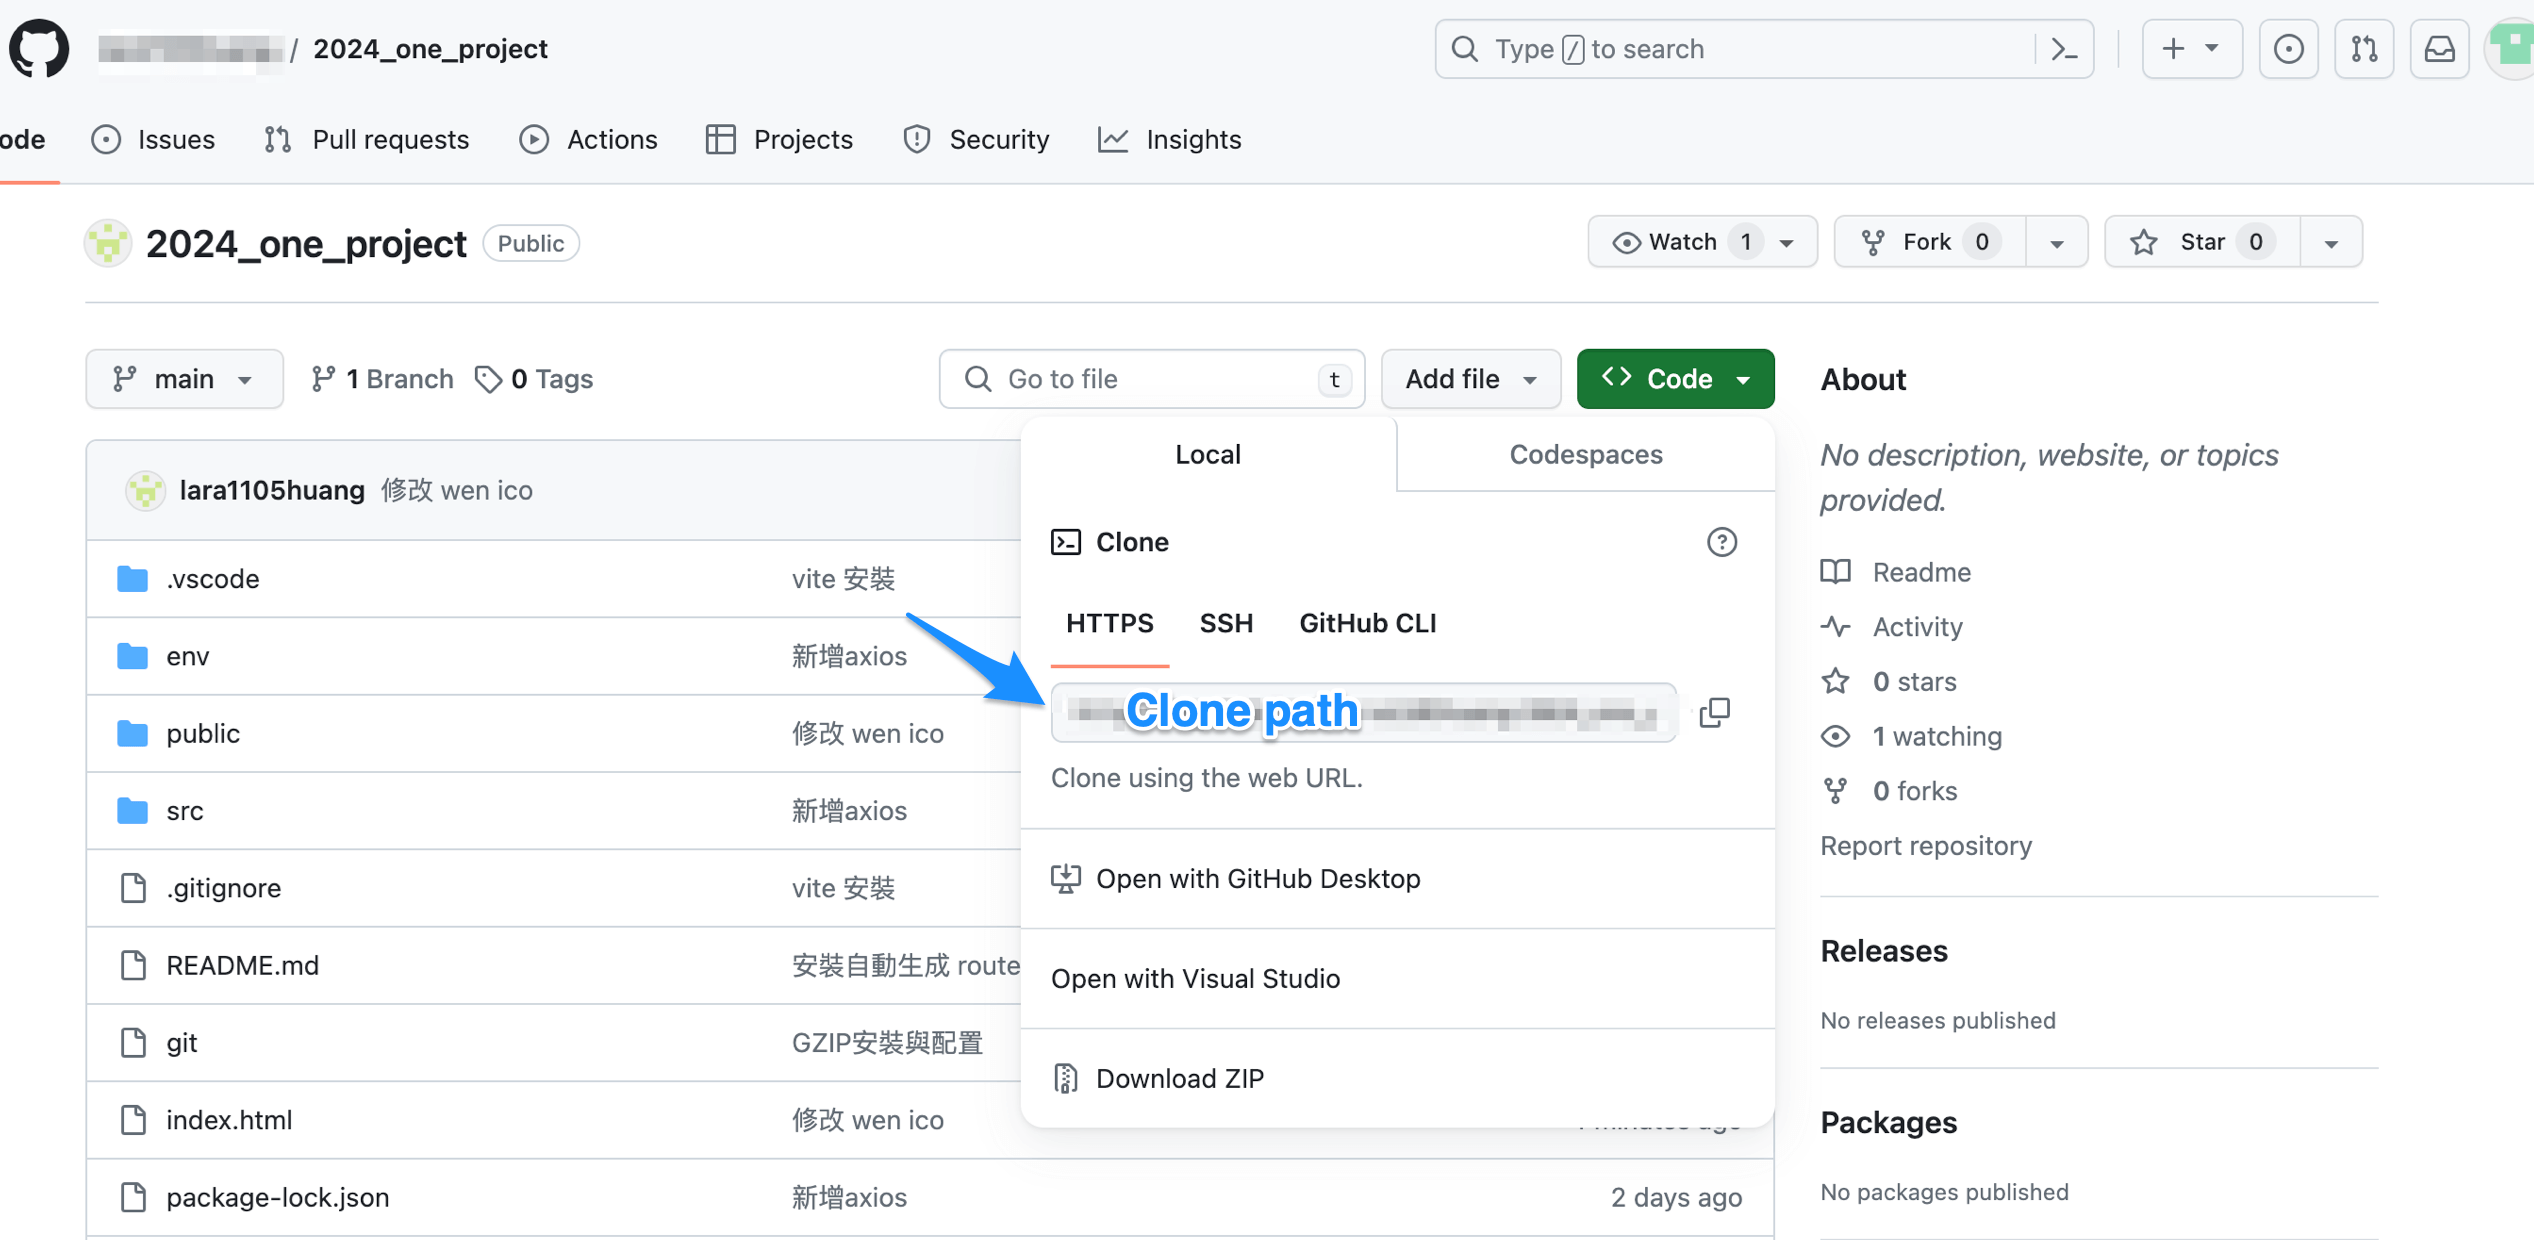
Source URL:Clone 來源網址
Destination Path目的地路徑
Name
Advanced Options進階選項
This is not Valid source path / Url這不是有效的來源路徑/網址

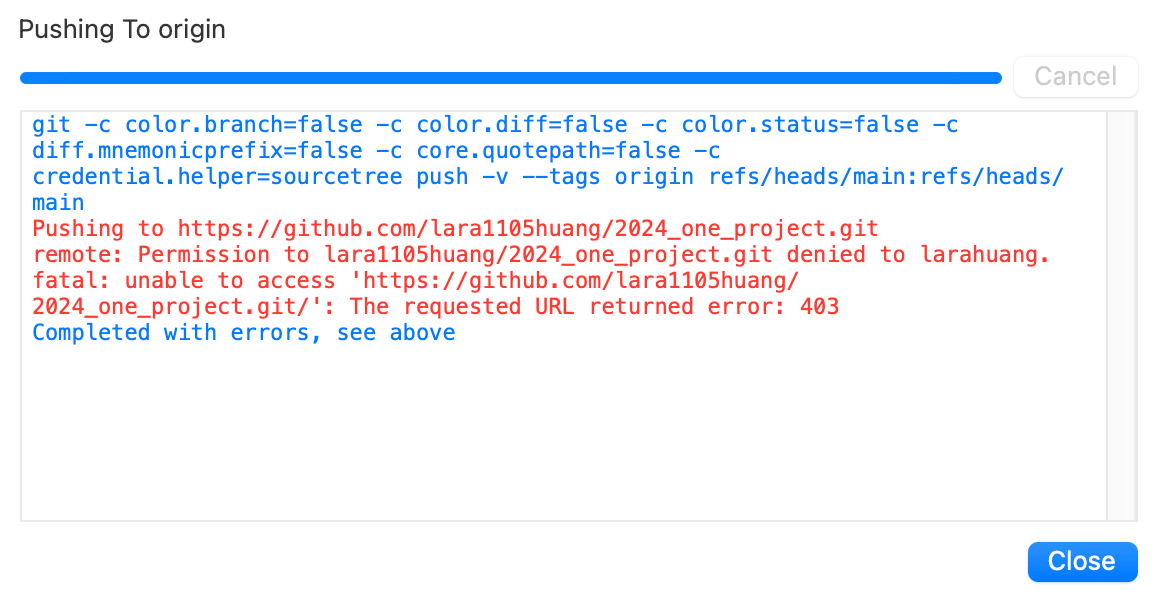
Sourcetree push 錯誤訊息

處理方式:
Source URL:Clone 來源網址 必須加TOKEN(令牌) https://@github.com/網址.git

參考資料