Vue3 TelePort

Teleport Alert

父元件建立

  • 建立一個isOpenAlert=ref(true) =>放置到 return
  • openAlert與closeAlert函式 =>放置到 return
  • template 內 Teleport 下放置 to="#modal" `` **@closeFunction=> $emit('closeFunction')
  • 到App.vue放置 `` 對應 to="#modal"

父元件

1
2
3
4
5
6
7
8
9
10
11
12
13
14
15
16
17
18
19
20
21
22
23
24
25
26
27
28
29
30
31
32
33
34
<template>
<div>
<a @click="">打開Alert</a>
<!---template 內 放置 -->
<Teleport to="#modal">
<Alert v-if="isOpenAlert" @closeFunction="closeAlert" />
</Teleport>
</div>
</template>


<script>
import { ref } from 'vue'

// 引入子元件
import Alert from './Alert'

export default {
setup () {
const isOpenAlert = ref(false)
const openAlert = () => {
isOpenAlert.value = true
}
const closeAlert = () => {
isOpenAlert.value = false
}
return{
isOpenAlert,
openAlert,
closeAlert,
}
}
}
</script>

App.vue 這裡是跳出框的跳出位置 id與父元件的 #id對應

1
2
3
4
<template>
<div id="modal"></div>
</template>

子元件

  • 使用 @click="$emit('closeFunction')" 關閉必須與父元件的@closeFunction對應
1
2
3
4
5
6
7
8
9
10
11
12
13
14
15
16
17
18
19
20
21
22
23
24
25
26
27
28
29
30
31
32
33
34
35
36
37
38
39
40
41
42
43
44
45
46
47
48
49
50
51
52
53
54
55
56
57
58
59
60
61
62
<template>
<div
class="deposit-pop__wrap"
:class="tw([
'absolute',
'z-30',
'top-1/2',
'left-1/2',
'-translate-x-1/2',
'-translate-y-1/2',
'w-428px',
'max-w-full',
])"
>
<div
class="deposit-pop__container"
:class="tw([
'bg-depositBg',
'px-10px',
'pb-30px',
'mx-18px',
'md:mx-0',
'rounded-20px',
])"
>
<div
class="close__icon"
:class="tw([
'ml-auto',
'w-60px',
'h-60px',
'bg-white',
])"
:style="{
'-webkit-mask': setStyleMaskImage(require('./images/i_pad_menu_close.svg')),
'mask': setStyleMaskImage(require('./images/i_pad_menu_close.svg')),
}"
@click="$emit('closeFunction')"
>
</div>
<div>
Content
</div>
</div>
</div>
</template>


<script>
import { ref } from 'vue'
export default {
setup () {
const setStyleMaskImage = (url) => {
return `url(${url}) no-repeat center /contain`
}

return{
setStyleMaskImage,
}
}
}
</script>

參考資料
使用 Vue3 Teleport 製作對話框(Modal)
ithome Teleport
Teleport

第一種寫法

1
2
3
4
5
6
7
8
9
10
11
12
13
14
15
16
17
18
19
20
21
22
23
24
25
26
27
28
29
30
31
32
33
34
35
36
37
38
39
40
41
42
43
44
45
46
47
48
49
50
51
52
53
54
55
56
57
58
59
60
61
62
63
64
65
66
67
68
69
70
71
72
73
74
75
76
<template>

<button class="el-button el-button--primary"
@click="open = true">Open Modal
</button>

<!--Teleport 寫法-->
<Teleport to="body">
<div v-if="open" class="modal">
<div class="modal-main">
<div class="modal-header">
<a @click="open = false">
<i class="icon-cross"></i>
</a>
</div>
<div class="modal-body">
<p>Hello from the modal!</p>
</div>
</div>
</div>
</Teleport>
</template>

<script setup lang="ts">
import { ref} from 'vue';

const open = ref<boolean>(false);
const close = () => {
open.value=false
}
</script>

<style lang="scss">
.modal {
position: fixed;
z-index: 999;
top: 0%;
left: 0%;
width: 100vw;
margin-left: 0px;
height: 100vh;
background-color: #1610108a;
.modal-main{
width: 550px;
background-color: white;
margin: 100px auto;
border-radius: 8px;
padding: 25px;
.modal-header{
display: flex;
justify-content: flex-end;
i{
display: flex;
justify-content: flex-end;
}
}
}
}
@media (width<=767px) {
.modal {
.modal-main{
width: 90%;
max-width: 90%;
padding: 4%;
}
}
}
@media (width<=360px) {
.modal {
.modal-main{
width: 85%;
max-width: 85%;
}
}
}
</style>

父子間的傳值
父組件

1
2
3
4
5
6
7
8
9
10
11
12
13
14
15
16
17
18
19
20
21
22
23
24
25
26
27
28
29
30
31
32
33
34
35
36
37
38
39
40
41
42
43
44
45
46
47
48
49
50
51
52
53
54
55
56
57
58
59
60
61
62
63
64
65
66
67
68
69
70
71
72
73
74
75
76
77
78
79
80
81
82
83
84
85
86
87
88
89
90
91
92
93
94
95
96
97
98
99
100
101
102
103
104
105
106
107
108
109
110
111
112
113
114
115
116
117
118
119
120
121
122
123
<template>
<button class="el-button el-button--primary"
@click="open = true"
>Open Modal</button>

<Teleport to="body">
<Alert :open="open" :lists="lists" :dynamicValidateForm="dynamicValidateForm"
@sendOpen="close" :formRef="formRef"
@sendRemoveDomain="removeDomain" @sendSubmitForm="submitForm"
@sendResetForm="resetForm" @sendAddDomain="addDomain"/>
</Teleport>
</template>

<script setup lang="ts">
import { ref, reactive } from 'vue';
import Alert from './Alert.vue';

const open = ref<boolean>(false);

const close = () => {
open.value=false
}
const lists = ref<any[]>([
{ 'subject': 'one', id: 123 },
{ 'subject': 'two', id: 221 }
]);
import type { FormInstance } from 'element-plus'

const formRef = ref<FormInstance>()
const dynamicValidateForm = reactive<{
domains: DomainItem[]
email: string
}>({
domains: [
{
key: 1,
value: '',
},
],
email: '',
})

interface DomainItem {
key: number
value: string
}

const removeDomain = (item: DomainItem) => {
const index = dynamicValidateForm.domains.indexOf(item)
if (index !== -1) {
dynamicValidateForm.domains.splice(index, 1)
}
}

const addDomain = () => {
dynamicValidateForm.domains.push({
key: Date.now(),
value: '',
})
}

const submitForm = (formEl: FormInstance | undefined) => {
if (!formEl) return
formEl.validate((valid) => {
if (valid) {
console.log('submit!')
} else {
console.log('error submit!')
return false
}
})
}

const resetForm = (formEl: FormInstance | undefined) => {
if (!formEl) return
formEl.resetFields()
}
</script>

<style lang="scss">
.modal {
position: fixed;
z-index: 999;
top: 0%;
left: 0%;
width: 100vw;
margin-left: 0px;
height: 100vh;
background-color: #1610108a;
.modal-main{
width: 550px;
background-color: white;
margin: 100px auto;
border-radius: 8px;
padding: 25px;
.modal-header{
display: flex;
justify-content: flex-end;
i{
display: flex;
justify-content: flex-end;
}
}
}
}
@media (width<=767px) {
.modal {
.modal-main{
width: 90%;
max-width: 90%;
padding: 4%;
}
}
}
@media (width<=360px) {
.modal {
.modal-main{
width: 85%;
max-width: 85%;
}
}
}
</style>

Alert.vue
子組件

1
2
3
4
5
6
7
8
9
10
11
12
13
14
15
16
17
18
19
20
21
22
23
24
25
26
27
28
29
30
31
32
33
34
35
36
37
38
39
40
41
42
43
44
45
46
47
48
49
50
51
52
53
54
55
56
57
58
59
60
61
62
63
64
65
66
67
68
69
70
71
72
73
74
75
76
77
78
79
80
81
82
83
84
85
<template>
<div v-if="open" class="modal">
<div class="modal-main">
<div class="modal-header">
<a @click="sendOpen"><i class="icon-cross"></i></a>
</div>
<div class="modal-body">
<el-form
ref="formRef"
:model="dynamicValidateForm"
label-width="120px"
class="demo-dynamic"
>
<el-form-item
prop="email"
label="Email"
:rules="[
{
required: true,
message: 'Please input email address',
trigger: 'blur',
},
{
type: 'email',
message: 'Please input correct email address',
trigger: ['blur', 'change'],
},
]"
>
<el-input v-model="dynamicValidateForm.email" />
</el-form-item>
<el-form-item
v-for="(domain, index) in dynamicValidateForm.domains"
:key="domain.key"
:label="'Domain' + index"
:prop="'domains.' + index + '.value'"
:rules="{
required: true,
message: 'domain can not be null',
trigger: 'blur',
}"
>
<el-input v-model="domain.value" />
<el-button class="mt-2" @click.prevent="sendRemoveDomain(domain)"
>Delete</el-button
>
</el-form-item>
<el-form-item>
<el-button type="primary" @click="sendSubmitForm(formRef)">Submit</el-button>
<el-button @click="sendAddDomain">New domain</el-button>
<el-button @click="sendResetForm(formRef)">Reset</el-button>
</el-form-item>
</el-form>
</div>
</div>
</div>
</template>

<script setup lang="ts">
import { defineProps } from 'vue'

const props = defineProps({
open: { type: Boolean },
lists: { type: Object },
dynamicValidateForm: { type: Object },
formRef: { type: Object },
})

const emits = defineEmits(['sendOpen', 'sendRemoveDomain', 'sendSubmitForm','sendResetForm', 'sendAddDomain']);
const sendOpen = () => {
emits('sendOpen', props.open=false)
}
const sendRemoveDomain = (domain:any) => {
emits('sendRemoveDomain', domain)
}
const sendSubmitForm = (formRef: any) => {
emits('sendSubmitForm', formRef)
}
const sendResetForm = (formRef: any) => {
emits('sendResetForm', formRef)
}
const sendAddDomain = () => {
emits('sendAddDomain')
}
</script>

github Teleport說明

json-server 模擬Api

json-server

  • json-server安裝
  • 查看json-server版本號
  • 建立db.json
  • 啟動 json-server db.json
  • 更改 Port 號:json-server --watch db.json --port 3004

根目錄 安裝 json-server

1
npm install -g json-server

查看 json-server版本號

1
json-server -v

啟動 json-server(資料檔案名 db.json)

新增一個json檔案類型

1
json-server (資料檔案名 db.json)
1
2
3
4
5
6
Last login: Wed Jul 12 20:00:18 on console
larahuang@larahuangde-MacBook-Pro db % json-server -v
0.17.3
larahuang@larahuangde-MacBook-Pro db % json-server db.json


啟動以後的結果

1
2
3
4
5
6
7
8
9
10
11
12
13
14
15

\{^_^}/ hi!

Loading db.json
Done

Resources
http://localhost:3000/Data
http://localhost:3000/Status

Home
http://localhost:3000

Type s + enter at any time to create a snapshot of the database

更改 Port 號

1
json-server --watch db.json --port 3004

Vite ts error

moduleResolution

Cannot find module 'vue'. Did you mean to set the 'moduleResolution' option to 'node', or to add aliases to the 'paths' option?Vetur(2792)

處理方式: tsconfig.json 的moduleResolution配置原來為bundler改為node,"moduleResolution": "node",

Vite tel input 國際電話輸入法套件

安裝 vue3-tel-input 國際電話輸入法套件

vue3-tel-input

1
npm i --save vue3-tel-input

main.ts 引入

1
2
3
4
5
6
7
8
9
10
11
12
import { createApp } from 'vue'
// @ts-ignore
import VueTelInput from 'vue3-tel-input'

// @ts-ignore 參數
const VueTelInputOptions = {
mode: "international",
onlyCountries: ['NG', 'GH', "GB", "US", "CA"]
}
const app = createApp(App)
app.use(VueTelInput, VueTelInputOptions);
app.mount('#app')

Vite sass安裝

Sass安裝

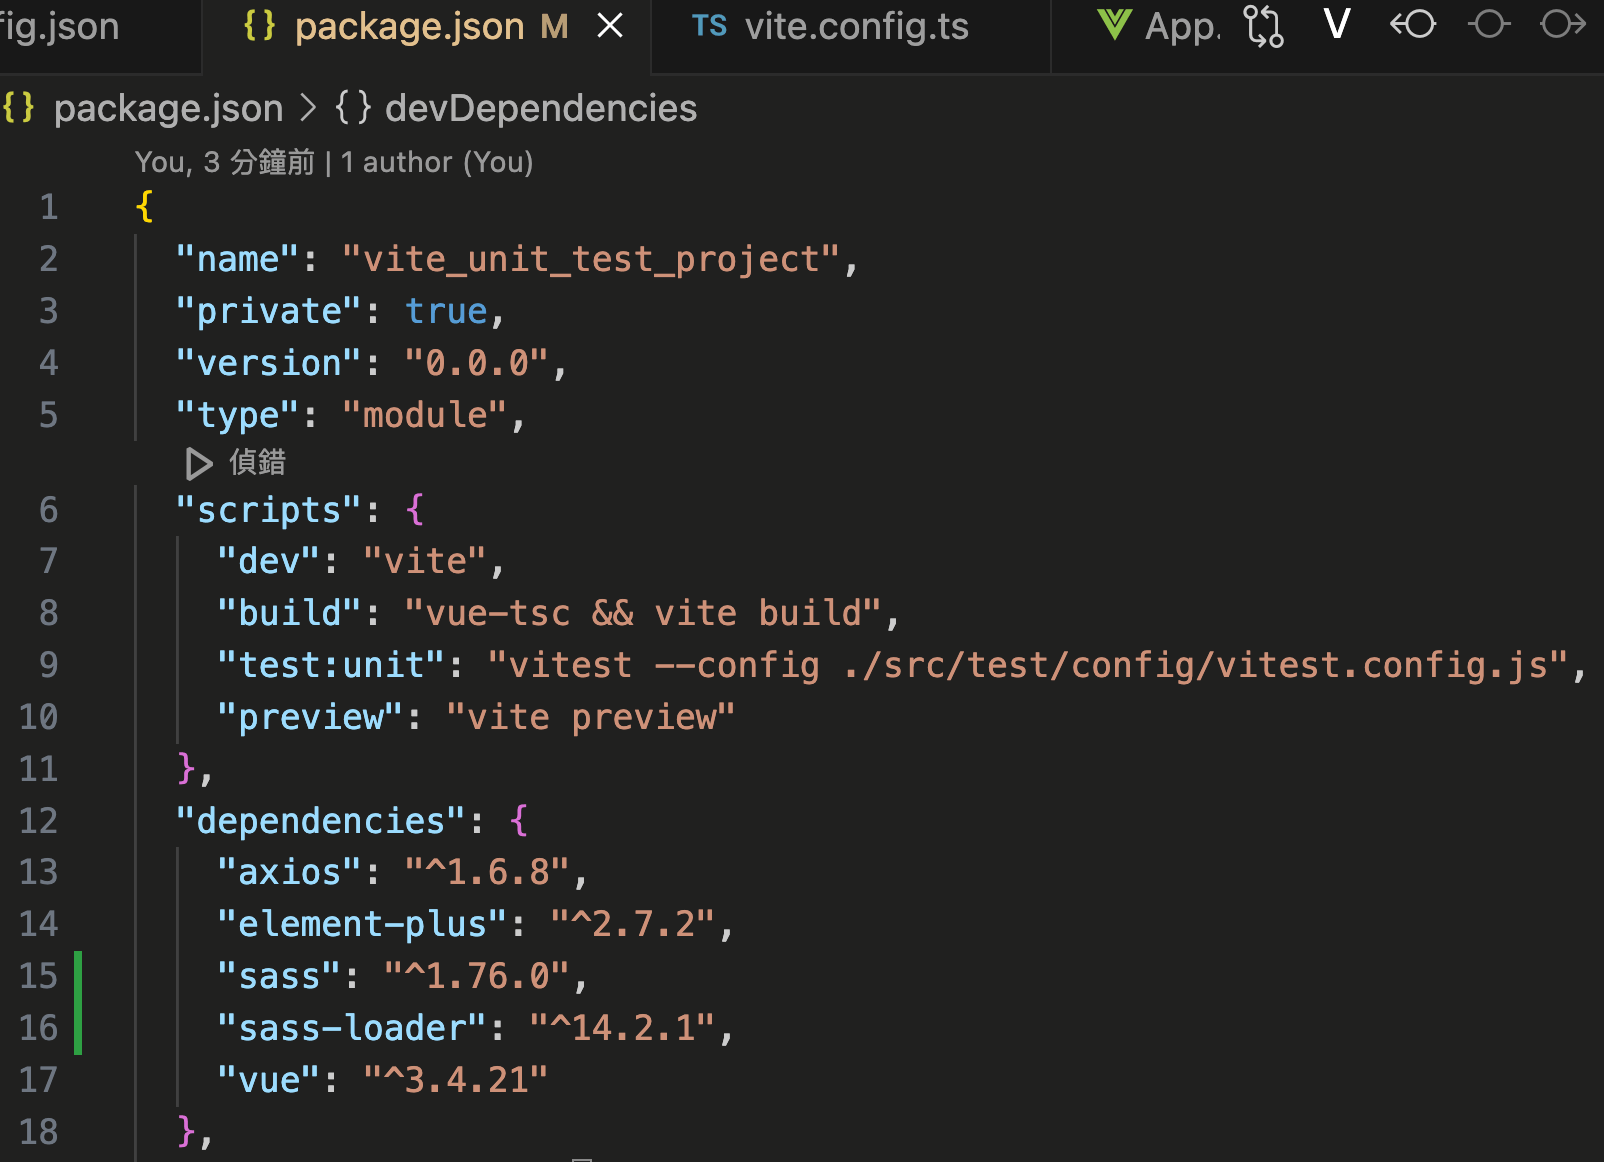
1
npm install --save sass sass-loader

package.json內的dependencies會有sass sass-loader的版本訊息如圖片

assets新增scss資料夾;新增檔案allStyle.scss; main.ts引入

1
2
//main.ts
import './assets/scss/allStyle.scss'

src/assets/scss新增public.scss

1
2
//allStyle.scss
@import "./public.scss";

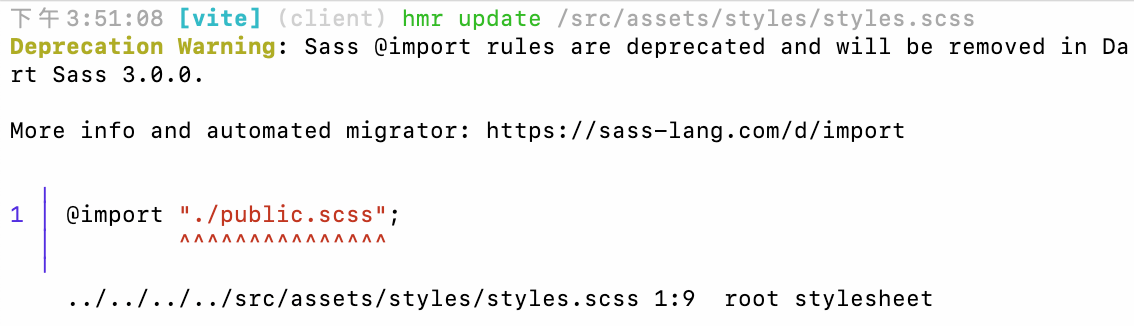
錯誤訊息

Deprecation Warning [import]: Sass @import rules are deprecated and will be removed in Dart Sass 3.0.0.
棄用警告 [import]:Sass @import 規則已棄用,將在 Dart Sass 3.0.0 中刪除。

修改方式

1
@use "./public.scss";

public.scss

1
2
3
4
5
6
7
8
9
10
11
12
13
14
15
16
17
18
19
20
21
22
23
24
25
26
27
28
29
30
31
32
33
34
35
36
37
38
39
40
41
42
43
44
45
46
47
48
49
50
51
52
53
54
55
56
57
58
59
60
61
62
63
64
65
66
67
68
69
70
71
72
/*建立全域變數*/
:root {
--bs-blue: #0d6efd;
--bs-indigo: #6610f2;
--bs-purple: #6f42c1;
--bs-pink: #d63384;
--bs-red: #dc3545;
--bs-orange: #fd7e14;
--bs-yellow: #ffc107;
--bs-green: #198754;
--bs-teal: #20c997;
--bs-cyan: #0dcaf0;
--bs-black: #000;
--bs-white: #fff;
--bs-gray: #6c757d;
--bs-gray-dark: #343a40;
--bs-gray-100: #f8f9fa;
--bs-gray-200: #e9ecef;
--bs-gray-300: #dee2e6;
--bs-gray-400: #ced4da;
--bs-gray-500: #adb5bd;
--bs-gray-600: #6c757d;
--bs-gray-700: #495057;
--bs-gray-800: #343a40;
--bs-gray-900: #212529;
--bs-primary: #0d6efd;
--bs-secondary: #6c757d;
--bs-success: #198754;
--bs-info: #0dcaf0;
--bs-warning: #ffc107;
--bs-danger: #dc3545;
--bs-light: #f8f9fa;
--bs-dark: #212529;
--bs-primary-rgb: 13,110,253;
--bs-secondary-rgb: 108,117,125;
--bs-success-rgb: 25,135,84;
--bs-info-rgb: 13,202,240;
--bs-warning-rgb: 255,193,7;
--bs-danger-rgb: 220,53,69;
--bs-light-rgb: 248,249,250;
--bs-dark-rgb: 33,37,41;
--bs-primary-text-emphasis: #052c65;
--bs-secondary-text-emphasis: #2b2f32;
--bs-success-text-emphasis: #0a3622;
--bs-info-text-emphasis: #055160;
--bs-warning-text-emphasis: #664d03;
--bs-danger-text-emphasis: #58151c;
--bs-light-text-emphasis: #495057;
--bs-dark-text-emphasis: #495057;
--bs-primary-bg-subtle: #cfe2ff;
--bs-secondary-bg-subtle: #e2e3e5;
--bs-success-bg-subtle: #d1e7dd;
--default-color: hotpink;
--bs-bg-color: #ffff;
--bs-text-color: #808080;
--bs-line-height: 1.5;
--bs-font-weight: 400;
--bs-font-size: 14px;
--bs-font-family:"Mabry Pro","Noto Sans TC","微軟正黑體","Microsoft JhengHei","Heiti TC","黑體","Nunito Sans",sans-serif;
}
/*套用變數*/
body {
margin: 0;
font-family: var(--bs-font-family);
font-size: var(--bs-font-size);
font-weight: var(--bs-font-weight);
line-height: var(--bs-line-height);
color: var(--bs-dark-text-emphasis);
background-color: var(--bs-bg-color);
-webkit-text-size-adjust: 100%;
-webkit-tap-highlight-color: transparent;
}

github sass安裝

Vite 動態title

安裝 vue-page-title

vue-page-title

1
yarn add vue-page-title # npm i --save vue-page-title

在mail.ts內新增

1
2
3
4
5
6
7
8
9
10
11
12
13
14
15
16
17
18
19
20
21
22
23
24
25
26
27
28
import { createApp } from 'vue';

import { pageTitle } from 'vue-page-title';//引入vue-page-title

import VueGtag from 'vue-gtag-next';//引入ga
// @ts-ignore
import VueTelInput from 'vue3-tel-input';//引入國際電話下拉表單
// @ts-ignore
import 'vue3-tel-input/dist/vue3-tel-input.css'//引入國際電話下拉表單style
//引入router
import router from './router/index'
import App from './App.vue'

const app = createApp(App)
app.use(router)
app.use(pageTitle({ router }));//動態title
app.use(i18n);//i18n
app.use(pinia);//pinia

app.use(VueGtag, {
property: {
//id: 你的 google 分析追蹤碼
id: import.meta.env.VITE_API_URL,
},
})
app.use(VueTelInput, allCountries);//使用國際電話下拉表單

app.mount('#app')

router meta title名字

1
2
3
4
5
6
7
8
9
10
11
12
13
14
15
16
17
18
19
20
21
22
23
24
25
import { createRouter, createWebHashHistory } from 'vue-router';
import FooComponent from 'path/to/foo-component';
import HomeComponent from 'path/to/home-component';

const routes = [
{
path: '/',
component: HomeComponent,
meta: {
title: import.meta.env.VITE_API_TITLE +'Home Page', // Title must be a string.
},
},
{
path: '/foo',
component: FooComponent,
meta: {
title: 'Foo Page',
},
},
];
export default createRouter({
history: createWebHashHistory(),
routes,
});
結論:
  1. 安裝 vue-page-title
  2. main.ts引入 vue-page-title
  3. main.ts使用與Router搭配使用 app.use(pageTitle({ router }))
  4. router page 必須加入 meta: { title: 'Page Name', },


vue-page-title 範例

導入數據分析 Vue gtag

安裝vue-gtag-next

1
npm i -D vue-gtag-next

在main.ts內導入

1
2
3
4
5
6
7
8
9
10
11
12
//引入
import VueGtag from 'vue-gtag-next'

const app = createApp(App)
//使用
app.use(VueGtag, {
property: {
//id: 你的 google 分析追蹤碼
id: import.meta.env.VITE_API_URL,
},
})
app.mount('#app')

Stylelint

Stylelint

StyleLint 是一套檢查 CSS Coding Style

  • 安裝 stylelint npm install stylelint -D
  • 安裝 CSS 配置 npm install stylelint-config-standard -D
  • 安裝 SCSS 配置 npm install stylelint-config-sass-guidelines stylelint-scss -D
  • 安裝其他配置 可以參考 Stylelint 官方Github
  • 建立 .stylelintrc.cjs

    1
    2
    3
    4
    5
    6
    7
    8
    9
    10
    11
    12
    13
    14
    15
    16
    17
    18
    19
    20
    21
    22
    23
    24
    25
    26
    27
    28
    29
    30
    31
    32
    33
    34
    35
    36
    37
    38
    39
    40
    41
    42
    43
    44
    module.exports = {
    // 繼承推薦規範配置
    extends: [
    "stylelint-config-standard",
    "stylelint-config-recommended-scss",
    "stylelint-config-recommended-vue/scss",
    "stylelint-config-html/vue",
    "stylelint-config-recess-order",
    ],
    // 指定不同文件對應的解析器
    overrides: [
    {
    files: ["**/*.{vue,html}"],
    customSyntax: "postcss-html",
    },
    {
    files: ["**/*.{css,scss}"],
    customSyntax: "postcss-scss",
    },
    ],
    // 自定義規則
    rules: {
    "import-notation": "string", // 指定導入CSS文件的方式("string"|"url")
    "selector-class-pattern": null, // 選擇器類名命名規則
    "custom-property-pattern": null, //自定義屬性命名規則
    "keyframes-name-pattern": null, // 動畫節點樣式命名規則
    "no-descending-specificity": null, // 允許無降序特異性
    // 允許 global 、export 、deep偽類
    "selector-pseudo-class-no-unknown": [
    true,
    {
    ignorePseudoClasses: ["global", "export", "deep"],
    },
    ],
    // 允許未知屬性
    "property-no-unknown": [
    true,
    {
    ignoreProperties: ["menuBg", "menuText", "menuActiveText"],
    },
    ],
    },
    };

    在 VS Code setting.json 加入自動修正錯誤,

    1
    2
    3
    4
    "editor.codeActionsOnSave": {
    "source.fixAll.eslint": true,
    "source.fixAll.stylelint": true
    },

    VS Code 安裝 stylelint套件

    套用到專案

    1
    2
    3
    4
    // 檢查錯誤
    npx stylelint "**/*.css"
    // 修正錯誤
    npx stylelint "**/*.css" --fix

    或是在 package.json 內設定,透過 npm run lint:style 去執行

    1
    2
    3
    4
    5
    6
    7
    8
    / package.json

    {
    "scripts": {
    "check:style": "stylelint **/*.{css,scss,sass,vue}",
    "lint:style": "stylelint **/*.{css,scss,sass,vue} --fix"
    }
    }

    stylelint參考資料

    stylelint失效問題

    Dayjs

    安裝

    dayjs官網
    所有程式碼都應該在這兩種環境中運行,並且所有單元測試都在這兩種環境中運行。

    目前,ci 系統使用以下瀏覽器:Windows XP 上的 Chrome、Windows 7 上的 IE 8、9 和 10、Windows 10 上的 IE 11、Linux 上最新的 Firefox 以及 OSX 10.8 和 10.11 上最新的 Safari。

    瀏覽器使用

    cdn

    1
    2
    3
    <!-- CDN example (jsDelivr) -->
    <script src="https://cdn.jsdelivr.net/npm/dayjs@1/dayjs.min.js"></script>
    <script>dayjs().format()</script>

    typescript

    參閱官網Typescript安裝

    1
    2
    3
    npm install --save dayjs
    import * as dayjs from 'dayjs'
    dayjs().format()

    區域設定和插件導入

    要使用語言環境和插件,您首先需要匯入目標語言和插件。

    1
    2
    3
    4
    5
    6
    import * as dayjs from 'dayjs'
    import * as isLeapYear from 'dayjs/plugin/isLeapYear' // import plugin
    import 'dayjs/locale/zh-cn' // import locale

    dayjs.extend(isLeapYear) // use plugin
    dayjs.locale('zh-cn') // use locale

    處理打包dayjs錯誤訊息

    打包dayjs錯誤訊息

    1
    2
    3
    4
    5
    6
    { //tsconfig.json
    "compilerOptions": {
    "esModuleInterop": true,
    "allowSyntheticDefaultImports": true,
    }
    }

    npm

    1
    2
    3
    4
    5
    npm install --save dayjs
    # or
    yarn add --save dayjs
    # or
    pnpm add --save dayjs

    npm 引入或使用

    1
    2
    3
    4
    5
    // 引入 Day.js
    const dayjs = require('dayjs')

    // 或使用 ES6 import 方式引入 Day.js,(Angular ,Vue,React 使用頁面引入方法)
    import dayjs from 'dayjs'

    使用方式

    dayjs取得目前時間為字符

    1
    2
    const now = new Date();//等同 dayjs(new Date());"2024-04-20T05:25:08.194Z"
    const now = dayjs() // 等同 dayjs(new Date());"2024-04-20T05:25:08.194Z"

    可傳入 Data 物件取得目前時間

    1
    const now = dayjs(new Date());"2024-04-20T05:25:08.194Z";

    *從字符”2024-04-20T05:25:08.194Z”取得時間搓

    1
    2
    const timestamp = new Date().getTime();
    console.log('timestamp',timestamp);//1713590708194

    取得特定時間的年月日時等資訊

    1
    2
    3
    4
    5
    6
    7
    8
    console.log('取得現在年份', dayjs().year())
    console.log('取得現在月份', dayjs().month() + 1)
    console.log('取得現在日', dayjs().date())
    console.log('取得星期', dayjs().day())
    console.log('取得時', dayjs().hour())
    console.log('取得分', dayjs().minute())
    console.log('取得秒', dayjs().second())
    console.log('取得豪秒',dayjs().millisecond())

    取得 UTC 時間

    1
    2
    3
    4
    5
    6
    7
    dayjs.extend(utc)

    // 取得本地時間
    dayjs().format() //2019-03-06T08:00:00+08:00

    // 取得 UTC 時間
    dayjs.utc().format() // 2019-03-06T00:00:00Z

    驗證返回的時間是否正確

    1
    2
    dayjs(null).isValid() // false
    dayjs().isValid() // true

    取得

    1
    2
    3
    4
    5
    6
    7
    8
    9
    10
    11
    12
    13
    14
    15
    16
    17
    18
    19
    20
    21
    22
    23
    24
    25
    26
    27
    28
    29
    30
    31
    32
    33
    34
    35
    36
    37
    38
    39
    40
    // 取得毫秒
    dayjs().millisecond()
    // 設定毫秒,如傳入數字在 0-999 範圍外,會進位到秒。
    dayjs().millisecond(100)

    // 取得秒
    dayjs().seconds()
    // 設定秒,如傳入數字在 0-59 範圍外,會進位到分鐘。
    dayjs().seconds(30)


    // 取得分鐘
    dayjs().minute()
    // 設定秒,如傳入數字在 0-59 範圍外,會進位到小時。
    dayjs().minute(30)

    // 取得小時
    dayjs().hour()
    // 設定小時,如傳入數字在 0-23 範圍外,會進位到天數。
    dayjs().hour(12)

    // 取得天數
    dayjs().date()
    // 設定天數,如傳入數字在 0-月份天數 範圍外,會進位到月份。
    dayjs().date(1)

    // 取得星期(幾)
    dayjs().day()
    // 設定星期(幾),如傳入數字在 0-6 範圍外,會進位到週。
    dayjs().day(0)

    // 取得月份
    dayjs().month()
    // 設定月份,如傳入數字在 0-11 範圍外,會進位到年。
    dayjs().month(6)

    // 取得年份
    dayjs().year()
    // 設定年份
    dayjs().year(2020)

    格式化時間

    1
    2
    3
    4
    5
    6
    7
    8
    9
    10
    dayjs().format("YYYY-MM-DD HH:mm:ss"); // 2025-03-25 21:11:06

    // 默認返回 ISO 8601 時間字串,例:'2020-05-15T10:59:34+08:00'
    dayjs().format()

    // 返回 'YYYYescape 2019-01-25T00:00:00-02:00Z'
    dayjs('2019-01-25').format('[YYYYescape] YYYY-MM-DDTHH:mm:ssZ[Z]')

    // 返回 '25/01/2019'
    dayjs('2019-01-25').format('DD/MM/YYYY')

    加減時間

    1
    2
    3
    4
    5
    // 取得現在日加1日
    dayjs().add(1, "day").date();

    // 取得現在日減1日
    dayjs().subtract(1, "day").date();

    計算時間差

    1
    2
    3
    4
    // 計算兩個時間的時間差(天)
    dayjs().diff(dayjs("2025-03-24"), "day"); //-3
    // 計算兩個時間的時間差分鐘
    dayjs().diff(dayjs("2025-03-20 11:00"), "minute"); //-43

    起始時間 / 結束時間

    1
    2
    dayjs().startOf("day").format('YYYY/MM/DD')
    dayjs().endOf("day").format('YYYY/MM/DD')

    轉換成 unix 時間戳記

    使用 valueOf() 可以將時間轉換成 unix 時間戳記

    1
    2
    3
    4
    5
    6
    7
    dayjs().valueOf() // 1742437455396

    // 情境:時間戳 => YYYY-MM-DD HH:mm:s
    dayjs(item.buildDate).format('YYYY-MM-DD HH:mm:ss')

    //情境:YYYY-MM-DD HH:mm:s => 時間戳
    dayjs(item.buildDate).valueOf()

    Node express MySql & Swagger

    使用 Express-Generator 來自動產生環境

    參考epxress generator 安裝
    node版本 14.20.1

    1
    2
    3
    4
    5
    6
    7
    8
    9
    10
    11
    //全域方法安裝express-generator
    npm install express-generator -g

    //项目初始化:專案名稱
    express -e 專案名稱

    //cd 專案名稱,到專案
    cd 專案名稱

    //啟動
    npm start

    到此網址觀看
    http://localhost:3000

    安裝mysql

    1
    npm install --save mysql

    安裝dotenv環境變數

    1
    npm install --save dotenv

    環境變數:新增.env

    1
    2
    3
    4
    5
    //.env
    DB_HOST=資料庫主機
    DB_USER=使用者
    DB_PASSWORD=密碼
    DB_NAME=資料庫名稱

    加入DB主機,使用者名稱,帳密,資料表名稱

    連接MySQL資料庫 Connecting to MySQL
    Create a new folder named config, and add database.js in this folder.
    新增 config資料夾內新增database.js

    1
    2
    3
    4
    5
    6
    7
    8
    9
    10
    11
    12
    13
    14
    15
    16
    17
    //database.js
    const mysql = require('mysql');
    require('dotenv').config();

    const connection = mysql.createConnection({
    host: process.env.DB_HOST,
    user: process.env.DB_USER,
    password: process.env.DB_PASSWORD,
    database: process.env.DB_NAME
    });

    connection.connect((err) => {
    if (err) throw err;
    console.log('連接MySQL資料庫');
    });

    module.exports = connection;

    定義使用者
    新增models/users.js

    • 載入資料庫const db = require('../config/database');
    • 獲取使用者陣列getAllUsers 函式 db.query('SELECT * FROM users', callback); SQL SELECT
    • 獲取單一使用者getUserById 函式 db.query('SELECT * FROM users WHERE id = ?', [id], callback) SQL WHERE
    • 建立單一使用者getUserById 函式 db.query('INSERT INTO users SET ?', newTodo, callback)SQL WHERE
    • 修改單一使用者updateUser 函式 db.query('UPDATE users SET ? WHERE id = ?', [updatedTodo, id], callback); SQL UPDATE
    • 刪除單一使用者deleteUser 函式 db.query('DELETE FROM users WHERE id = ?', [id], callback) SQL DELETE
    • 輸出getAllUsers,getUserById,getUserById,createUser,updateUser,deleteUser
    1
    2
    3
    4
    5
    6
    7
    8
    9
    10
    11
    12
    13
    14
    15
    16
    17
    18
    19
    20
    21
    22
    23
    //users.js
    const db = require('../config/database');
    //獲取所有
    exports.getAllUsers = (callback) =>
    {
    db.query('SELECT * FROM users', callback);
    };
    //獲取單一
    exports.getUserById = (id, callback) =>{
    db.query('SELECT * FROM users WHERE id = ?', [id], callback);
    };
    //建立單一
    exports.createUser = (newTodo, callback) =>{
    db.query('INSERT INTO users SET ?', newTodo, callback);
    };
    //修改單一
    exports.updateUser = (id, updatedTodo, callback)=>{
    db.query('UPDATE users SET ? WHERE id = ?', [updatedTodo, id], callback);
    };
    //刪除單一
    exports.deleteUser = (id, callback) =>{
    db.query('DELETE FROM users WHERE id = ?', [id], callback);
    };

    建立控制器
    新增controllers/userController.js

  • 引入models/users

  • 加入swagger名稱與描述必須語法

  • 獲取單一,修改單一,刪除單一都必須有唯一碼req.params.id

  • 1
    2
    3
    4
    5
    6
    7
    8
    9
    10
    11
    12
    13
    14
    15
    16
    17
    18
    19
    20
    21
    22
    23
    24
    25
    26
    27
    28
    29
    30
    31
    32
    33
    34
    35
    36
    37
    38
    39
    40
    41
    42
    43
    44
    45
    46
    47
    48
    49
    50
    51
    52
    53
    54
    55
    56
    57
    58
    59
    60
    61
    62
    63
    64
    65
    66
    67
    68
    69
    70
    71
    72
    73
    74
    75
    76
    77
    78
    //controllers/userController.js
    //引入models/users
    const User = require('../models/users');

    //獲取所有
    exports.getAllUsers = (req, res) => {
    User.getAllUsers((err, Users) =>
    {
    /* #swagger.tags = ['獲取所有使用者']
    #swagger.description = '' */
    if (err) throw err;
    res.json(Users);
    });
    };
    //獲取單一
    exports.getUserById = (req, res) =>
    {
    /* #swagger.tags = ['獲取單一使用者']
    #swagger.description = '' */
    User.getUserById(req.params.id, (err, User) => {
    if (err) throw err;
    res.json(User);
    });
    };
    //建立單一
    exports.createUser = (req, res) =>
    {
    /* #swagger.tags = ['新增單一使用者']
    #swagger.description = '' */
    /* #swagger.parameters['obj'] = {
    in: 'body',
    description: '',
    required: true,
    schema: { $ref: "#/definitions/AddUser" }
    } */
    const newUser = {
    name: req.body.name,
    address: req.body.address,
    country: req.body.country
    };

    User.createUser(newUser, (err, result) => {
    if (err) throw err;
    res.json({ message: '成功建立使用者',newUser,result});
    });
    };
    //修改立單一
    exports.updateUser = (req, res) =>
    {
    /* #swagger.tags = ['修改單一使用者']
    #swagger.description = '' */
    /* #swagger.parameters['obj'] = {
    in: 'body',
    description: '',
    required: true,
    schema: { $ref: "#/definitions/AddUser" }
    } */
    const updatedUser = {
    name: req.body.name,
    address: req.body.address,
    country: req.body.country
    };

    User.updateUser(req.params.id, updatedUser, (err, result) => {
    if (err) throw err;
    res.json({ message: '成功更新使用者',updatedUser,result});
    });
    };
    //刪除單一
    exports.deleteUser = (req, res) =>
    {
    /* #swagger.tags = ['刪除單一使用者']
    #swagger.description = '' */
    User.deleteUser(req.params.id, (err, result) => {
    if (err) throw err;
    res.json({ message: '成功刪除使用者!',result });
    });
    };

    swagger.js
    definitionss內的AddUser是預設參數

    1
    2
    3
    4
    5
    6
    7
    8
    9
    10
    11
    12
    13
    14
    15
    16
    17
    18
    19
    20
    21
    22
    23
    24
    25
    26
    27
    28
    29
    30
    31
    32
    33
    34
    35
    36
    37
    const swaggerAutogen = require('swagger-autogen')();
    //內容
    const doc = {
    info: {
    "version": "1.0.0",
    "title": "Node Mysql Restful Api",
    description: "larahuang2024/06/29"
    },

    host:['localhost:3000'], //"localhost:3000"
    basePath: "/",
    schemes: ['http'],//, 'https
    consumes: ['application/json'],
    produces: ['application/json'],
    //安全定義
    securityDefinitions: {

    apiKeyAuth:{
    type: "apiKey",
    in: "header",
    name: "Authorization",
    description: ""
    }
    },
    //定義
    definitions: {
    AddUser: {
    $name: "Lara",
    $address: '三重',
    $country: '新北市'
    },

    }
    }
    const outputFile = './swagger.json';
    const endpointsFiles = ['./index.js'];
    swaggerAutogen(outputFile, endpointsFiles,doc);