Vite 單元測試設置

  • Vitest Config 設定方式
  • 透過 vitest.config.js 檔案調整測試設定
  • 執行 npm 指令時帶參數指定設定檔案路徑
  • 直接在原先 vite.config.js 中調整

Vitest config option

Vitest config調整什麼?

  • include
    • Type:string[]
    • 預設值:['**/*.{test,spec}.{js,mjs,cjs,ts,mts,cts,jsx,tsx}']
    藉由這個欄位我們可以提供 glob 格式讓 vitest 去比對哪些是測試檔案,也可以放入多個條件在陣列中。
    1
    2
    3
    4
    5
    6
    import { defineConfig } from 'vitest/config'
    export default defineConfig({
    test: {
    include: ['**/*.spec.js'],
    },
    })
    這個設定主要會影響到後續我們要如何擺放測試程式碼,因此做規劃時可以按需求考量調整。
  • exclude
    • Type: string[]
    • 預設值: ['**/node_modules/**', '**/dist/**', '**/cypress/**', '**/.{idea,git,cache,output,temp}/**']
    藉由這個欄位我們可以提供 glob 格式讓 vitest 去排除哪些不是測試檔案,也可以放入多個條件在陣列中。
    1
    2
    3
    4
    5
    6
    7
    import { defineConfig } from 'vitest/config'

    export default defineConfig({
    test: {
    exclude: ['**/node_modules/**', '**/dist/**', '**/cypress/**', '**/.{idea,git,cache,output,temp}/**'],
    },
    })
    與 include 相反,這次則是要排除哪些路徑不需要尋找是否有測試檔案,其中如果有用到 cypress 做 E2E 測試的話,預設規則中就已經有另外排除了,所以沒必要的話不必特別設置,但可以先記得有這個方便的欄位。
  • <li><b>Globals</b>
        <div> 
            <ul>
                <li>Type:boolean</li>
                <li>預設值: false</li>
            </ul>
            由於在撰寫測試時,Vitest 預設是需要自己按需要引入對應的方法等等,如果要類似像 Jest 以全域的方式注入到測試中,就可以透過在執行時加上 --globals 選項,或是在 vitest config 選項中加入 globals: true 。
            <div>
            
    1
    2
    3
    4
    5
    6
    import { defineConfig } from 'vitest/config'
    export default defineConfig({
    test: {
    globals: true,
    },
    })
    <div> 原先設定前,測試程式碼需要如下方引入:
    1
    2
    3
    4
    5
    6
    7
    import { describe, it, expect } from 'vitest'

    describe('HelloWorld', () => {
    it('1 + 1 should be 2', () => {
    expect(1 + 1).toBe('2')
    })
    })
    </div> <div> 加入 Globals: true 後,就不需要顯示引入 vitest 測試相關的 API,讓測試看起來更乾淨:
    1
    2
    3
    4
    5
    describe('HelloWorld', () => {
    it('1 + 1 should be 2', () => {
    expect(1 + 1).toBe('2')
    })
    })
    </div> </div> </div> </li> <li><b>environment</b> <div> <ul> <li>Type:'node' | 'jsdom' | 'happy-dom' | 'edge-runtime' | string</li> <li>預設值: 'node'</li> </ul> <div> 由於 Vitest 本身默認環境 Node.js,因此若要在測試中仿造瀏覽器的應用程式,可以透過類似 jsdom 等工具來取代,而已經介紹過的npm 指令的寫法之外 -environment jsdom ,還可以在測試檔案上以 docblock 或 comment 風格的方式註記。 </div> <div> Docblock 風格:
    1
    2
    3
    4
    5
    6
    7
    /*** @vitest-environment jsdom*/

    it('use jsdom in this test file', () => {
    const element = document.createElement('div')
    element.innerHTML = '<p>Hello, HTML!</p>'
    expect(element.innerHTML).toBe('<p>Hello, HTML!</p>')
    })
    </div> <div> Comment 風格:
    1
    2
    3
    4
    5
    6
    // @vitest-environment jsdom
    it('use jsdom in this test file', () => {
    const element = document.createElement('div')
    element.innerHTML = '<p>Hello, HTML!</p>'
    expect(element.innerHTML).toBe('<p>Hello, HTML!</p>')
    })
    </div> <div> 寫在 vitest config 中:
    1
    2
    3
    4
    5
    6
    7
    import { defineConfig } from 'vitest/config'

    export default defineConfig({
    test: {
    environment: 'jsdom',
    },
    })
    </div> </div> </li>
### 透過 vitest.config.js 檔案調整測試設定完整語法 專案src/test/config/新增vitest.config.js
1
2
3
4
5
6
7
8
9
10
11
12
13
14
import { defineConfig } from 'vitest/config'
import vue from '@vitejs/plugin-vue'
export default defineConfig({
plugins: [
vue(),
],
test: {
// 在這裡加入測試設定
include: ['**/*.spec.js'],
// 全域
globals: true,//就不需要顯示引入 vitest 測試相關的 API,讓測試看起來更乾淨
environment: 'jsdom',
},
})
### 執行 npm 指令時帶參數指定設定檔案路徑 package.json script加上(修改)設定./src/test/config/vitest.config.js是剛剛新增的vitest.config.js
1
2
3
"scripts": {
"test:unit": "vitest --config ./src/test/config/vitest.config.js",
},

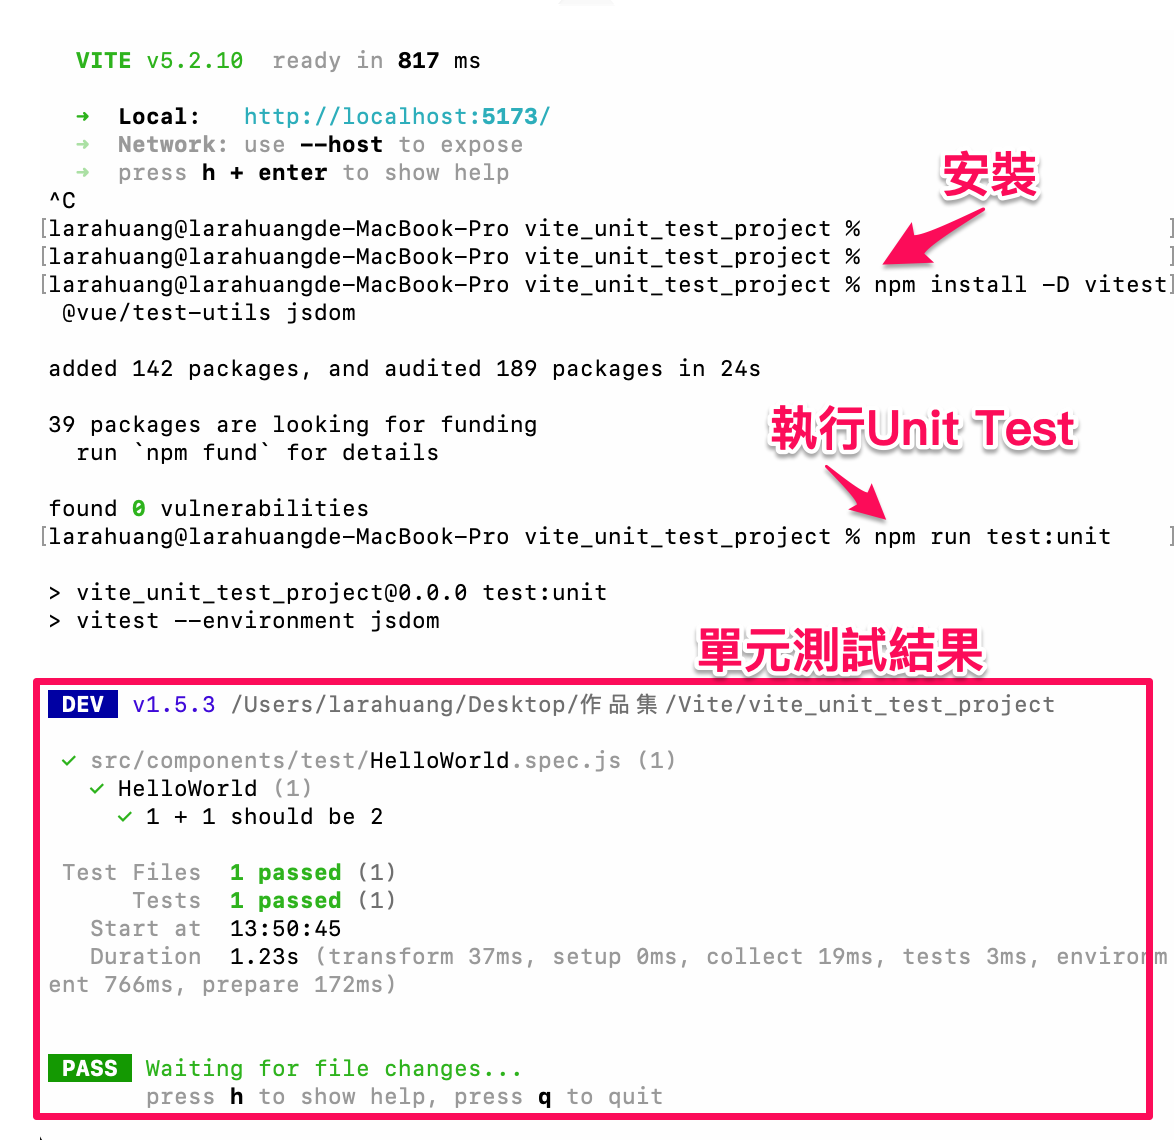
執行 test

1
npm run test:unit

github

測試價值

  1. 製作一個簡易的測試工具
  2. 寫測試案例
  3. 寫受測程式碼的實作

簡易的測試工具

1
expect(受測物).toBe(預期狀態)
  • 回傳 true 表示測試成功 (即為最終狀態與預期狀態相同)
  • 回傳 false 表示測試失敗 (即為最終狀態與預期狀態不同),然後加上 error 提示預期狀態應該要是什麼,最終狀態目前是什麼。
宣告函式 expect,參數則是預計輸入受測物(input);再來工具本身呼叫時需回傳了一個叫做 toBe 的驗證方法,該驗證方法的參數為預期目標(expected);接著設計該驗證的方法,使其能夠回應測試的結果
1
2
3
4
5
6
7
8
9
10
const expect = (input) => {
// 接著設計該驗證的方法,使其能夠回應測試的結果
const toBe = (expected) => input === expected
return {
toBe
}
}
//現在我們透過網頁瀏覽器的 devtool console 控制台,就可以透過該測試工具做簡易的測試案例了
expect(1 === 1).toBe(true)
expect(2 !== 1).toBe(true)
但我們希望他能夠在測試案例失敗的時候回應一下當下預期與結果的狀況,後續我們才能針對紀錄的結果做修正。因此我們再修改一下測試方法:
1
2
3
4
5
6
7
8
9
10
const expect = (input) => {
const handleOnError = (result, expected) => {
console.error(`測試失敗:預期應該為 ${expected},結果現在為 ${result}`)
return false
}
const toBe = (expected) => input === expected ? true : handleOnError(input, expected)
return {
toBe
}
}
再執行一個故意寫錯的測試案例:
1
expect(2 === 1).toBe(true)

實際一點的例子說明;有個登入的表單元件
測試案例在 Vitest 工具中主要便是透過 describe 與 it(或 test) 來撰寫

錯誤的相關資訊:

  • FAIL:發生斷言錯誤檔案路徑 + 情境描述 + 案例描述(視當下錯誤所屬的情境與案例)
  • AssertionError:發生斷言錯誤的原因,與發生錯誤的段落
  • Expected:預期結果
  • Received:實際結果

綜合結果:

  • Test Files:總共測試了幾隻測試檔案,並顯示成功、失敗與跳過的數量
  • Tests:總共測了幾個測試案例,並顯示成功、失敗與跳過的數量
  • Start:測試開始時間
  • Duration:測試過程總共耗費時間
請看單元測試結果
1
2
3
4
5
6
7
8
9
10
11
12
13
14
15
16
describe('登入元件', () => {
// Happy Path
it('輸入正確帳號密碼,應登入到OO頁面', () => {
// ...
})
// Sad Path
it('只輸入帳號,應該顯示請輸入密碼', () => {
// ...
})
it('只輸入密碼,應該顯示請輸入帳號', () => {
// ...
})
it('輸入錯誤帳號密碼,應該顯示登入資訊錯誤', () => {
// ...
})
})
允許巢狀的方式來建構測試
1
2
3
4
5
6
7
8
9
10
11
12
13
14
15
describe('父層情境', () => {
describe('基於父層情境的情境一', () => {
it('測試案例', () => {
// ...
})
})
describe('基於父層情境的情境二', () => {
it('測試案例', () => {
// ...
})
it('出現提示寄件者姓名與電話將直接註冊成會員', () => {
// ...
})
})
})

describe & it 輔助 API

  • .only:測試情境、測試案例皆可使用
  • .skip:測試情境、測試案例皆可使用
  • .todo:測試情境、測試案例皆可使用
  • .fails:測試案例才能使用

only

若在測試情境用了此指令,則在同個測試檔案中只會執行帶有 .only 的測試情境,而其餘測試情境底下所有的測試案例將會被跳過(skipped):
1
2
3
describe.only('測試情境 1', () => { /* */ })
describe('測試情境 2', () => { /* */ }) // skipped
describe('測試情境 3', () => { /* */ }) // skipped
若在測試案例中使用,則除了帶有 .only 之外的測試案例都將會被跳過:
1
2
3
4
5
6
7
8
9
10
11
describe('測試情境 1', () => {
it.only('測試案例', () => { /* */ })
it('測試案例', () => { /* */ }) // skipped
})

describe('測試情境 2', () => {
it.only('測試案例', () => { /* */ })
it('測試案例', () => { /* */ }) // skipped
})

describe('測試情境 3', () => { /* */ }) // skipped

skip

測試情境或測試案例被標注時,將自動跳過該範疇內的測試案例:
1
2
3
4
5
6
7
8
9
describe.skip('測試情境 1', () => {
it('測試案例', () => { /* */ }) skipped
it('測試案例', () => { /* */ }) // skipped
})

describe('測試情境 2', () => {
it('測試案例', () => { /* */ })
it.skip('測試案例', () => { /* */ }) // skipped
})

todo

測試情境或測試案例被標注時,同樣將自動跳過該範疇內的測試案例,但 todo 含義比較接近待加入測試的區塊,並且將來若產出報告時也會特別整理出還有哪些地方需要補上測試。

fails

最後一個介紹的是測試案例才能使用的輔助 API,還記得列測試案例時的 sad path 嗎?當測試案例應該要失敗的時候就可以透過 fails 顯性標註他們:
1
2
3
4
it.fails(`'1' + '1' should not to be '11'`, () => {
const add = (x, y) => Number(x) + Number(y)
expect(add('1', '1')).toBe('11')
})
當然你也可以單純藉由斷言中的 .not 達到同樣的效果:
1
2
3
4
it(`'1' + '1' should not to be '11'`, () => {
const add = (x, y) => Number(x) + Number(y)
expect(add('1', '1')).not.toBe('11')
})
準備(Setup)與清理(Teardown)
  • beforeEach:在每個測試案例執行前呼叫一次
  • beforeAll:在所有測試案例執行前呼叫一次
  • afterEach:在每個測試案例執行後呼叫一次
  • afterAll:在所有測試案例執行後呼叫一次
1
2
3
4
beforeEach(() => {
// 針對測試案例重新初始化
initTestEnv()
})
Setup & Teardown API 的範疇
Setup & Teardown API 「所有」的定義是根據當下的範疇(context)來決定,除了測試檔案本身之外,使用 describe 來定義測試情境也會形成一個 context,因此假如測試情境有巢狀的情況如下:
1
2
3
4
5
6
7
8
9
10
11
12
13
14
15
16
17
18
19
20
21
22
23
24
25
26
27
28
29
30
31
32
33
34
35
36
37
38
39
40
41
42
43
44
45
46
47
48
49
50
51
52
53
54
55
const history = []
describe('父層情境', () => {
beforeAll(() => {
history.push('beforeAll - 父層情境')
})
beforeEach(() => {
history.push('beforeEach - 父層情境')
})
afterAll(() => {
history.push('afterAll - 父層情境')
})
afterEach(() => {
history.push('afterEach - 父層情境')
})
describe('子層情境 A', () => {
beforeAll(() => {
history.push('beforeAll - 子層情境 A')
})
beforeEach(() => {
history.push('beforeEach - 子層情境 A')
})
afterAll(() => {
history.push('afterAll - 子層情境 A')
})
afterEach(() => {
history.push('afterEach - 子層情境 A')
})
it('案例 1', () => {
history.push('子層情境 A 案例 1')
})
it('案例 2', () => {
history.push('子層情境 A 案例 2')
})
})
describe('子層情境 B', () => {
beforeAll(() => {
history.push('beforeAll - 子層情境 B')
})
beforeEach(() => {
history.push('beforeEach - 子層情境 B')
})
afterAll(() => {
history.push('afterAll - 子層情境 B')
})
afterEach(() => {
history.push('afterEach - 子層情境 B')
})
it('案例 1', () => {
history.push('子層情境 B 案例 1')
})
it('案例 2', () => {
history.push('子層情境 B 案例 2')
})
})
})

此時將透過 console.log(history) 查看並歸納整理就能得到以下結果:

1
2
3
4
5
6
7
8
9
10
11
12
13
14
15
16
17
18
19
20
21
22
23
24
25
26
27
28
29
30
31
32
33
34
35
--- 進入測試程式碼本身的 Context
--- 進入父層情境的 Context
beforeAll - 父層情境
--- 進入子層情境 A 的 Context
beforeAll - 子層情境 A
beforeEach - 父層情境
beforeEach - 子層情境 A
子層情境 A 案例 1 // 執行 情境 A 案例 1 的時間點
afterEach - 子層情境 A
afterEach - 父層情境
beforeEach - 父層情境
beforeEach - 子層情境 A
子層情境 A 案例 2 // 執行 情境 A 案例 2 的時間點
afterEach - 子層情境 A
afterEach - 父層情境
afterAll - 子層情境 A
--- 離開子層情境 A 的 Context

--- 進入子層情境 B 的 Context
beforeAll - 子層情境 B
beforeEach - 父層情境
beforeEach - 子層情境 B
子層情境 B 案例 1 // 執行 情境 B 案例 1 的時間點
afterEach - 子層情境 B
afterEach - 父層情境
beforeEach - 父層情境
beforeEach - 子層情境 B
子層情境 B 案例 2 // 執行 情境 B 案例 2 的時間點
afterEach - 子層情境 B
afterEach - 父層情境
afterAll - 子層情境 B
--- 離開子層情境 B 的 Context
afterAll - 父層情境
--- 離開父層情境的 Context
--- 離開測試程式碼本身的 Context
避免誤區:在 expect 後做清掃處理
除了上面的用法,有時候你可能會認為既然要清掃,那我何不在斷言後處理就好呢:
1
2
3
4
5
6
7
describe('', () => {
it('', () => {
expect().toBe()
// 在這裡做清除
resetTestingEnv()
})
})
這麼做當你在測試案例都是通過的情況下都沒有問題,但是一但某個測試案例發生了錯誤,由於測試案例就會在斷言時拋出 AssertionError 後停止,因此很有可能因為一個測試案例壞了導致接下來所有測試都受到影響:
1
2
3
4
5
6
7
8
9
10
11
12
13
14
15
16
17
18
describe('', () => {
it('', () => {
expect().toBe() // AssertionError,這個測試案例就停在這了
resetTestingEnv()
})
it('', () => {
// 在沒有經過 `resetTestingEnv()` 下進行測試
})
it('', () => {
// 在沒有經過 `resetTestingEnv()` 下進行測試
})
it('', () => {
// 在沒有經過 `resetTestingEnv()` 下進行測試
})
it('', () => {
// 在沒有經過 `resetTestingEnv()` 下進行測試
})
})
因此較佳的作法還是使用 Setup & Teardown API 來處理會比較好:
1
2
3
4
5
6
7
8
9
10
11
12
13
describe('', () => {
beforeEach('', () => {
setupTestingEnv()
})
afterEach('', () => {
resetTestingEnv()
})
it('', () => {})
it('', () => {})
it('', () => {})
it('', () => {})
it('', () => {})
})
避免過度使用 Setup & Teardown API
抽象光譜(The Spectrum of Abstraction)
Setup & Teardown:beforeAll, beforeEach, AfterAll & AfterEach 】斷言(Assertion)上篇:斷言語法與 Matchers 斷言(Assertion)下篇: 替身、快照(Snapshot)與拋出錯誤

第一個測驗:測試情境案例、Setup & Teardown 與 Matchers
測試工具: Vue Test Utils 與元件測試
元件測試:容器(Wrapper)
元件測試:容器方法(Wrapper methods)-選擇器與陷阱
元件測試:容器方法(Wrapper methods)-取得目標資訊
元件測試:容器方法(Wrapper methods)-模擬事件
元件測試:模擬 Vue APIs(data, props)
元件測試:模擬 Vue APIs(slots, custom directives)
第二個測驗:容器(Wrapper)與容器方法(Wrapper methods)

Vue3語法糖-emit子對父傳值

父元件程式碼如下

  • 引入ref,申明宣告,接收子傳給父的數據
  • 接收子傳給父的數據放於template
  • 在template 子組件childClick=>子組件設定的觸發事件childClick
1
2
3
4
5
6
7
8
9
10
11
12
13
14
15
16
17
18
<template>
<!--子對父傳值時-->
<child @childClick="childValFn"/>
<div>{{ childData }}</div>
</template>

<script setup lang="ts">
import { ref } from 'vue'
// 引入子元件
import child from './child.vue'

const childData = ref(null)
const childValFn = (e: any) => {
//接收子组件傳遞给父组件的值
childData.value = e.value
}
</script>

子元件程式碼如下

1
2
3
4
5
6
7
8
9
10
11
12
13
14
15
16
17
18
<template>
<div>
<!--子對父傳值時-->
<button class="el-button el-button--success" @click="toEmit">子组件向外傳遞數據</button>
</div>
</template>
<script setup>
//Vue3.2 版本后 defineProps 和 defineEmits 無需再導入
import {ref} from 'vue'

const childrenSay = ref('我是小孩')
const emits = defineEmits(['childClick'])
//點擊事件,向父組件傳值
const toEmit = () => {
// 觸發父組件事件childClick攜帶參數
emits('childClick', childrenSay)
}
</script>

語法糖子對父傳值

Vue3語法糖-props父傳子

父元件程式碼如下

  • 新增子組件,引入子組件
  • 引入ref
  • 申明宣告父對子傳值數據
  • 在子組件將數據傳遞,:name="name" :list="lists"
1
2
3
4
5
6
7
8
9
10
11
12
13
14
15
16
17
18
19
<template>
<div>
<child :name="name" :list="lists"/>
</div>
</template>

<script setup lang="ts">
import {ref} from 'vue'
// 引入子元件
import child from './child.vue'
const name = ref('小叮噹')
const lists = ref([
{id:110,name:'狂徒'},
{ id: 111, name: '上班族' },
{id:112,name:'自由業'}
])
</script>


子元件程式碼如下

  • 新增子組件,引入子組件
  • 引入defineProps(Vue3.2 版本后 defineProps 和 defineEmits 無需再導入)
  • 申明宣告props,欄位type
  • 在子組件將數據傳遞,:name="name" :list="lists"
1
2
3
4
5
6
7
8
9
10
11
12
13
14
15
16
17
18
19
20
21
22
23
24
25
26
27
28
29
<template>
<div>
<!--父對子傳值時-->
<span>{{props.name}}</span>
<ul>
<li v-for="(item, id) in list" :key="id">
{{ item.name }}
</li>
</ul>
</div>
</template>

<script setup lang="ts">
//Vue3.2 版本后 defineProps 和 defineEmits 無需再導入
//import { defineProps } from 'vue'
// 宣告props
const props = defineProps({
name: {
type: String,
default: '11'
},
list: {
type: Array,
default: '11'
}

})

</script>

父對子

Vue3語法糖-provide 和 inject

父组件代碼如下

  • 引入provide
  • 申明宣告
1
2
3
4
5
6
7
8
9
10
11
<template>
<Inject></Inject>
</template>

<script setup lang="ts">
import { ref,provide } from 'vue';
import Inject from '../components/Inject.vue';
const title = ref('這是provide to jnject')
provide('title',title)
</script>

子組件代碼如下

  • 引入inject
  • 引入孫組件
  • 申明宣告inject
1
2
3
4
5
6
7
8
<template>
{{ sendTitle }}
</template>

<script setup lang="ts">
import { ref, inject } from 'vue';
const sendTitle =inject('title')
</script>

孫組件代碼如下

1
2
3
4
5
6
7
8
9
10
11
12
13
<template>
<div>
<div>Model</div>
<h3>{{ data }}</h3>
</div>
</template>

<script setup lang="ts">

import { inject } from 'vue'

const data = inject('data')
</script>

provide & inject

Vue3語法糖-路useRoute和useRouter

$route 路由信息對象,path,parms,has,query
$router路由實例對象,路由的跳轉,鉤子涵數

Vue3語法糖-路useRoute和useRouter

  • params(動態路由)路由設定參數params 可以不顯示在 URL 裏
  • 重刷頁面後會失去 params 資料,但 query 資料仍存在
1
2
3
4
5
6
7
8
9
10
11
12
13
14
15
16
17
18
19
20
21
22
23
24
25
26
<template>
<div>
<ul>
<li @click.prevent="$router.push('/admin')">教師列表</li>
<li @click.prevent="$router.push('/admin/schedules')">教師課程表</li>
<li @click="handleSignOut">登出</li>
</ul>
</div>
</template>

<script setup>
import { useRoute, useRouter } from 'vue-router'
// 申明
const route = useRoute()
const router = useRouter()
// 獲取query
console.log(route.query)
// 獲取params
console.log(route.params)
// 路由跳轉
router.push({
path: `/index`
})
//router.push('/admin/index')
//router.push(`talk/${item.id}`)
</script>

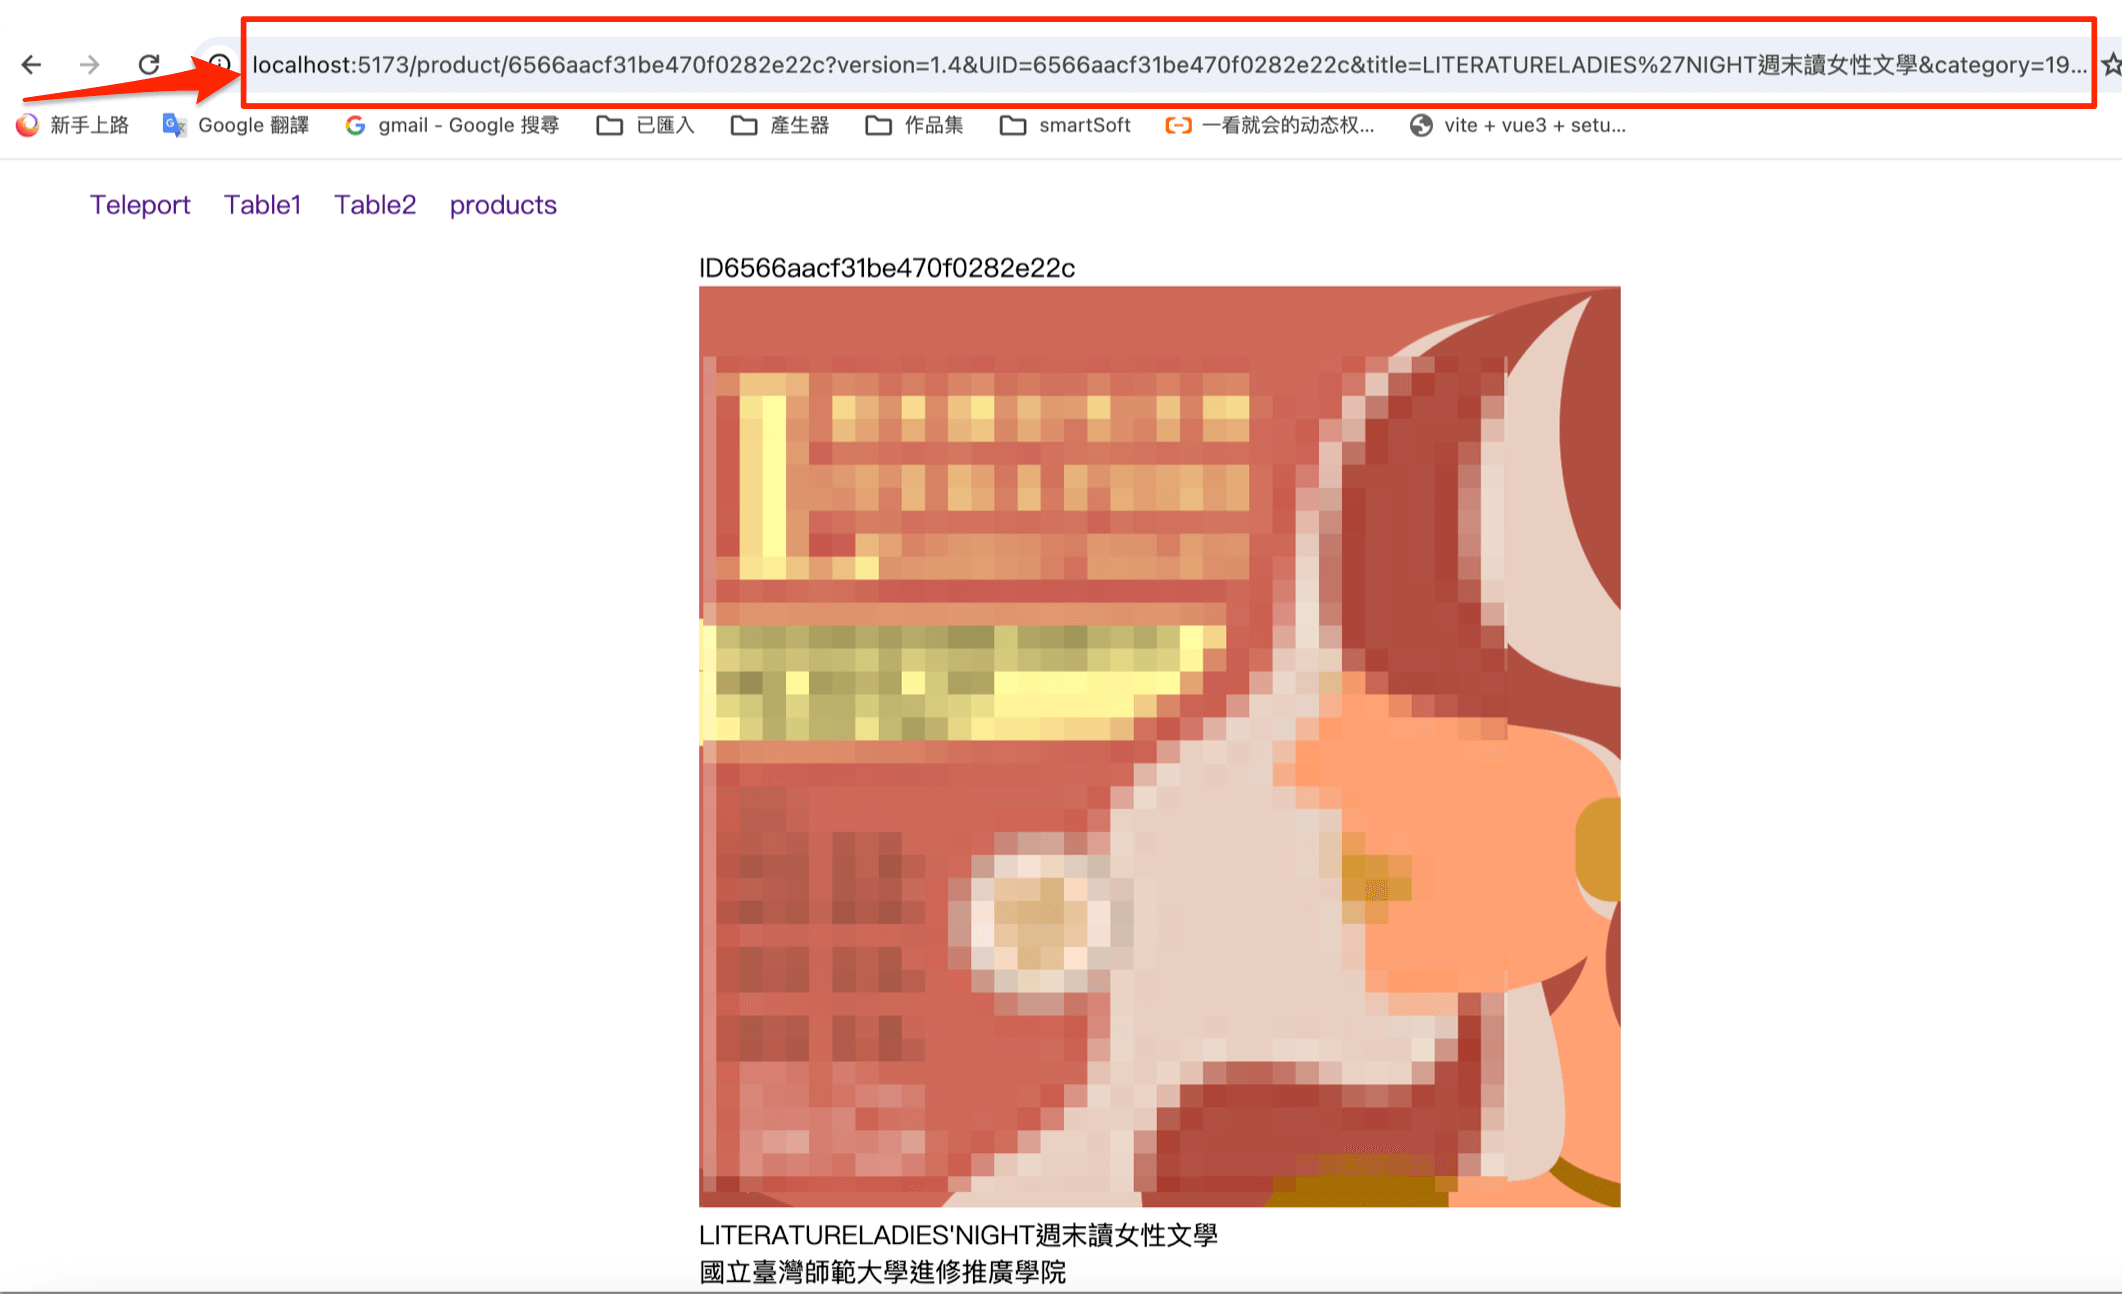
範例query 傳參數

openItem(item)函式打開 傳query到網址
products.vue

1
2
3
4
5
6
7
8
9
10
11
12
13
14
15
16
17
18
19
20
21
22
23
24
25
26
27
28
29
30
31
32
33
34
35
36
37
38
39
40
41
42
43
44
45
46
47
<template>
<div class="products">
<div class="item"
v-for="(item,index, UID) in lists" :key="UID">
<a @click="openItem(item)"> <div class="card">
<img :src="item.imageUrl">
{{ item.title }}
</div></a>
</div>
</div>
</template>

<script setup lang="ts">
import axios from 'axios';
import { ref, onMounted } from 'vue';
import { useRoute, useRouter } from 'vue-router';
import { listType } from '@/types/productsType';

const router = useRouter();
const openItem = (item: any ) => {
console.log(item.UID)
router.push({
path: `/product/${item.UID}`,
query: item,
})
}
const lists = ref<listType[]>([]);
// 獲取資料
const getData = async () => {
try {
const api = "https://cloud.culture.tw/frontsite/trans/SearchShowAction.do?method=doFindTypeJ&category=200";
await axios.get(api)
const res = await axios.get(api);
console.log('culture', res.data, typeof res.data[0].masterUnit
, 'otherUnit', typeof res.data[0].otherUnit, 'showInfos', typeof res.data[0].showInfo);
if (res.status === 200) {
lists.value = res.data;
}

} catch (error) {
console.log(error)
}
}
onMounted(() => {
getData();
})
</script>

@/types/productsType.ts 的type 屬性

1
2
3
4
5
6
7
8
9
10
11
12
13
14
15
16
17
18
19
20
21
22
23
export interface listType {
UID?: string;
category?: string;
comment?: string;
descriptionFilterHtml?: string;
discountInfo?: string | any;
editModifyDate?: string;
endDate?: string;
hitRate?: number;
imageUrl?: string;
masterUnit?: object;
otherUnit?: object;
showInfo?: object;
showUnit?: string;
sourceWebName?: string | any;
sourceWebPromote?: string;
startDate?: string | any;
subUnit?: object;
supportUnit?: object;
version?: string;
title?: string | any;
webSales?: string;
}

query 傳參數

product.vue

1
2
3
4
5
6
7
8
9
10
11
12
13
14
15
16
17
18
19
20
<template>
<div style="width:40%;max-width:40%;margin:auto">
<div>ID{{ route.query?.UID }}</div>
<img style="width:100%;max-width:100%" :src="route.query.imageUrl">
<div>{{ route.query?.title }}</div>
<div>{{ route.query.masterUnit[0]}}</div>
</div>
</template>

<script setup lang="ts">
import { ref, onMounted } from 'vue'
import { useRoute } from 'vue-router';
const route = useRoute();
onMounted(() => {
const id = route.params.id;
console.log('讀取動態參數id', id)
console.log('route.query.UID', route.query.UID)
})
</script>

  • 使用 useRoute 的 query
接受参数

範例params 傳動態參數

  • params使用name
1
2
3
4
5
6
7
8
9
10
11
12
13
14
15
16
17
18
19
20
21
22
23
24
25
26
27
28
29
30
31
32
33
34
35
36
37
38
39
40
41
42
43
44
45
46
47
48
49
50
<template>
<div class="products">
<div class="item"
v-for="(item,index, UID) in lists" :key="UID">
<a @click="openItem(item)"> <div class="card">
<img :src="item.imageUrl">
{{ item.title }}
</div></a>
</div>
</div>
</template>

<script setup lang="ts">
import axios from 'axios'
import { ref, onMounted } from 'vue'
import { useRoute, useRouter } from 'vue-router';
import { listType } from '@/types/productsType';
const route = useRoute();
const router = useRouter()

const openItem = (item: any ) => {
console.log(item.UID)
router.push({
name:'Product',//params使用name 傳參數
params:{id:item.UID},
})
}
const lists = ref<listType[]>([]);
const getData = async () => {
try {
const api = `${import.meta.env.VITE_API_URL}/frontsite/trans/SearchShowAction.do?method=doFindTypeJ&category=200`;
await axios.get(api)
const res = await axios.get(api);
console.log('culture', res.data, typeof res.data[0].masterUnit
, 'otherUnit', typeof res.data[0].otherUnit, 'showInfos', typeof res.data[0].showInfo);
if (res.status === 200) {
lists.value = res.data;
}

} catch (error) {
console.log(error)
}

}
onMounted(() => {
getData();
const id = route.params.id;
console.log('讀取動態參數id',id)
})
</script>
接收參數:使用 useRoute 的 params product.vue
  • filterItem函式過濾typeof item.UID===route.params.id =>typeof 檢查屬性
    return singleList.value = item
1
2
3
4
5
6
7
8
9
10
11
12
13
14
15
16
17
18
19
20
21
22
23
24
25
26
27
28
29
30
31
32
33
34
35
36
37
38
39
40
41
42
43
44
45
46
47
48
49
<template>
<div style="width:40%;max-width:40%;margin:auto">
<div>{{ singleList.title }}</div>
<img style="width:100%" :src="singleList.imageUrl" >
<div>{{ singleList.location }}</div>
</div>
</template>

<script setup lang="ts">
import axios from 'axios'
import { ref, onMounted } from 'vue'
import { useRoute } from 'vue-router';
import { listType } from '@/types/productsType';
const route = useRoute();

const singleList = ref<any>('');
const filterItem = () => {
if (lists.value.length != 0) {
lists.value.filter((item: any) => {
console.log('typeof item.UID', typeof item.UID)
console.log('typeof route.params.id', typeof route.params.id)
if (item.UID === route.params.id) {
return singleList.value = item
}
})
}
}
const lists = ref<listType[]>([]);
const getData = async () => {
try {
const api = `${import.meta.env.VITE_API_URL}/frontsite/trans/SearchShowAction.do?method=doFindTypeJ&category=200`;
await axios.get(api)
const res = await axios.get(api);
if (res.status === 200) {
lists.value = res.data;
filterItem();

}

} catch (error) {
console.log(error)
}

}
onMounted(() => {
getData();
})
</script>


params傳參數與動態id ,過濾項目

query 與 params

項目query params
傳值配置pathname,且在 params中配置 path 無效
参数顯示在 URL 上則不一定
参数刷新頁面數據不會消失刷新頁面會消失

參考資料

Vue3語法糖-ref,reactive,onMounted

Vue3.2 版本開始使用語法糖!

script 標籤上寫上 setup!

1
$ <script setup></script>

import { ref,reactive,onMounted } from ‘vue’;

不需寫 return,直接宣告資料

1
2
3
4
5
6
7
8
9
10
11
12
13
14
15
16
17
18
19
20
21
22
23
24
25
26
27
28
29
30
31
32
33
34
35
36
37
38
39
40
41
42
43
44
45
46
47
48
49
50
51
52
53
54
55
56
57
<template>
<div id="app">
<h1 v-show="data.sayShow">{{ message }}</h1>
<button @click="open">Say hello.</button>
</div>
</template>

<script setup>
import { ref,reactive } from 'vue';
const message = ref('Hi I am Lara')
const data = reactive({
sayShow: false,
})
const open = () => {
console.log('打開')
data.sayShow = true
}
//TypeScript 型別設定
interface listType {
dt?: number | null,
message?: number | null,
cnt?: number | null,
list:any[]
}

interface weatherType {
cod?: number|null,
message?: number | null,
cnt?: number | null,
list: listType[]
}

const weathers = ref<any>();
//${ import.meta.env.VITE_API_URL }
//${ import.meta.env.VITE_API_KEY }
const getData = async () => {
const api = `${import.meta.env.VITE_API_URL}forecast?q=Taichung,tw&APPID=${import.meta.env.VITE_API_KEY }&lang=zh_tw&units=metric`
try {
const data = await fetch(api);
if (!data.ok) {
throw Error('fetch data 失敗');
}
if (data.status === 200) {
weathers.value = await data.json();
console.log(await data.json())
}
} catch (error) {
// throw Error(error?:any)
}
}


onMounted(() => {
getData();
});
</script>

附上CodePen連結
點擊

Vite Vue 目錄

Quasar Vite Vue3

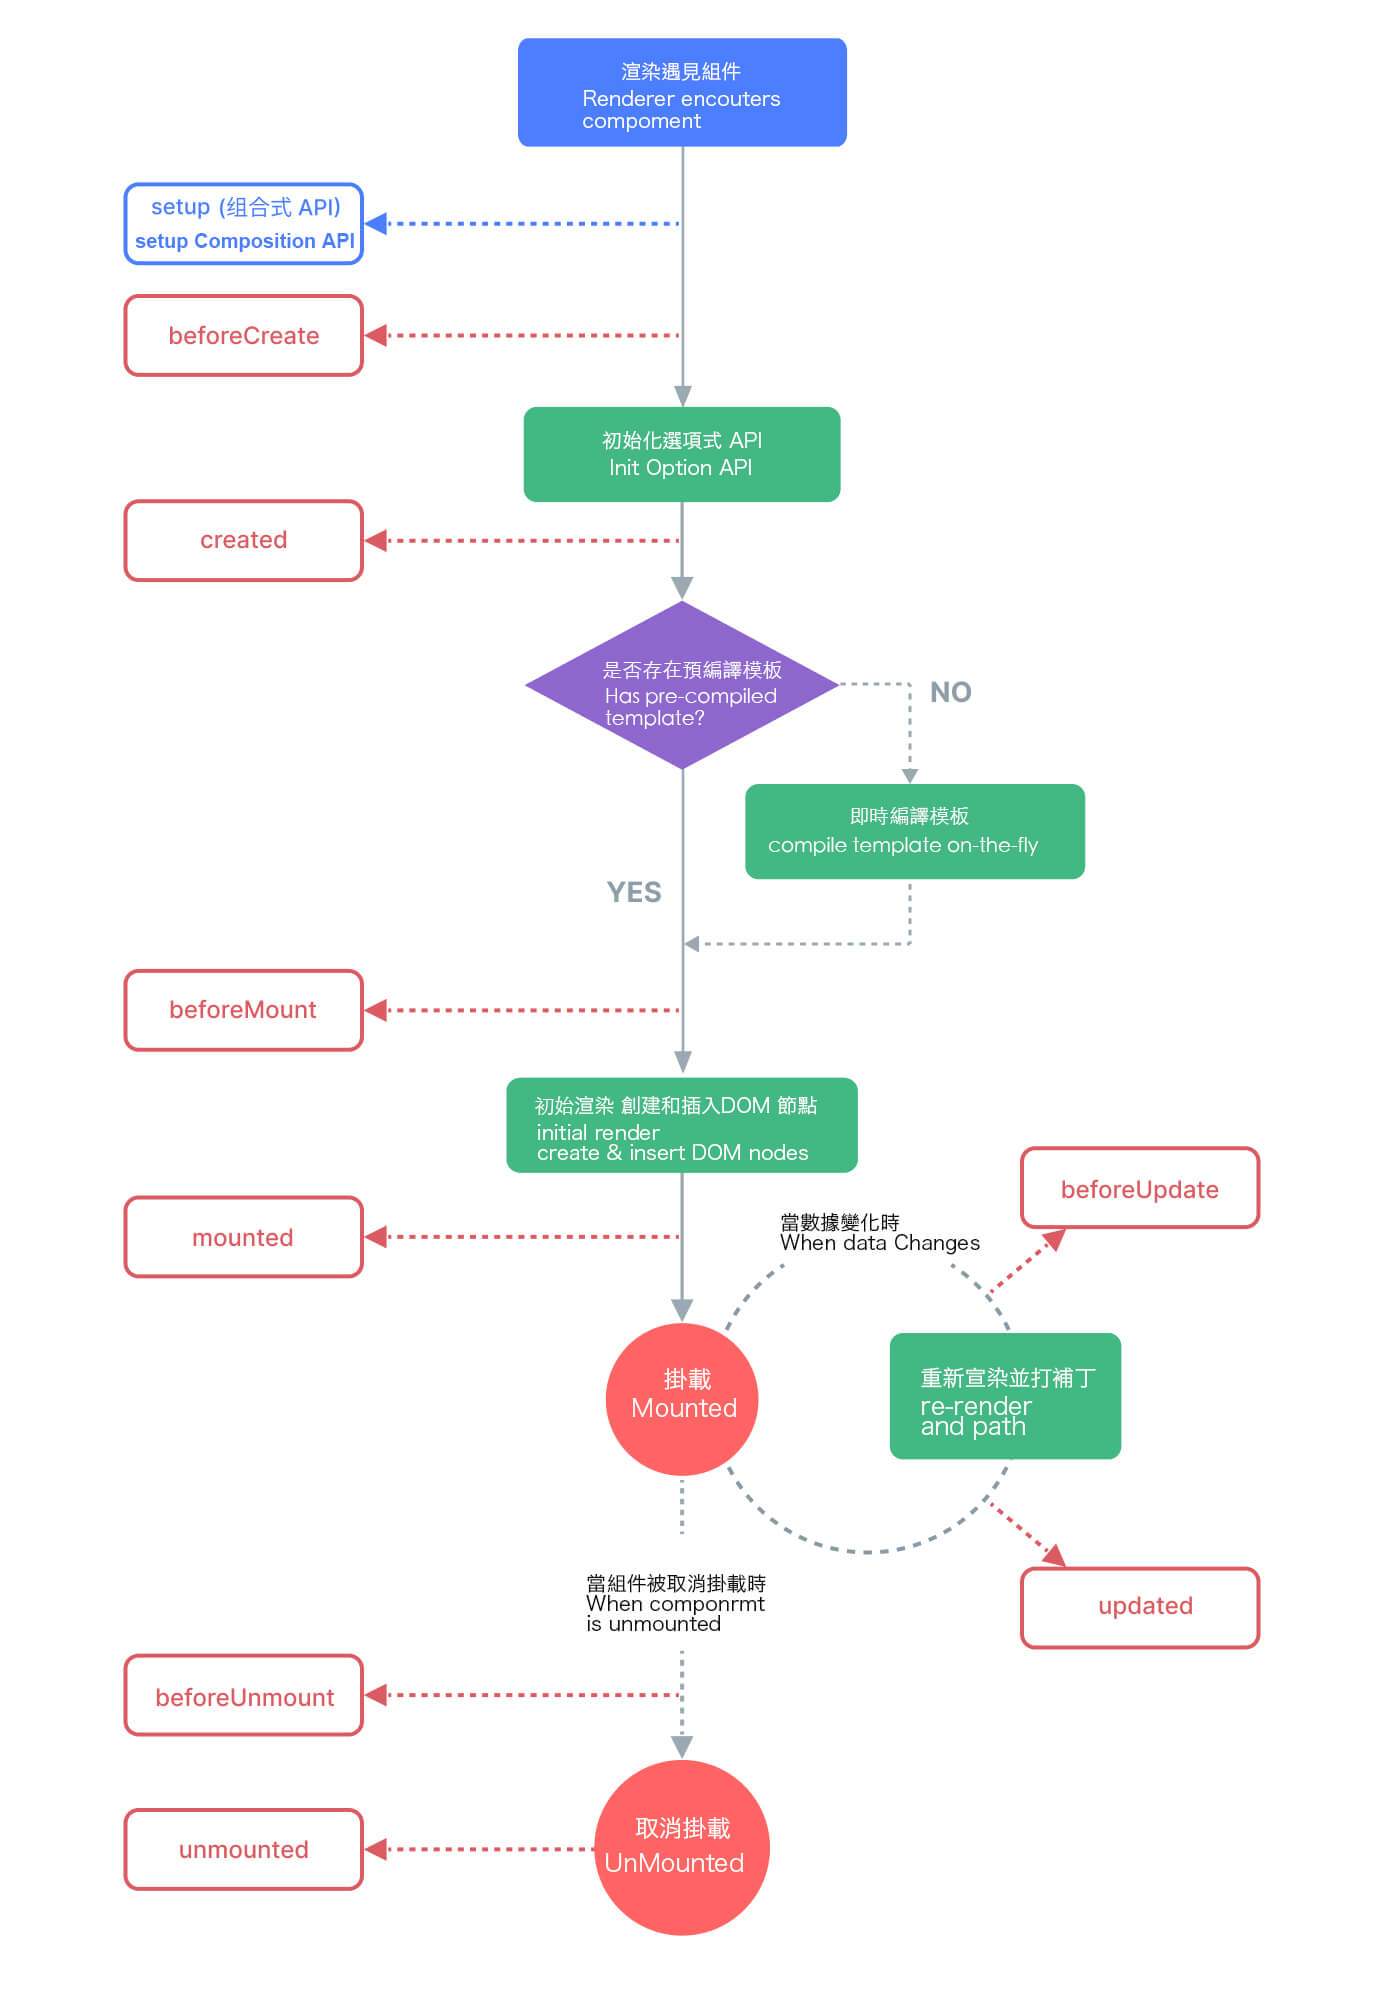
Vue3 生命週期

宣染器遇到組件 Render encounters compoment
setup API (Composition API)

beforeCreate 創建前

資料觀測和事件配置之前調用。

created 創建完成

=>初始化選項式API: inited Option API

是否有編譯模板:Has pre-complete template ?
No=> 即時編譯模板complete compoment on-the-fly

beforeMount 掛載前

初始宣染 創建與插入DOM node: init render create & insert DOM nodes

Mounted 掛載

當數據變化:When date changes

BeforeUpdate 更新前

更新渲染與補丁 re-render and path

Updated 更新完成

當組建被取消掛載:When compoment is UnMounted

BeforeUnMount 取消掛載前

UnMounted 取消掛載完成