Vite Vue 單元測試text()& html()內容物

describe:是用來將一至多組有相關的測試組合在一起的區塊。

text()& html()內容物

mount:掛載。
data-test:在html綁定。
find():使用 Document.querySelector() 的語法,find() 沒有找到目標元素時不會拋出錯誤。
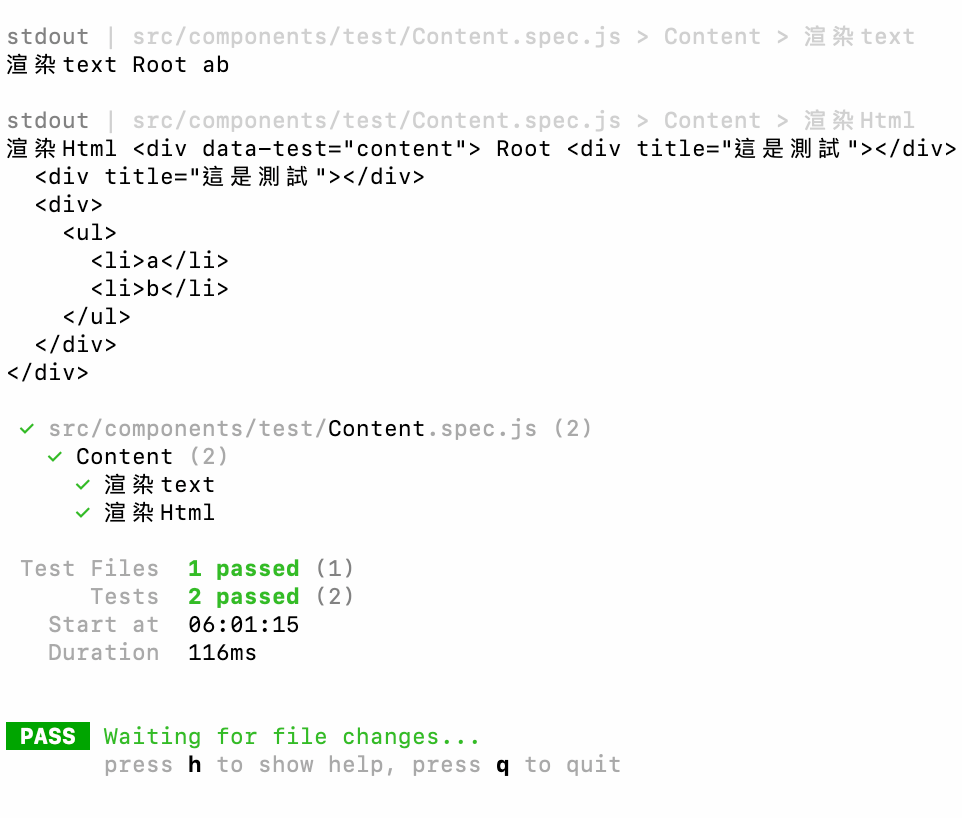
text()text內容物。
html()html內容物。

案例 text()& html()內容物 單元測試

1
2
3
4
5
6
7
8
9
10
11
12
13
14
//html
<template>
<div data-test="content">
Root
<childComponent :title="title"/>
</div>
</template>

<script setup lang="ts">
import { ref } from 'vue'
import childComponent from './Test.vue'
const title =ref<string>('這是測試')
</script>
單元測試
1
2
3
4
5
6
7
8
9
10
11
12
13
14
15
16
17
18
19
20
21
22
23
24
25
//引入描述、它、期望
import { describe, it } from 'vitest'
//引入測試實用程式
import { mount } from '@vue/test-utils'
//引入元件
import Content from '../Content.vue'

describe('Content', () =>
{
if (typeof document !== 'undefined') {
const wrapper = mount(Content)
}
it('正確渲染text', () =>{
if (typeof document !== 'undefined') {
wrapper.find('[data-test="content"]').text()
console.log(wrapper.find('[data-test="content"]').text())
}
})
it('正確渲染Html', () =>{
if (typeof document !== 'undefined') {
wrapper.find('[data-test="content"]').html()
console.log(wrapper.find('[data-test="content"]').html())
}
})
})


Vue 單元測試attributes 判斷屬性

Vite Vue 單元測試

describe:是用來將一至多組有相關的測試組合在一起的區塊

1
2
3
4
5
6
7
8
9
10
11
12
13
14
import { describe, it} from 'vitest'
import { mount } from "@vue/test-utils"

const number = 2

describe('Number', () => {
test('is 2', () => {
expect(number).toBe(2)
})

test('is even', () => {
expect(number % 2).toBe(0)
})
})
  • attributes:判斷屬性。
  • class:尋找 class 屬性
    target:尋找target 屬性
    1
    2
    3
    4
    <template>
    <a data-test="link" href="https://ithelp.ithome.com.tw/" target="_blank">ithelp</a>
    </template>

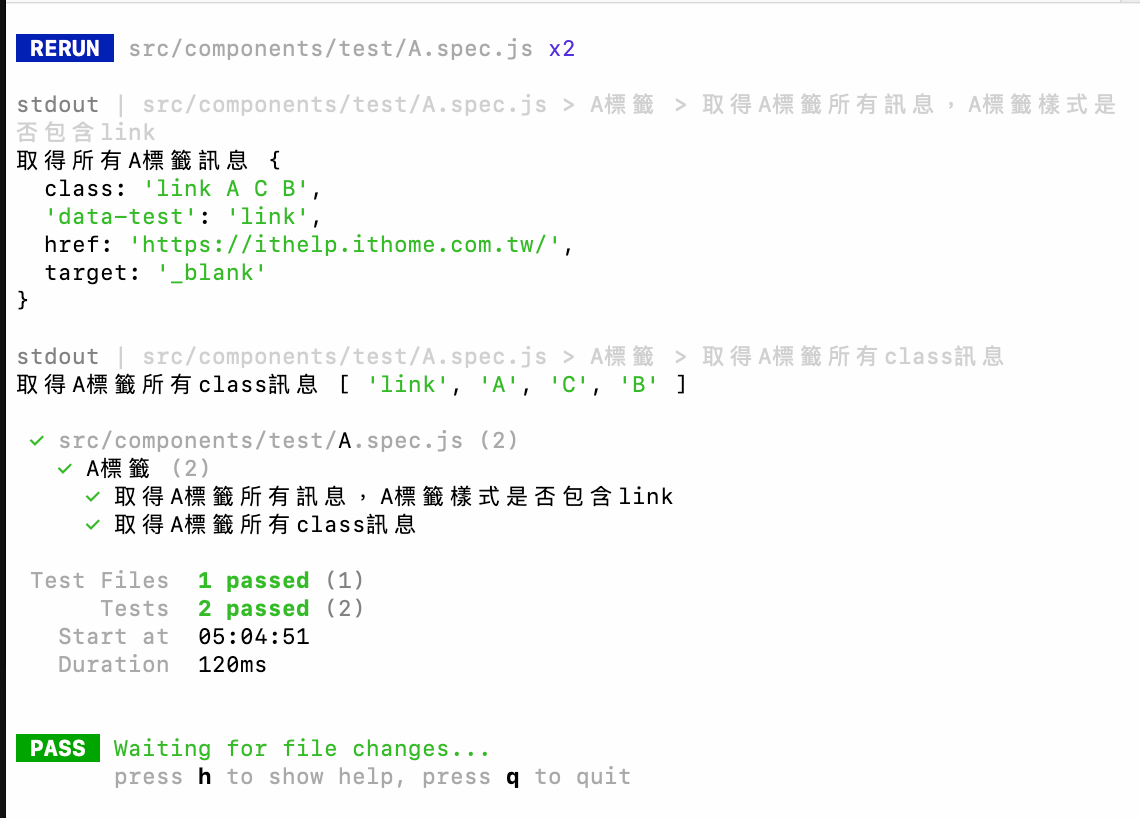
    單元測試結果
    1
    2
    3
    4
    5
    6
    7
    8
    9
    10
    11
    12
    13
    14
    15
    16
    17
    18
    19
    20
    21
    22
    23
    24
    25
    26
    27
    28
    29
    30
    31
    32
        /引入描述、它、期望
    import { describe, it, expect,expectTypeOf } from 'vitest'
    //引入測試實用程式
    import { mount } from '@vue/test-utils'
    //引入元件
    import AButton from '../A.vue'

    describe('A標籤', () =>
    {
    const href = 'https://ithelp.ithome.com.tw/'
    const target = '_blank'

    let wrapper
    if (typeof document !== 'undefined') {
    wrapper = mount(AButton, {
    props: {
    href: href,
    target: target
    }
    })
    }
    it('取得A標籤所有訊息,A標籤樣式是否包含link', () =>
    {
    if (typeof document !== 'undefined') {
    wrapper.find('[data-test="link"]').attributes()
    console.log('取得所有A標籤訊息', wrapper.find('[data-test="link"]').attributes())
    // 屬性{ href: 'https://ithelp.ithome.com.tw/', 'target': '_blank' }
    expect(wrapper.find('[data-test="link"]').classes()).toContain('link')
    // class樣式link
    }
    })
    })
    <div><b>classes:</b>語法查詢的話將得到一個陣列的結果</div>
      <div>
      
    1
    wrapper.find('[data-test="wrap"]').classes()
    </div> </li> <li><b>expect(value):</b>攥寫每一筆測試時都會使用 expect(value) 和匹配器 (matcher) 來斷言某個值,expect (value) 的參數 value 會是程式碼產生的值</li> <li><b> toBe </b>是一個匹配器</li> <li><b> html() </b>回傳元件的 HTML</li> <li><b> toContain() </b>檢查一個字符串是否是另一個字符串的子字符串,也可檢查一個項目是否在 Array 中。</li> <li><b> get() </b> get 方法來搜索現有元素:如果 get() 沒有找到目標元素,它會拋出錯誤並導致測試失敗。如果找到的話則會回傳一個 DOMWrapper。</li> <li><b>find()</b>和 get() 很像,一樣是使用 Document.querySelector() 的語法,不過差別在於 find() 沒有找到目標元素時不會拋出錯誤。</li> <li><b>exist()</b> 檢查元素是否存在。</li> <li><b> text() </b> 回傳元素的文本內容 (text content)。</li> <li><b>isVisible ()</b>專門用來檢查元素是否為隱藏的狀態:元素或元素的祖先中有 display: none、visibility: hidden、opacity:0 的樣式,收合的 <details> 標籤中,具有 hidden 屬性</li> <li><b>trigger ()</b>可以用來觸發 DOM 事件,例如 click、submit 或 keyup 等操作,值得注意的是, trigger 回傳的是一個 Promise,也因此我使用了 async & await 的方式來等待 promise resolve。</li> <li><b>emits()</b>事件通常是由子元件向父元件所觸發的</li> <li><b>vm</b>是 VueWrapper 的一個屬性,我們可以透過 vm 來取得 Vue instance,如此一來就能再透過 vm 取得 count 變數了。</li> <li><b>emitted() </b>emitted() 會回傳一個紀錄元件發出的所有事件的物件,其中也包含著 emit 的參數。</li> <li><b>toHaveProperty()</b>jest 有提供一個 toHaveProperty 的匹配器 (matcher),可以用來檢查物件中是否存在某屬性。</li> <li><b>toEqual()</b>匹配器會去比較物件的所有屬性或陣列的所有元素是否相等。</li>

mount:透過 mount() 產生一個已經掛載 (mounted) 和渲染完的元件(Wrapper),並對其進行操作和斷言。

mount的第二個參數是可以用來定義元件的狀態 (state) 配置,例如 props, data, attrs 等等,因此這次我們就傳入 data 覆蓋掉元件中的預設值。

1
2
3
4
5
6
7
8
9
10
11
12
13
14
15
16
17
18
19
20
21
22
import { describe, it, expect } from 'vitest'
import { mount } from '@vue/test-utils'
import HelloWorld from '../HelloWorld.vue'

describe('HelloWorld', () =>
{
//1+1 應該是2
it('1 + 1 should be 2', () => {
expect(1 + 1).toBe(2)
})
//
it('正確渲染', () => {
const wrapper = mount(HelloWorld, { props: { msg: 'Hello Vitest' } })
expect(wrapper.text()).toContain('Hello Vitest')
})
it('在此測試檔案中使用 jsdom', () => {
const element = document.createElement('div')
element.innerHTML = '<p>Hello, HTML!</p>'
expect(element.innerHTML).toBe('<p>Hello, HTML!</p>')
})
})

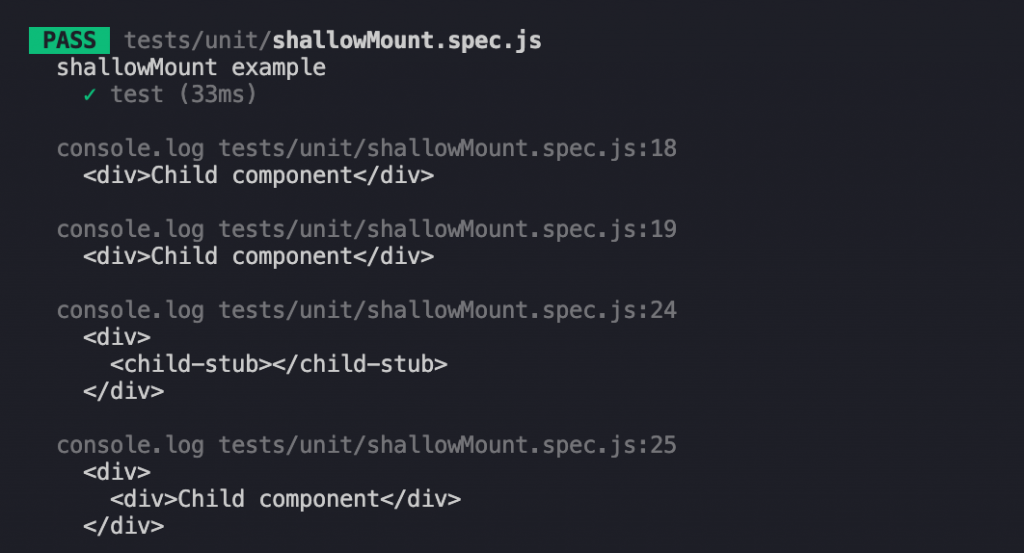
shallowMount():透過 shallowMount 產生的 wrapper 元件,如果它有子元件的話,子元件不會被解析渲染,也不會觸發子元件內的程式碼,而是會用 stub 來替代。

1
2
3
4
5
6
7
8
9
10
11
12
13
14
15
16
17
18
19
20
21
22
23
24
25
26
import { mount, shallowMount } from '@vue/test-utils'

const Child = {
template: "<div>Child component</div>"
}

const Parent = {
template: "<div><child /></div>",
components: {
Child
}
}

describe('shallowMount example', () => {
test('test', () => {
const childShallowWrapper = shallowMount(Child)
const childMountWrapper = mount(Child)
console.log(childShallowWrapper.html())
console.log(childMountWrapper.html())

const parentShallowWrapper = shallowMount(Parent)
const parentMountWrapper = mount(Parent)
console.log(parentShallowWrapper.html())
console.log(parentMountWrapper.html())
})
})

執行結果

善用data-test

Unit test透過 get() 或 find() 來尋找目標的元素,在元件內綁定元件

1
2
3
4
5
6
7
8
9
10
11
12
import { mount } from '@vue/test-utils'

const Component = {
template: '<div data-test="target">dataset</div>'
}

test('render dataset', () => {
const wrapper = mount(Component)

expect(wrapper.get('[data-test="target"]').text()).toBe('dataset')
})

表單單元測試

1
2
3
4
5
6
7
8
9
10
<template>
<div>
<input type="email" v-model="email" data-test="email" />
</div>
</template>

<script setup lang="ts">
import { ref } from 'vue'
const email = ref<string>('')
</script>

測試=>輸入元素的值應該是 my@mail.com

1
2
3
4
5
6
7
8
test('輸入元素的值應該是 my@mail.com', async () => {
const wrapper = mount(Component)
const input = wrapper.get('[data-test="email"]')

await input.setValue('my@mail.com')

expect(input.element.value).toBe('my@mail.com')
})
  • setValue()要更改表單元素的值可以使用 setValue() 方法,setValue 接受一個參數,可以是字串或布林值,並且回傳的是一個 Promise。
  • DOMWrapper透過 get() 或是 find() 成功找到目標元素時都會回傳一個圍繞 Wrapper API 的 DOM 元素的瘦包裝器 (thin wrapper),而它有一個代表著 HTMLElement 的屬性 element,又因為在上面的情況目標元素為 input tag 所以此時 element 真實的值其實為 HTMLInputElement。

測試 =>設定值後,電子郵件的值應為 my@mail.com

1
2
3
4
5
6
7
test('設定值後,電子郵件的值應為 my@mail.com', async () => {
const wrapper = mount(Component)

await wrapper.get('[data-test="email"]').setValue('my@mail.com')

expect(wrapper.vm.email).toBe('my@mail.com')
})

比較複雜的表單

1
2
3
4
5
6
7
8
9
10
11
12
13
14
15
16
17
18
19
20
21
22
23
24
25
26
27
28
29
30
31
<template>
<form data-test="form" @submit.prevent="submit">
<input data-test="email" type="email" v-model="form.email" />

<textarea data-test="description" v-model="form.description" />

<select data-test="city" v-model="form.city">
<option value="taipei">Taipei</option>
<option value="tainan">Tainan</option>
</select>

<input data-test="subscribe" type="checkbox" v-model="form.subscribe" />

<input data-test="interval.weekly" type="radio" value="weekly" v-model="form.interval" />
<input data-test="interval.monthly" type="radio" value="monthly" v-model="form.interval" />

<button type="submit"
@click="sendSubmit"
>Submit</button>
</form>
</template>

<script setup lang="ts">
const props = defineProps({
form:{type:Object}
})
const emit = defineEmits(['sendSubmit'])
const sendSubmit=()=>{
emit('sendSubmit')
}
</script>
1
2
3
4
5
6
7
8
9
10
11
12
13
14
15
16
17
18
19
20
21
22
23
24
25
26
27
28
29
30
31
<template>
<div>
<Forms
:form="form"
@sendSubmit ="submit"
></Forms>
</div>
</template>

<script setup lang="ts">
import { ref } from 'vue'
import Forms from '../component/form.vue'
interface formType{
email: string,
description: string,
city: string,
subscribe: boolean,
interval: string,
}
const form = ref<formType>({
email: '',
description: '',
city: '',
subscribe: false,
interval: ''
})
const submit = () => {
emit('submit', form)
}
</script>

表單測試
Case 1

1
2
3
4
5
6
7
8
9
10
11
12
13
14
15
16
17
18
19
20
21
22
23
test('填寫表單', async () => {
const wrapper = mount(Component)

const email = 'name@mail.com'
const description = 'Lorem ipsum dolor sit amet'
const city = 'taipei'
const subscribe = true

await wrapper.get('[data-test="email"]').setValue(email)
await wrapper.get('[data-test="description"]').setValue(description)
await wrapper.get('[data-test="city"]').setValue(city)
await wrapper.get('[data-test="subscribe"]').setValue()
await wrapper.get('[data-test="interval.weekly"]').setValue()

expect(wrapper.vm.form).toEqual({
email,
description,
city,
subscribe,
interval: 'weekly'
})
})

Case 2

1
2
3
4
5
6
7
8
9
10
11
12
13
14
15
16
17
18
19
20
21
22
23
24
test('提交表單', async () => {
const wrapper = mount(Component)

const email = 'name@mail.com'
const description = 'Lorem ipsum dolor sit amet'
const city = 'taipei'
const subscribe = true

await wrapper.get('[data-test="email"]').setValue(email)
await wrapper.get('[data-test="description"]').setValue(description)
await wrapper.get('[data-test="city"]').setValue(city)
await wrapper.get('[data-test="subscribe"]').setValue(subscribe)
await wrapper.get('[data-test="interval.monthly"]').setValue()

await wrapper.get('[data-test="form"]').trigger('submit.prevent')

expect(wrapper.emitted('submit')[0][0]).toEqual({
email,
description,
city,
subscribe,
interval: 'monthly'
})
})
  • emitted()會回傳一個紀錄元件發出的所有事件的物件,其中也包含著 emit 的參數

prop & Computed

1
2
3
4
5
6
7
8
9
10
11
12
13
14
15
16
17
18
19
20
21
22
23
24
25
26
27
28
29
import { ref, computed } from 'vue'

const Component = {
template: `
<div>
<input data-test="password" v-model="password">
<p v-if="showError && isError" data-test="errorMsg">Password must be at least {{minLength}} characters.</p>
</div>
`,
props: {
minLength: {
type: Number,
required: true
},
showError: {
type: Boolean,
default: true
}
},
setup (props) {
const password = ref('')
const isError = computed(() => password.value.length < props.minLength)

return {
isError,
password
}
}
}
  • beforeEach() 在每一個 test() 執行前運行的一個函式,常會用來初始化 wrapper 。
  • setProps() 在 wrapper 生成後,動態的改變 props 的值。
1
2
3
4
5
6
7
8
9
10
11
12
13
14
15
16
17
18
19
20
21
22
23
24
25
26
27
28
29
30
31
32
33
34
35
36
37
describe('Props & Computed', () => {
let wrapper
const minLength = 6
beforeEach(() => {
wrapper = mount(Component, {
props: {
minLength
}
})
})

// Case 1: 密碼在大於或等於最短長度限制時,不會出現錯誤訊息。
test(`not renders an error if length is more than or equal to ${minLength}`, async () => {
await wrapper.get('[data-test="password"]').setValue('123456')

expect(wrapper.find('[data-test="errorMsg"]').exists()).toBe(false)
})

// Case 2: 密碼少於最短長度限制時,出現錯誤訊息。
test(`renders an error if length is less than ${minLength}`, async () => {
await wrapper.get('[data-test="password"]').setValue('12345')

expect(wrapper.html()).toContain(`Password must be at least ${minLength} characters`)
})

// Case 3: 當 showError 為 false 時,不顯示錯誤訊息。
test('not renders an error if showError is false ', async () => {
await wrapper.get('[data-test="password"]').setValue('12345')

expect(wrapper.html()).toContain(`Password must be at least ${minLength} characters`)

await wrapper.setProps({ showError: false })

expect(wrapper.find('[data-test="errorMsg"]').exists()).toBe(false)
})
})

Node express Vite Vue

創建 Vite Vue

Vite 安裝與環境變數設定

相容性說明

Vite 需要 Node.js 版本 18+。 20+。 但是,某些模板需要更高的 Node.js 版本才能運作,如果您的套件管理器發出警告,請升級。

1
2
3
4
5
6
7
8
9
10
11
12
13
14
npm create vite-extra@latest 專案名稱

create-vite@5.5.2
Ok to proceed? (y)
? Select a framework: › - Use arrow-keys. Return to submit.
Vanilla
❯ Vue
React
Preact
Lit
Svelte
Solid
Qwik
Others

參考官網

1
2
3
4
cd vite-project
npm install
npm run dev

專案架構

1
2
3
4
5
6
7
8
9
10
11
12
13
14
15
16
17
18
19
20
├── .vscode
├── public
│ └── vite.svg
├── src
│ ├── App.vue
│ ├── assets
│ │ └── vue.svg
│ ├── components
│ │ └── HelloWorld.vue
│ ├── main.js
│ └── style.css
├── .gitignore
├── index.html
├── package.json
├── package-lock.json
├── README.md
├── tsconfig.app.json
├── tsconfig.json
├── tsconfig.node.json
└── vite.config.js

安裝完成
gitHub上的說明

gitHub上的說明(vite ^5.4.1”)

創建 Express 伺服器

安裝 express 與nodemon concurrently

1
2
npm install express
npm install --save-dev nodemon concurrently

gitHub上的說明:安裝 express 與nodemon concurrently
專案新增server/index.js

1
2
3
4
5
6
7
8
9
10
11
12
13
import express from "express";

const port = process.env.PORT || 3000;

const app = express();

app.get("/api/v1/hello", (_req, res) => {
res.json({ message: "Hello, world!" });
});

app.listen(port, () => {
console.log("Server listening on port", port);
});

修改package.json設定檔,新增一個主檔案並將 dev 命令替換為以下內容

1
2
3
4
5
6
7
8
9
10
11
   "version": "1.0.1",
"type": "module",
+ "main": "server/index.js",
"scripts": {
- "dev": "vite",
+ "dev:frontend": "vite",
+ "dev:backend": "nodemon server/index.js",
+ "dev": "concurrently 'npm:dev:frontend' 'npm:dev:backend'",
+ "build": "vite build",
"preview": "vite preview"
},

這樣Vite伺服器和Nodemon就會並行運作。
運行來啟動伺服器

1
npm run dev

如果我們訪問http://localhost:3000/api/v1/hello
現在有一個前端和一個後端正在運行,但它們還沒有互相溝通

1
2
3
{
"message": "Hello, world!"
}

gitHub上的說明:測試api/v1/hello運行

連接客戶端和伺服器

安裝ejs

1
npm install ejs

新增server/homepageRouter.js

1
2
3
4
5
6
7
8
9
10
11
12
13
14
15
16
17
18
19
20
21
22
23
24
25
26
27
28
29
import express from "express";
import fs from "fs/promises";
import path from "path";

const router = express.Router();
//
const environment = process.env.NODE_ENV;

//開發中,獲取所有的數據(來自打包產生dist/manifest.json
router.get("/*", async (_req, res) => {
const data = {
environment,
manifest: await parseManifest(),
};
console.log('data', data)
res.render("index.html.ejs", data);
});

const parseManifest = async () => {
if (environment !== "production") return {};

const manifestPath = path.join(path.resolve(), "dist", "manifest.json");
console.log('manifestPath', manifestPath)
const manifestFile = await fs.readFile(manifestPath);
console.log(' manifestFile', manifestFile)
return JSON.parse(manifestFile);
};

export default router;

homepageRouter.js
新增server/assetsRouter.js,靜態圖片

1
2
3
4
5
6
7
8
9
10
11
12
13
14
15
16
17
18
19
import express from "express";

const router = express.Router();
//支持的檔案類型
const supportedAssets = ["svg", "png", "jpg", "png", "jpeg", "mp4", "ogv"];

const assetExtensionRegex = () =>
{
//JS 把陣列 Array 所有元素併成字串,且可任意穿插符號的 join()
const formattedExtensionList = supportedAssets.join("|");
//JS Regex 正則表達式
return new RegExp(`/.+\.(${formattedExtensionList})$`);
};

router.get(assetExtensionRegex(), (req, res) => {
res.redirect(303, `http://localhost:5173/src${req.path}`);
});

export default router;

homepageRouter.js

修改server/index.js

1
2
3
4
5
6
7
8
9
10
11
12
13
14
15
16
17
18
19
20
21
22
23
24
25
26
27
28
29
30
import express from "express";
import path from "path";
import homepageRouter from "./homepageRouter.js";
import assetsRouter from "./assetsRouter.js";

const port = process.env.PORT || 3000;
//載入為靜態目錄
const publicPath = path.join(path.resolve(), "public");
const distPath = path.join(path.resolve(), "dist");

const app = express();

app.get("/api/v1/hello", (_req, res) => {
res.json({ message: "Hello, Lara!" });
});

//如果是生產階段就連結到dist/,否則連接到public與/src
if (process.env.NODE_ENV === "production") {
app.use("/", express.static(distPath));
} else {
app.use("/", express.static(publicPath));
app.use("/src", assetsRouter);
}

//將路由器連接到 Express 應用程式
app.use(homepageRouter);

app.listen(port, () => {
console.log("Server listening on port", port);
});

路由器

修改src/components/HelloWorld.vue

1
2
3
4
5
6
7
8
9
10
11
12
13
14
<script setup lang="ts">
import { ref } from 'vue'
const count = ref(0)
const serverHello = ref({})
fetch('/api/v1/hello')
.then((res) => res.json())
.then(({ message }) => {
serverHello.value = message
})
</script>

<template>
<h2>{{ serverHello }}</h2>
</template>

HelloWorld.vue

刪除index.html,在根目錄新增一個 views/index.html.ejs

1
2
3
4
5
6
7
8
9
10
11
12
13
14
15
16
17
18
19
20
21
<!DOCTYPE html>
<html lang="en">
<head>
<meta charset="UTF-8" />
<link rel="icon" type="image/svg+xml" href="/vite.svg" />
<meta name="viewport" content="width=device-width, initial-scale=1.0" />
<title>Vite + Vue</title>
<% if (environment === 'production') { %>
<link rel="stylesheet" href="<%= manifest['src/main.css'].file %>" />
<% } %>
</head>
<body>
<div id="app"></div>
<% if (environment === 'production') { %>
<script type="module" src="<%= manifest['src/main.ts'].file %>"></script>
<% } else { %>
<script type="module" src="http://localhost:5173/@vite/client"></script>
<script type="module" src="http://localhost:5173/src/main.ts"></script>
<% } %>
</body>
</html>

index.html.ejse

生產中運行

1
2
3
4
5
6
7
8
9
10
11
12
13
14
import { defineConfig } from "vite";
import vue from "@vitejs/plugin-vue";

// https://vitejs.dev/config/
export default defineConfig({
plugins: [vue()],
// 新增打包
build: {
manifest: true,
rollupOptions: {
input: "./src/main.ts",
},
},
});

vite.config.ts 新增打包設定

執行打包,

1
npm run build

產生dist後,在.vite將manifest.json移動到dist根目錄,並修改manifest.json

1
2
3
4
5
6
7
8
9
10
11
12
13
14
15
16
17
18
19
{
"src/assets/vue.svg": {
"file": "vite.svg",
"src": "src/assets/vue.svg"//物件名與src名相同
},
"src/main.css": {
"file": "assets/main-CYBnthfA.css",//打包後的檔案
"src": "src/main.css"//物件名與src名相同
},
"src/main.ts": {
"file": "assets/main-CpTINVMW.js",//打包後的檔案
"name": "main",
"src": "src/main.ts",//物件名與src名相同
"isEntry": true,
"css": [
"assets/main-CYBnthfA.css"//打包後的檔案
]
}
}

demo

Vite Pwa 漸進式網路應用程式 安裝與設定

Vite Pwa漸進式網路應用程式 安裝與設定

Vite 的Pwa功能是在web情況下,開發web就能製作成App的效果,不需要上架app store / google play 也不需要使用安裝 exe檔案,只需要連結就能增加的手機畫面,
Vite PWA
Vite 和生態系統的 PWA 整合零配置和與框架無關的 Vite PWA 插件
做好了網站以後,執行以下指令:

1
npm i -D vite-plugin-pwa

vite.config.js增加

  • 引入vite-plugin-pwa解構VitePWA
  • plugins內新增VitePWA({ ... })
1
2
3
4
5
6
7
8
9
10
11
12
13
14
15
16
17
18
19
20
21
22
23
24
25
26
import { VitePWA } from "vite-plugin-pwa"
export default defineConfig({
plugins: [
VitePWA({ registerType: 'autoUpdate' })
<!-- VitePWA({
srcDir: "/",
filename: "vite_pwa.js",
registerType: 'autoUpdate',
devOptions: {
enabled: true,
type: 'module',
},
strategies: "injectManifest",
injectRegister: false,
manifest: false,
injectManifest: {
injectionPoint: undefined,
},
}), -->
],
server: {
hmr: {
overlay: false
}
},
})
產生 PWA 資產產生和圖像

PWA 資產產生器

安裝PWA 資產產生和圖像

1
npm install --global vue-pwa-asset-generator

執行指令
剛剛製作的icon路徑產生到public/img/icons檔案夾內

1
2
3
//剛剛製作的icon路徑 =>(產生) => icons
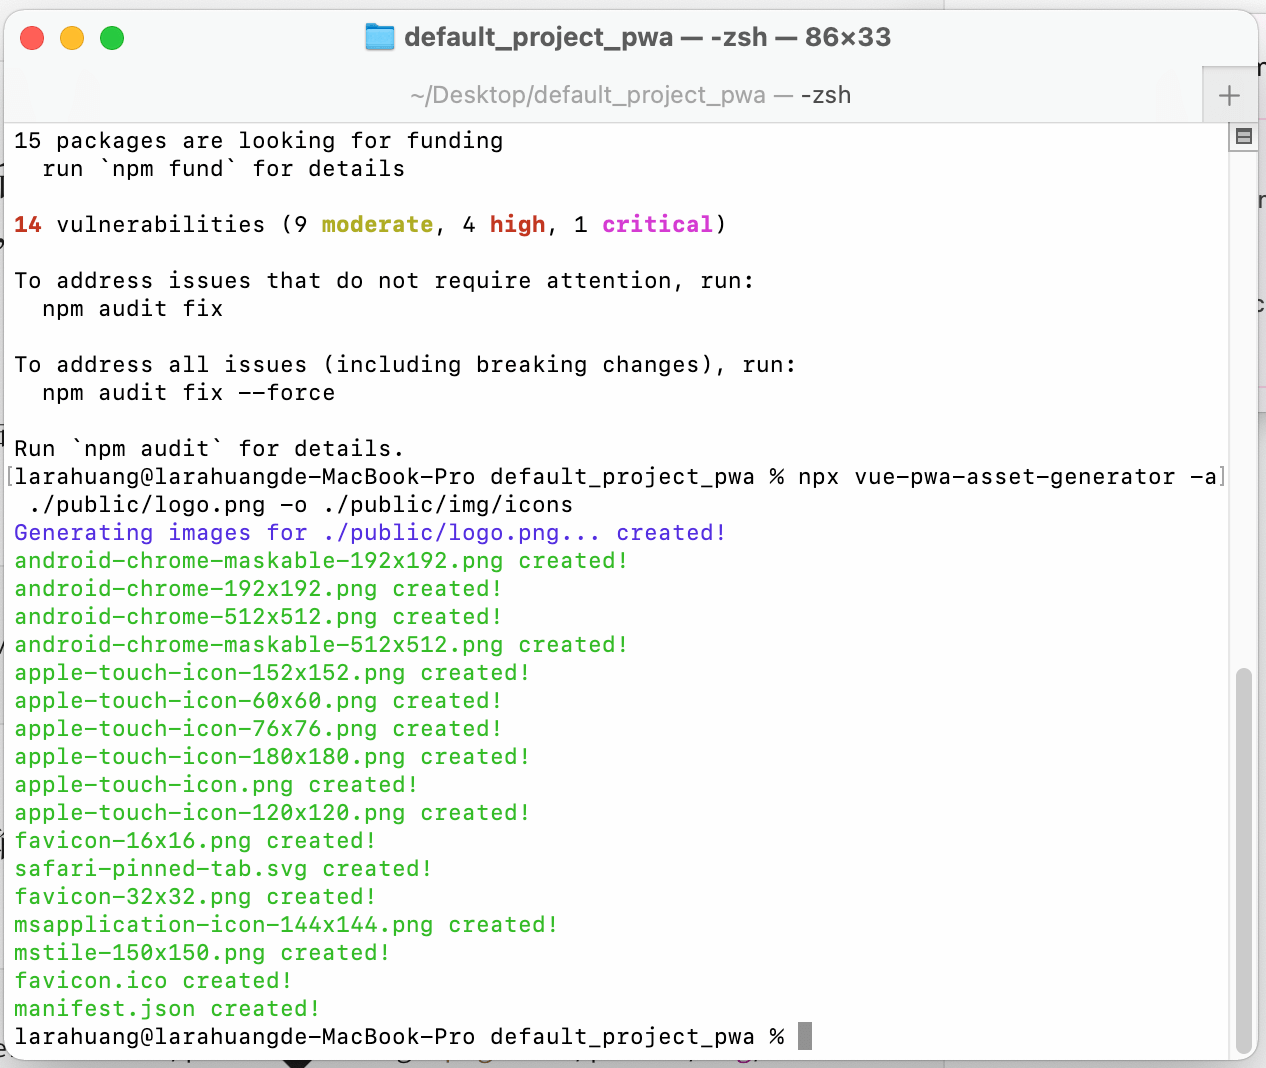
npx vue-pwa-asset-generator -a ./public/logo.png -o ./public/img/icons

終端機回應:產生資料到/public/

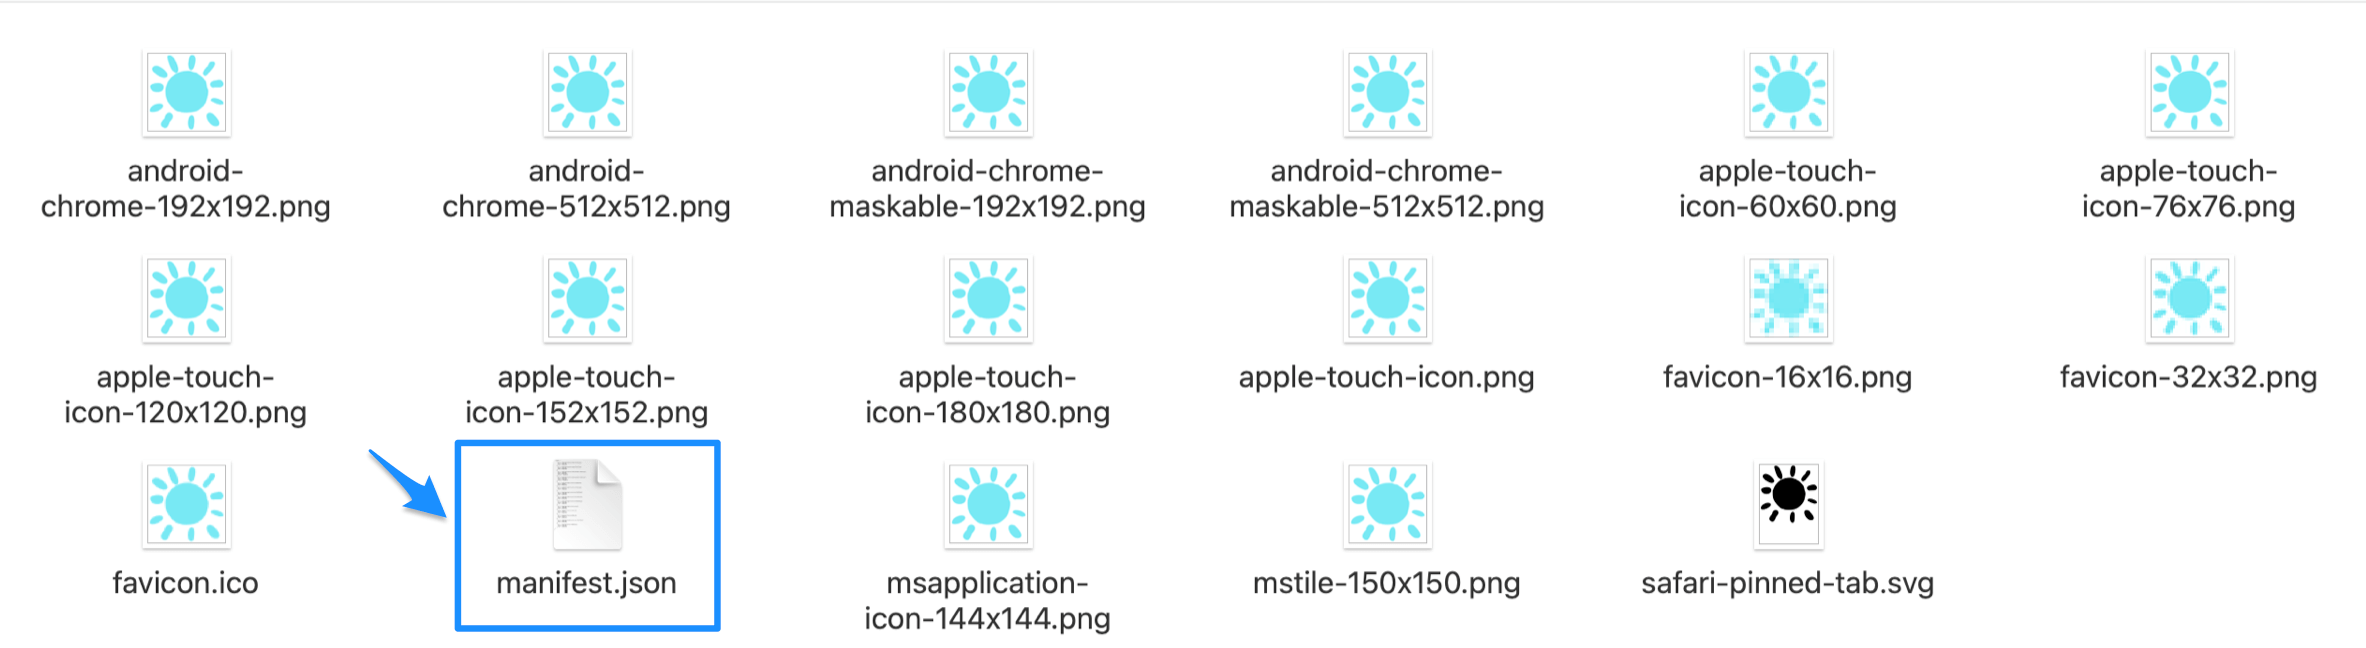
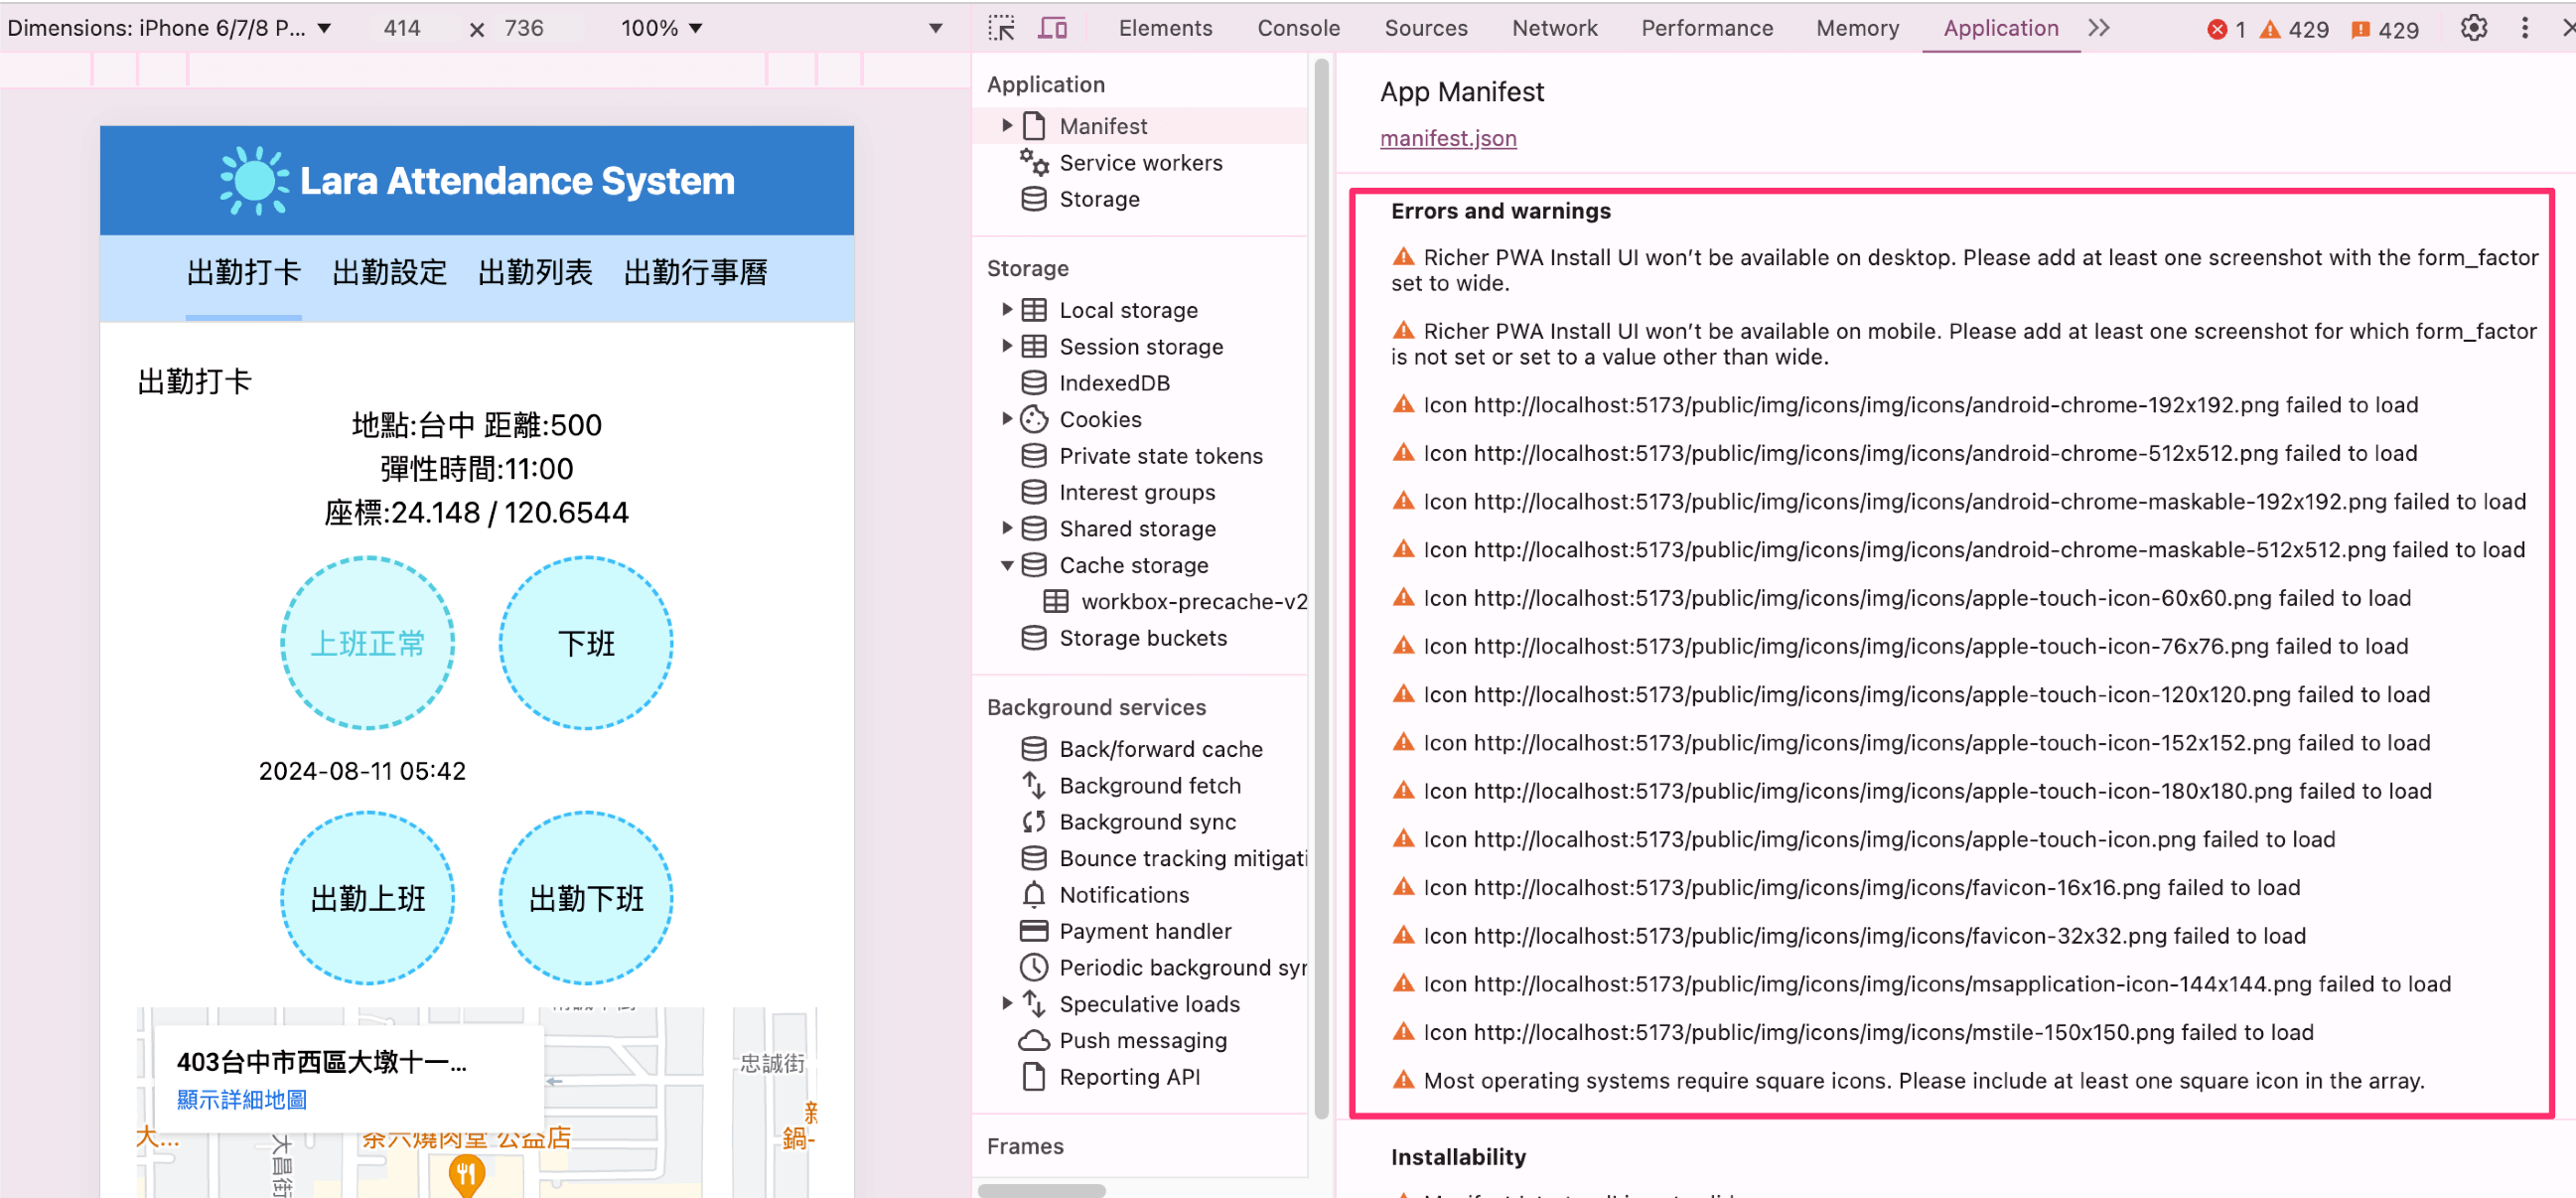
產生的檔案內會有一個manifest.json檔

index.html載入manifest.json

1
2
3
4
5
6
7
8
9
10
11
12
13
14
15
16
17
18
19
20
21
22
<!doctype html>
<html lang="en">
<head>
<meta charset="UTF-8" />
<link rel="icon" type="image/svg+xml" href="/logo.svg" />
<meta name="viewport" content="width=device-width, initial-scale=1.0" />
<title>Lara Huang 出勤系統</title>
<link rel="apple-touch-icon" sizes="180x180" href="/img/icons/apple-touch-icon.png">
<link rel="icon" type="image/png" sizes="32x32" href="/img/icons/favicon-32x32.png">
<link rel="icon" type="image/png" sizes="16x16" href="/img/icons/favicon-16x16.png">
<!--manifest.json 注意路徑--->
<link rel="manifest" href="/img/icons/manifest.json">
<link rel="mask-icon" href="/img/icons/safari-pinned-tab.svg" color="#5bbad5">
<meta name="msapplication-TileColor" content="#da532c">
<meta name="theme-color" content="#ffffff">
</head>
<body>
<div id="app"></div>
<script type="module" src="/src/main.ts"></script>
</body>
</html>

產生Bug
主要原因是位址路徑錯誤

manifest.json
注意:icons/src路徑必須正確

1
2
3
4
5
6
7
8
9
10
11
12
13
14
15
16
17
18
19
20
21
22
23
24
25
26
27
28
29
30
31
32
33
34
35
36
37
38
39
40
41
42
43
44
45
46
47
48
49
50
51
52
53
54
55
56
57
58
59
60
61
62
63
64
65
66
67
68
69
70
71
72
73
74
75
76
77
78
79
80
81
82
83
{
"name": "Lara Huang",
"short_name": "Lara Huang",
"description":"描述",
"start_url":"/",
"icons": [
{
"src": "./android-chrome-192x192.png",
"sizes": "192x192",
"type": "image/png"
},
{
"src": "./android-chrome-512x512.png",
"sizes": "512x512",
"type": "image/png"
},
{
"src": "./android-chrome-maskable-192x192.png",
"sizes": "192x192",
"type": "image/png",
"purpose": "maskable"
},
{
"src": "./android-chrome-maskable-512x512.png",
"sizes": "512x512",
"type": "image/png",
"purpose": "maskable"
},
{
"src": "./apple-touch-icon-60x60.png",
"sizes": "60x60",
"type": "image/png"
},
{
"src": "./apple-touch-icon-76x76.png",
"sizes": "76x76",
"type": "image/png"
},
{
"src": "./apple-touch-icon-120x120.png",
"sizes": "120x120",
"type": "image/png"
},
{
"src": "./apple-touch-icon-152x152.png",
"sizes": "152x152",
"type": "image/png"
},
{
"src": "./apple-touch-icon-180x180.png",
"sizes": "180x180",
"type": "image/png"
},
{
"src": "./apple-touch-icon.png",
"sizes": "180x180",
"type": "image/png"
},
{
"src": "./favicon-16x16.png",
"sizes": "16x16",
"type": "image/png"
},
{
"src": "./favicon-32x32.png",
"sizes": "32x32",
"type": "image/png"
},
{
"src": "./msapplication-icon-144x144.png",
"sizes": "144x144",
"type": "image/png"
},
{
"src": "./mstile-150x150.png",
"sizes": "150x150",
"type": "image/png"
}
],
"theme_color": "#ffffff",
"background_color": "#ffffff",
"display": "standalone"
}

vite_pwa.js 這個檔案夾 不一定要使用

1
2
3
4
5
6
7
8
9
10
11
12
13
14
15
self.addEventListener("notificationclick", function (event) {
console.log("開啟通知");
});

self.addEventListener("notificationclick", function (event) {
const channel = new BroadcastChannel("sw-mensajes");
if (event.action == "aceptar") {
channel.postMessage({ title: "接受" });
}

if (event.action == "rechazar") {
channel.postMessage({ title: "衰退" });
}
});

打包

1
npm run build

重新運行測試

1
npm run dev

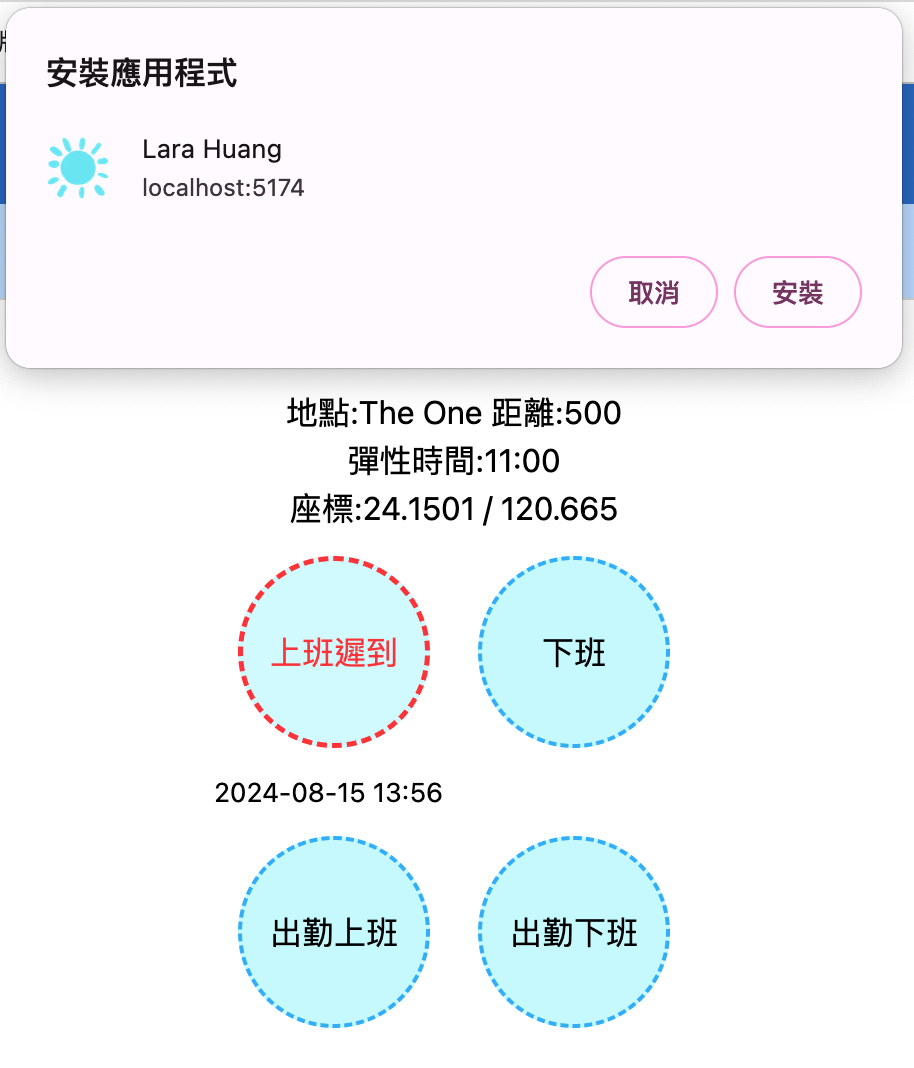
畫面出現標示安裝

前端頁面部署方式的全面解析與比較

整理部署方式:

  1. FTP上傳: 這是最傳統的方式,將你的前端檔案(HTML,CSS,JavaScript等)上傳到你的web伺服器。大多數的web主機提供FTP訪問,這也是小型專案的快速部署方式。
  2. 使用Git: 如果你的伺服器支援Git,你可以設定一個Git倉庫,並使用**git push**指令部署你的前端頁面。這種方式方便版本控制,也支援多人協作。
  3. 使用SSH:可以透過SSH將你的檔案推送到你的伺服器,這個過程可以透過腳本自動化。
  4. 使用雲端服務: 像AWS S3,Google Cloud Storage,Azure Storage等服務可以託管靜態網站,通常它們提供了很好的效能和安全性。
  5. 使用專門的前端部署服務: 服務如Netlify,Vercel等,這些平台通常提供一站式服務,包括版本控制,持續集成,HTTPS和CDN等。
  6. 使用CDN服務: 這些服務可以將你的網站部署到全球的伺服器上,加速存取速度。例如,Cloudflare,Akamai等。
  7. 容器化部署: 使用如Docker等工具,將前端套用容器化,然後在Kubernetes等容器編排平台進行部署。

Nginx

1.將你的前端程式碼上傳到伺服器上的某個目錄,例如 /var/www/mywebsite。
2.建立Nginx設定檔:Nginx的設定檔通常位於 /etc/nginx/ 目錄下,特定路徑可能會因伺服器的不同而略有不同。
在該目錄下,你通常會找到一個叫做 sites-available 的目錄
在這個目錄下,你可以為每個網站建立一個設定檔。例如,你可以建立一個新的設定文件,命名為 mywebsite:sudo nano /etc/nginx/sites-available/mywebsite

1
2
3
4
5
6
7
8
9
10
server {
listen 80;
server_name your_domain_or_IP;

location / {
root /var/www/mywebsite;
index index.html;
try_files $uri $uri/ =404;
}
}

應該替換為你的程式碼所在的目錄:/var/www/mywebsite
應該替換為你的網域或IP位址:your_domain_or_IP
listen:此配置意味著Nginx將監聽80端口,並為所有指向你的網域或IP位址的請求提供服務
Nginx將傳回404狀態碼:如果請求的檔案不存在,Nginx將傳回404狀態碼。

4.啟用網站
建立並編輯完設定檔後,你需要建立一個到 sites-enabled 目錄的符號連結來啟用你的網站:

1
sudo ln -s /etc/nginx/sites-available/mywebsite /etc/nginx/sites-enabled/

5.檢查設定檔
重啟Nginx之前,檢查你的設定檔有沒有語法錯誤:

1
sudo nginx -t

如果沒有錯誤,你會看到類似這樣的輸出:

1
nginx: configuration file /etc/nginx/nginx.conf test is successful

6.重啟Nginx
需要重啟Nginx來讓你的設定生效:

1
sudo service nginx restart

前端頁面應該可以透過你的網域名稱或IP位址存取了。
注意,如果你的伺服器有防火牆,你可能需要設定防火牆來允許HTTP和HTTPS流量。

更完整的 Nginx 配置

首先,你需要為你的網域取得一個SSL證書,你可以使用Let’s Encrypt提供的免費證書。

設定檔可能如下:

1
2
3
4
5
6
7
8
9
10
11
12
13
14
15
16
17
18
19
20
21
22
23
24
25
26
27
28
29
30
31
32
33
34
35
server {
listen 80;
server_name your_domain_or_IP;
return 301 https://$host$request_uri;
}

server {
listen 443 ssl;

server_name your_domain_or_IP;

ssl_certificate /etc/letsencrypt/live/your_domain_or_IP/fullchain.pem;
ssl_certificate_key /etc/letsencrypt/live/your_domain_or_IP/privkey.pem;

ssl_protocols TLSv1.2 TLSv1.3;
ssl_prefer_server_ciphers on;
ssl_ciphers "EECDH+AESGCM:EDH+AESGCM:AES256+EECDH:AES256+EDH";

location / {
root /var/www/mywebsite;
index index.html;
try_files $uri $uri/ =404;
}

location ~* \\.(jpg|jpeg|png|gif|ico|css|js|pdf)$ {
expires 30d;
}

gzip on;
gzip_vary on;
gzip_min_length 10240;
gzip_proxied expired no-cache no-store private auth;
gzip_types text/plain text/css text/xml text/javascript application/x-javascript application/xml;
gzip_disable "MSIE [1-6]\\.";
}
  • 第一個 server 區塊監聽80個端口,也就是HTTP的預設端口,然後把所有的請求重定向到HTTPS。
  • 第二個 server 區塊監聽443端口,也就是HTTPS的預設端口。
  • ssl_certificate 和 ssl_certificate_key 指向你的SSL憑證和私鑰的位置。
  • ssl_protocols 和 ssl_ciphers 定義了你伺服器支援的SSL協定和加密套件。
  • location / 區塊定義了你的網站的根目錄和預設文件,以及如何處理不存在的路徑。
  • location ~* \\.(jpg|jpeg|png|gif|ico|css|js|pdf)$ 區塊定義了對於靜態檔案如圖片,CSS文件,JavaScript檔案等,客戶端應該快取30天。
  • gzip 相關的行啟用了gzip壓縮,並定義了哪些類型的檔案應該被壓縮。

這只是一個基本的配置範例,你可以根據你的需求進行修改。
有許多其他的選項可以配置,例如負載平衡,
反向代理,HTTP/2支援等。

負載平衡

使用 Nginx 來做負載平衡的實作非常直接。以下是一個簡單的範例來說明如何設定 Nginx 來實現對多個伺服器的負載平衡。

假設你有兩個或更多的應用程式伺服器實例,它們分別託管在不同的 IP 位址或主機名稱下**。你可以在 Nginx 設定檔中設定一個 upstream 模組,然後在 server 模組中將請求反向代理到這個 upstream。 **

首先,你需要在你的 Nginx 設定檔(一般位於 /etc/nginx/nginx.conf 或 /etc/nginx/conf.d/ 目錄下的某個檔案)中定義一個 upstream。例如:

1
2
3
4
5
6
7
http {
upstream myapp {
server app1.example.com;
server app2.example.com;
}
...
}

在這個例子中,myapp 是你定義的 upstream 的名字,app1.example.com 和 app2.example.com 是你的應用程式伺服器的位址。

然後,在 server 模組中,你可以將來自客戶端的請求代理到這個 upstream:

1
2
3
4
5
6
7
server {
listen 80;

location / {
proxy_pass <http://myapp>;
}
}

在這個範例中,所有來自客戶端的 HTTP 請求(即 :80 連接埠的請求)都會被 Nginx 轉送到定義的 upstream(即 myapp)。 Nginx 預設使用輪詢(round-robin)演算法將請求指派給 upstream 中的伺服器,你也可以設定其他的負載平衡演算法,如最少連接(least_conn)或 IP 雜湊(ip_hash)。

這樣,Nginx 就會把請求平衡地轉送到你的各個應用程式伺服器實例上,實現負載平衡。注意這個配置對於前端靜態頁面來說可能不太必要,因為靜態頁面通常不會對伺服器產生太大負載,但對於動態應用來說是非常有用的。

Docker

使用 Docker 來部署前端應用程式是一種很好的方式,因為它可以將你的應用程式及其依賴項打包到一個獨立、可移植的容器中,可以在任何安裝了 Docker 的環境中運行。

以下是使用 Docker 部署一個基本的靜態前端頁面的步驟:

1.建立 Dockerfile

在你的專案根目錄中,建立一個名為”Dockerfile”的檔案。這個檔案是用來定義你的 Docker 映像的,可以看作是一個自動化的腳本。以下是一個簡單的 Dockerfile 範例,其中使用了官方的 Nginx 映像來部署靜態頁面:

1
2
3
4
5
6
7
8
9
10
11
12
13
14
# 使用官方的 Nginx 镜像
FROM nginx:latest

# 删除 Nginx 默认的静态资源
RUN rm -rf /usr/share/nginx/html/*

# 将你的静态资源复制到 Nginx 的静态资源目录下
COPY ./dist /usr/share/nginx/html

# 暴露 80 端口
EXPOSE 80

# 启动 Nginx
CMD ["nginx", "-g", "daemon off;"]

2.建置 Docker 映像

在專案根目錄下,你可以使用 docker build 指令來根據 Dockerfile 建立 Docker 映像:

1
docker build -t my-frontend-app .

其中,-t my-frontend-app 參數用於為您的 Docker 映像命名,. 指定了 Dockerfile 所在的位置(在這裡,它在目前目錄下)。

3:运行 Docker 容器

你现在可以使用 docker run 命令来运行你刚刚构建的 Docker 镜像:

1
docker run -p 80:80 -d my-frontend-app

參數指定了將容器的 80 端口映射到宿主機的 80 端口,d 參數指定了以後台模式運行容器。

現在你應該可以在你的瀏覽器中透過造訪 http://localhost 來查看你的前端頁面了。

如果你的前端應用更複雜,或者需要與後端服務進行交互,你可能需要進行更複雜的配置,例如使用 Docker Compose 來管理多個服務,或使用環境變數來配置你的應用程式。

負載平衡
如果你的前端應用使用 Docker 部署,有多種方式可以實現負載平衡。以下是一些常見的方法:

  1. 使用 Docker Swarm:

Docker Swarm 是 Docker 的原生叢集管理和編排工具。在 Swarm 叢集中,你可以建立一個服務,然後指定服務的副本數量。 Swarm 會自動在叢集的節點間分配這些副本,實現負載平衡。

以下是一個簡單的 Docker Swarm 服務建立指令:

1
docker service create --name my-frontend-app --publish 80:80 --replicas 3 my-frontend-app

在這個命令中,–name my-frontend-app 指定了服務的名稱,–publish 80:80 指定了將容器的80 端口映射到宿主機的80 端口,–replicas 3 指定了創建3 個副本,my-frontend-app 是你的Docker 映像的名稱。

2.使用 Kubernetes:
Kubernetes 是一個更強大的容器編排平台,它也支援負載平衡。在 Kubernetes 中,你可以建立一個 Deployment 和一個 Service,Kubernetes 會自動為你的應用提供負載平衡。

以下是一個簡單的 Kubernetes Deployment 和 Service 的定義:

1
2
3
4
5
6
7
8
9
10
11
12
13
14
15
16
17
18
19
20
21
22
23
24
25
26
27
28
29
30
31
32
apiVersion: apps/v1
kind: Deployment
metadata:
name: my-frontend-app
spec:
replicas: 3
selector:
matchLabels:
app: my-frontend-app
template:
metadata:
labels:
app: my-frontend-app
spec:
containers:
- name: my-frontend-app
image: my-frontend-app
ports:
- containerPort: 80

---

apiVersion: v1
kind: Service
metadata:
name: my-frontend-app
spec:
type: LoadBalancer
ports:
- port: 80
selector:
app: my-frontend-app

在這個定義中,Deployment 建立了 3 個前端應用的副本,Service 為這些副本提供了一個負載平衡器。

  1. 使用雲端服務提供者的負載平衡器:

如果你的應用程式部署在雲端環境(如 AWS, Google Cloud, Azure 等),你可以使用雲端服務供應商的負載平衡服務。這些負載平衡服務通常提供了更強大的功能,例如自動擴縮容,健康檢查,SSL 終結等。

以上都是實現 Docker 負載平衡的一些方式,你可以根據你的特定需求和環境選擇最合適的方式。

PM2

PM2 主要用於管理和維護 Node.js 應用,但你也可以使用 PM2 來運行一個靜態伺服器,用來部署你的前端頁面。
透過使用像 http-server 這樣的簡單的靜態檔案伺服器來完成
1.安装 http-server

1
npm install http-server --save

2.建立一個 PM2 的設定文件
你需要建立一個 PM2 的設定文件,例如 ecosystem.config.js。

1
2
3
4
5
6
7
8
9
10
11
12
13
14
15
module.exports = {
apps: [
{
name: 'frontend',
script: 'node_modules/http-server/bin/http-server',
args: './dist -p 8080', // 這裡的 ./dist 是你的前端頁面的路徑,-p 8080 是你要監聽的端口
instances: 'max',
exec_mode: 'cluster',
watch: true, // 如果你希望在檔案改變時自動重新啟動伺服器,可以設定 watch 為 true
env: {
NODE_ENV: 'production',
},
},
],
};

3.使用 PM2 啟動你的前端頁面
利用 PM2 提供的特性,例如應用的自動重啟和負載平衡。

1
pm2 start ecosystem.config.js

http-server 是一個非常簡單的靜態檔案伺服器,
如果你需要更複雜的功能(例如SSL、反向代理等),你可能需要考慮使用更強大的伺服器軟體,例如Nginx 或Express .js。

技術 優點 缺點 出現時間 適合場景 不適合場景
Nginx 輕量級,高效能,可作為反向代理和負載平衡器 需要手動配置和管理 2004年 任何需要靜態頁面服務的項目 需要動態伺服器端渲染的項目
PM2 Serve 可以使用PM2來管理靜態服務程序 不包含反向代理或負載平衡器 PM2:2014年 需簡單的靜態檔案服務 需複雜的HTTP請求處理或負載平衡的項目
Docker 容器化,跨平台 需要手動管理容器和映像 2013年 任何需要跨平台部署或以統一方式部署多種服務的項目
小規模或簡單的項目可能,
引入不必要的複雜性
GitHub Pages 免費,支援自訂域名,整合GitHub 功能有限,僅支援靜態內容 2008 年 簡單的個人、專案或組織頁面 複雜的、需要後端的應用
Netlify/Vercel 提供自動部署,函數即服務等 免費版有一些限制 Netlify:2014年,
Vercel:2015年
靜態網站和Jamstack應用 大規模、複雜的後端應用

Node express Vercel部署
參考資料
Vue Fetch

Fetch API基本

1
2
3
4
5
6
7
8
fetch(url, options)
.then(response => response.json())
.then(data => {
// 处理返回的数据
})
.catch(error => {
// 处理请求错误
});

封裝請求

在專案src目錄下新增request.js的文件並且 export

1
2
3
4
5
6
7
8
9
10
11
12
13
14
15
16
17
18
19
20
21
22
23
24
25
26
27
28
29
30
31
32
33
34
35
36
37
38
39
40
41
42
43
44
45
46
47
48
49
50
51
52
53
54
55
56
57
58
59
export default {
// GET請求
get(url, params = {}) {
if (params) {
//
url += '?' + Object.keys(params).map(key => `${key}=${params[key]}`).join('&');
}
return fetch(url)
.then(response => response.json())
.catch(error => {
console.error('Request failed:', error);
throw new Error(error);
});
},

// POST請求
post(url, data) {
return fetch(url, {
method: 'POST',
headers: {
'Content-Type': 'application/json',
},
body: JSON.stringify(data),
})
.then(response => response.json())
.catch(error => {
console.error('Request failed:', error);
throw new Error(error);
});
},

// PUT請求
put(url, data) {
return fetch(url, {
method: 'PUT',
headers: {
'Content-Type': 'application/json',
},
body: JSON.stringify(data),
})
.then(response => response.json())
.catch(error => {
console.error('Request failed:', error);
throw new Error(error);
});
},

// DELETE請求
delete(url) {
return fetch(url, {
method: 'DELETE',
})
.then(response => response.json())
.catch(error => {
console.error('Request failed:', error);
throw new Error(error);
});
},
};

引入頁面使用

1
2
3
4
5
6
7
8
9
10
11
12
13
14
15
16
17
18
19
20
21
22
23
24
25
26
27
28
29
30
31
32
33
34
35
36
37
38
39
40
41
42
43
44
45
46
<template>
<div>
<!-- 展示数据 -->
</div>
</template>

<script>
import request from '@/api/request.js';

export default {
name: 'ExampleComponent',
data() {
return {
data: [],
};
},
mounted() {
this.getData();
},
methods: {
getData() {
//
request.get('/api/data')
.then(response => {
this.data = response;
})
.catch(error => {
console.error('error);
});
},
postData() {
const data = {
// 提交的数据
};
request.post('/api/data', data)
.then(response => {
// 处理返回结果
})
.catch(error => {
console.error(error);
});
},

},
};
</script>

單元測試 describe & it

Unit Test官網
Unit Test官網
unit test VUE 3 Composition API methods?

元件測試的目標

  • data
  • props
  • slot
  • provide
  • directive
  • Event(瀏覽器中的互動行為)
  • API response(模擬回應)
  • 元件測試:針對 Vue 元件所進行的測試
  • 單元測試:針對元件引入函式、類別等 utils、helper 與 composable 的測試。
  • 工具本身:Pinia 測試、Vue Router 測試。
  • 容器(Wrapper)

    方法 mount
    import HelloWorld from ‘../HelloWorld.vue’
    const wrapper = mount(HelloWorld, { props: { msg: ‘Hello Vitest’ } })
    expect(1 + 1).toBe(2)
    expect(wrapper.text()).toContain(‘Hello Vitest’)

    1
    2
    3
    4
    5
    6
    7
    8
    9
    10
    11
    12
    13
    14
    15
    16
    17
    18
    19
    20
    21
    import { describe, it, expect } from 'vitest'
    import { mount } from '@vue/test-utils'

    describe('HelloWorld', () =>
    {
    //1+1 應該是2
    it('1 + 1 should be 2', () => {
    expect(1 + 1).toBe(2)
    })
    //正確渲染
    it('正確渲染', () => {
    const wrapper = mount(HelloWorld, { props: { msg: 'Hello Vitest' } })
    expect(wrapper.text()).toContain('Hello Vitest')
    })
    //在此測試檔案中使用 jsdom
    it('在此測試檔案中使用 jsdom', () => {
    const element = document.createElement('div')
    element.innerHTML = '<p>Hello, HTML!</p>'
    expect(element.innerHTML).toBe('<p>Hello, HTML!</p>')
    })
    })

    Nav

    檢查元件的可見

    檢查元件的可見

    1
    2
    3
    4
    5
    6
    7
    8
    9
    10
    11
    12
    13
    14
    15
    16
    17
    18
    19
    20
    21
    22
    23
    24
    25
    26
    27
    28
    29
    30
    31
    32
    33
    34
    35
    36
    37
    38
    39
    40
    41
    42
    43
    44
    45
    46
    47
    48
    49
    50
    51
    import { describe, it, expect } from 'vitest'
    import { mount } from '@vue/test-utils'
    import Nav from '../Nav.vue'

    describe('Nav.vue gets the following array from the parent element frontLayout.vue', () =>
    {
    const navLists = [
    { id_set: '001', title: '出勤打卡', href: '/' },
    { id_set: '002', title: '出勤設定', href: '/set_check' },
    { id_set: '003', title: '出勤列表', href: '/work_check_lists' },
    { id_set:'004', title:'出勤行事曆', href:'/work_calendar'}
    ]
    const pageNameActive = '001';
    const wrapper = mount(Nav, {
    props: {
    navLists: navLists,
    pageNameActive:pageNameActive
    }
    })

    it('Is navLists data correctly rendering information? ', () => {
    const items = wrapper.findAll('li');
    expect(items.length).toBe(4);
    expect(items[0].text()).toBe('出勤打卡');
    expect(items[1].text()).toBe('出勤設定');
    expect(items[2].text()).toBe('出勤列表');
    expect(items[3].text()).toBe('出勤行事曆');

    });
    it('pageNameActive is rendered when the initial value is passed', () => {
    expect(pageNameActive).toMatch(pageNameActive);
    })

    it('Emits the event of the current data when clicked', () =>
    {
    const items = wrapper.findAll('li');
    const button = wrapper.find('li');
    button.trigger('click');
    expect(pageNameActive).toMatch(items[0].id_set);
    expect(pageNameActive).toMatch(items[1].id_set)
    expect(pageNameActive).toMatch(items[2].id_set)
    expect(pageNameActive).toMatch(items[3].id_set)
    expect(button.find('li.isActive'));
    })
    //emitted ,toHaveProperty 點擊時取出當筆數據的事件
    it('Event to retrieve the current data when clicked', async () =>
    {
    await wrapper.get('[data-test="button"]').trigger('click')
    expect(wrapper.emitted()).toHaveProperty('sendMenuClickActive')
    })
    })

    form

    單元測試 describe & it

    describe & it 輔助 API

    describe

    1
    2
    3
    4
    5
    6
    7
    8
    9
    10
    11
    12
    13
    14
    15
    16
    17
    18
    19
    import { describe, it} from 'vitest'
    import { mount } from "@vue/test-utils"

    describe('登入元件', () => {
    // Happy Path
    it('輸入正確帳號密碼,應登入到OO頁面', () => {
    // ...
    })
    // Sad Path
    it('只輸入帳號,應該顯示請輸入密碼', () => {
    // ...
    })
    it('只輸入密碼,應該顯示請輸入帳號', () => {
    // ...
    })
    it('輸入錯誤帳號密碼,應該顯示登入資訊錯誤', () => {
    // ...
    })
    })

    允許巢狀的方式來建構測試

    1
    2
    3
    4
    5
    6
    7
    8
    9
    10
    11
    12
    13
    14
    15
    16
    describe('父層情境', () => {
    describe('基於父層情境的情境一', () => {
    it('測試案例', () => {
    // ...
    })
    })
    describe('基於父層情境的情境二', () => {
    it('測試案例', () => {
    // ...
    })
    it('出現提示寄件者姓名與電話將直接註冊成會員', () => {
    // ...
    })
    })
    })

    describe & it 輔助 API

    • .only:測試情境、測試案例皆可使用
    • .skip:測試情境、測試案例皆可使用
    • .todo:測試情境、測試案例皆可使用
    • .fails:測試案例才能使用
    only
    若在測試情境用了此指令,則在同個測試檔案中只會執行帶有 .only 的測試情境,而其餘測試情境底下所有的測試案例將會被跳過(skipped):
    1
    2
    3
    describe.only('測試情境 1', () => { /* */ })
    describe('測試情境 2', () => { /* */ }) // skipped
    describe('測試情境 3', () => { /* */ }) // skipped
    若在測試案例中使用,則除了帶有 .only 之外的測試案例都將會被跳過:
    1
    2
    3
    4
    5
    6
    7
    8
    9
    10
    11
    describe('測試情境 1', () => {
    it.only('測試案例', () => { /* */ })
    it('測試案例', () => { /* */ }) // skipped
    })

    describe('測試情境 2', () => {
    it.only('測試案例', () => { /* */ })
    it('測試案例', () => { /* */ }) // skipped
    })

    describe('測試情境 3', () => { /* */ }) // skipped

    skip

    測試情境或測試案例被標注時,將自動跳過該範疇內的測試案例:
    1
    2
    3
    4
    5
    6
    7
    8
    9
    describe.skip('測試情境 1', () => {
    it('測試案例', () => { /* */ }) skipped
    it('測試案例', () => { /* */ }) // skipped
    })

    describe('測試情境 2', () => {
    it('測試案例', () => { /* */ })
    it.skip('測試案例', () => { /* */ }) // skipped
    })

    todo

    測試情境或測試案例被標注時,同樣將自動跳過該範疇內的測試案例,但 todo 含義比較接近待加入測試的區塊,並且將來若產出報告時也會特別整理出還有哪些地方需要補上測試。

    fails

    最後一個介紹的是測試案例才能使用的輔助 API,還記得列測試案例時的 sad path 嗎?當測試案例應該要失敗的時候就可以透過 fails 顯性標註他們:
    1
    2
    3
    4
    it.fails(`'1' + '1' should not to be '11'`, () => {
    const add = (x, y) => Number(x) + Number(y)
    expect(add('1', '1')).toBe('11')
    })
    當然你也可以單純藉由斷言中的 .not 達到同樣的效果:
    1
    2
    3
    4
    it(`'1' + '1' should not to be '11'`, () => {
    const add = (x, y) => Number(x) + Number(y)
    expect(add('1', '1')).not.toBe('11')
    })
    準備(Setup)與清理(Teardown)
    • beforeEach:在每個測試案例執行前呼叫一次
    • beforeAll:在所有測試案例執行前呼叫一次
    • afterEach:在每個測試案例執行後呼叫一次
    • afterAll:在所有測試案例執行後呼叫一次
    1
    2
    3
    4
    beforeEach(() => {
    // 針對測試案例重新初始化
    initTestEnv()
    })
    Setup & Teardown API 的範疇
    Setup & Teardown API 「所有」的定義是根據當下的範疇(context)來決定,除了測試檔案本身之外,使用 describe 來定義測試情境也會形成一個 context,因此假如測試情境有巢狀的情況如下:
    1
    2
    3
    4
    5
    6
    7
    8
    9
    10
    11
    12
    13
    14
    15
    16
    17
    18
    19
    20
    21
    22
    23
    24
    25
    26
    27
    28
    29
    30
    31
    32
    33
    34
    35
    36
    37
    38
    39
    40
    41
    42
    43
    44
    45
    46
    47
    48
    49
    50
    51
    52
    53
    54
    55
    const history = []
    describe('父層情境', () => {
    beforeAll(() => {
    history.push('beforeAll - 父層情境')
    })
    beforeEach(() => {
    history.push('beforeEach - 父層情境')
    })
    afterAll(() => {
    history.push('afterAll - 父層情境')
    })
    afterEach(() => {
    history.push('afterEach - 父層情境')
    })
    describe('子層情境 A', () => {
    beforeAll(() => {
    history.push('beforeAll - 子層情境 A')
    })
    beforeEach(() => {
    history.push('beforeEach - 子層情境 A')
    })
    afterAll(() => {
    history.push('afterAll - 子層情境 A')
    })
    afterEach(() => {
    history.push('afterEach - 子層情境 A')
    })
    it('案例 1', () => {
    history.push('子層情境 A 案例 1')
    })
    it('案例 2', () => {
    history.push('子層情境 A 案例 2')
    })
    })
    describe('子層情境 B', () => {
    beforeAll(() => {
    history.push('beforeAll - 子層情境 B')
    })
    beforeEach(() => {
    history.push('beforeEach - 子層情境 B')
    })
    afterAll(() => {
    history.push('afterAll - 子層情境 B')
    })
    afterEach(() => {
    history.push('afterEach - 子層情境 B')
    })
    it('案例 1', () => {
    history.push('子層情境 B 案例 1')
    })
    it('案例 2', () => {
    history.push('子層情境 B 案例 2')
    })
    })
    })

    此時將透過 console.log(history) 查看並歸納整理就能得到以下結果:

    1
    2
    3
    4
    5
    6
    7
    8
    9
    10
    11
    12
    13
    14
    15
    16
    17
    18
    19
    20
    21
    22
    23
    24
    25
    26
    27
    28
    29
    30
    31
    32
    33
    34
    35
    --- 進入測試程式碼本身的 Context
    --- 進入父層情境的 Context
    beforeAll - 父層情境
    --- 進入子層情境 A 的 Context
    beforeAll - 子層情境 A
    beforeEach - 父層情境
    beforeEach - 子層情境 A
    子層情境 A 案例 1 // 執行 情境 A 案例 1 的時間點
    afterEach - 子層情境 A
    afterEach - 父層情境
    beforeEach - 父層情境
    beforeEach - 子層情境 A
    子層情境 A 案例 2 // 執行 情境 A 案例 2 的時間點
    afterEach - 子層情境 A
    afterEach - 父層情境
    afterAll - 子層情境 A
    --- 離開子層情境 A 的 Context

    --- 進入子層情境 B 的 Context
    beforeAll - 子層情境 B
    beforeEach - 父層情境
    beforeEach - 子層情境 B
    子層情境 B 案例 1 // 執行 情境 B 案例 1 的時間點
    afterEach - 子層情境 B
    afterEach - 父層情境
    beforeEach - 父層情境
    beforeEach - 子層情境 B
    子層情境 B 案例 2 // 執行 情境 B 案例 2 的時間點
    afterEach - 子層情境 B
    afterEach - 父層情境
    afterAll - 子層情境 B
    --- 離開子層情境 B 的 Context
    afterAll - 父層情境
    --- 離開父層情境的 Context
    --- 離開測試程式碼本身的 Context
    避免誤區:在 expect 後做清掃處理
    除了上面的用法,有時候你可能會認為既然要清掃,那我何不在斷言後處理就好呢:
    1
    2
    3
    4
    5
    6
    7
    describe('', () => {
    it('', () => {
    expect().toBe()
    // 在這裡做清除
    resetTestingEnv()
    })
    })
    這麼做當你在測試案例都是通過的情況下都沒有問題,但是一但某個測試案例發生了錯誤,由於測試案例就會在斷言時拋出 AssertionError 後停止,因此很有可能因為一個測試案例壞了導致接下來所有測試都受到影響:
    1
    2
    3
    4
    5
    6
    7
    8
    9
    10
    11
    12
    13
    14
    15
    16
    17
    18
    describe('', () => {
    it('', () => {
    expect().toBe() // AssertionError,這個測試案例就停在這了
    resetTestingEnv()
    })
    it('', () => {
    // 在沒有經過 `resetTestingEnv()` 下進行測試
    })
    it('', () => {
    // 在沒有經過 `resetTestingEnv()` 下進行測試
    })
    it('', () => {
    // 在沒有經過 `resetTestingEnv()` 下進行測試
    })
    it('', () => {
    // 在沒有經過 `resetTestingEnv()` 下進行測試
    })
    })
    因此較佳的作法還是使用 Setup & Teardown API 來處理會比較好:
    1
    2
    3
    4
    5
    6
    7
    8
    9
    10
    11
    12
    13
    describe('', () => {
    beforeEach('', () => {
    setupTestingEnv()
    })
    afterEach('', () => {
    resetTestingEnv()
    })
    it('', () => {})
    it('', () => {})
    it('', () => {})
    it('', () => {})
    it('', () => {})
    })

    Vite Vue SSr 專案

    安裝

    Vite 需要Node.js版本 14.18+、16+。但是,某些模板需要更高的 Node.js 版本才能運作
    官網
    參考資料

    1
    2
    3
    4
    5
    6
    7
    npm create vite-extra@latest 專案名稱

    yarn create vite-extra 專案名稱

    pnpm create vite-extra 專案名稱

    deno run -A npm:create-vite-extra

    Streaming 串流媒體
    Non-streaming非串流媒體

    index.html//為 Vite的進入點
    1
    2
    3
    4
    5
    6
    7
    8
    9
    10
    11
    12
    13
    14
    15
    16
    17
    18
    19
    20
    21
    22
    23
    24
    25
    26
    27
    28
    29
    30
    ├── node_modules // 安裝的所有套件
    ├── package.json //整個專案的設定檔
    ├── package-lock.json //整個專案的設定檔
    ├── public
    │ └── favicon.ico
    ├── env 環境變數資料夾
    │ └── .env.development 開發中環境變數
    │ └── .env.production 正式環境變數
    │ └── .env.staging 測試環境變數

    ├── README.md
    ├── src
    │ ├── App.vue
    │ ├── entry-client.ts //客戶端
    │ ├── entry-server.ts//伺服器
    │ ├── assets //放靜態資源
    │ ├── components //子元件
    │ │──layouts //佈局
    ├── main.ts //進入點
    │ ├── router//路由
    │ │ └── router.ts //路由
    │ ├── stores//Pinina 狀態管理庫
    │ │
    │ └── views
    │ └── type //屬性設定
    │ ├── engineering.ts
    │ └── filter //過濾

    └── vite.config.js // Vite 的設定檔

    main.ts

    1
    2
    3
    4
    5
    6
    7
    8
    9
    10
    11
    12
    13
    import { createSSRApp } from 'vue'
    import App from './App.vue'

    // SSR requires a fresh app instance per request, therefore we export a function
    //每個請求都需要一個新的應用程式實例,因此我們匯出一個函數
    // that creates a fresh app instance. If using Vuex, we'd also be creating a
    // fresh store here.

    export function createApp() {
    const app = createSSRApp(App)
    return { app }
    }

    package.json啟動指令

    1
    2
    3
    4
    "scripts": {
    "build:client": "vite build --ssrManifest --outDir dist/client",
    "build:server": "vite build --ssr src/entry-server.ts --outDir dist/server",
    }

    啟動指令

    1
    2
    npm run build:client =>dist/client會多出這個資料夾
    npm run build:server =>dist/server"會多出這個資料夾

    注意:server.js Constants 的port 如果重複就會出現白幕(完全沒顯示任何…,