1
2
3
4
5
6
7
8
9
10
11
12
13
14
15
16
17
18
19
20
21
22
23
24
25
26
27
28
29
30
31
32
33
34
35
36
37
38
39
40
41
42
43
44
45
46
47
48
49
50
51
52
53
54
55
56
57
58
59
60
61
62
63
64
65
66
67
68
69
70
71
72
73
74
75
76
77
78
79
80
81
82
83
84
85
86
87
88
89
90
91
92
93
94
95
96
97
98
99
100
101
102
103
104
105
106
107
108
109
110
111
112
113
114
115
116
117
118
119
120
121
122
123
124
125
126
127
128
129
130
131
132
133
134
135
136
137
138
139
140
141
142
143
144
145
146
147
148
149
150
151
152
153
154
155
156
157
158
159
160
161
162
163
164
165
166
167
168
169
170
171
172
173
174
175
176
177
178
179
180
181
182
183
184
185
186
187
188
189
190
191
192
193
194
195
196
197
198
199
200
201
202
203
204
205
206
207
208
209
210
211
212
213
214
215
216
217
218
219
220
221
222
223
224
225
226
227
228
229
230
231
232
233
234
235
236
237
238
239
240
241
242
243
244
245
246
247
248
249
250
251
252
253
254
255
256
257
258
259
260
261
262
263
264
265
266
267
268
269
270
271
272
273
274
275
276
277
278
279
280
281
282
283
284
285
286
287
288
289
290
291
292
293
294
295
296
297
298
299
300
301
302
303
304
305
306
307
308
309
310
311
312
313
314
315
316
317
318
319
320
321
322
323
324
| <template>
<div class="calendar_area">
<FullCalendar :options='calendarOptions'></FullCalendar>
<!--openScheduleDialog-->
<el-dialog class="openScheduleDialog" v-model="openScheduleDialog" :title="openScheduleDialogTitle">
<!--新增-->
<div>
<el-form ref="ruleFormRef" :model="scheduleForm" :rules="scheduleRules" class="search-ruleForm">
<div class="schedule_info">
<el-form-item label="課程主題" prop="title">
<el-input name="form_name" v-model="scheduleForm.title" placeholder="請輸入你的課程主題" />
</el-form-item>
<el-form-item label="整天" prop="allDay">
<el-radio-group v-model="scheduleForm.allDay">
<el-radio label="true" value="true">是</el-radio>
<el-radio label="false" value="false">否</el-radio>
</el-radio-group>
</el-form-item>
<div class="allDay_area" v-show="scheduleForm.allDay==='true'">
<div class="color_area">
<div class="isAllday">是否整天?</div>
<el-tabs v-model="scheduleForm.thisDay" class="demo-tabs" @tab-click="handleClick">
<el-tab-pane label="是" name="true">
.
</el-tab-pane>
<el-tab-pane label="否" name="false">
<el-form-item label="課程結束時間">
<el-date-picker v-model="scheduleForm.endValue" type="date" placeholder="課程結束時間"
format="YYYY-MM-DD" value-format="YYYY-MM-DD" />
{{ endValue }}
<span style="color:red">{{endValueErrorMessage}}</span>
</el-form-item>
</el-tab-pane>
</el-tabs>
<el-form-item style="display:none" label="當日" prop="thisDay">
<el-radio-group v-model="scheduleForm.thisDay" @click="thisDayClick">
<el-radio label="true" value="true">.</el-radio>
<el-radio label="false" value="false">
<el-date-picker v-model="scheduleForm.endValue" type="date" placeholder="課程結束時間"
format="YYYY-MM-DD" value-format="YYYY-MM-DD" />
{{ endValue }}
<span style="color:red">{{endValueErrorMessage}}</span>
</el-radio>
</el-radio-group>
</el-form-item>
<el-form-item style="display:none" label="課程結束時間" v-show="!allDayShow">
<el-date-picker v-model="scheduleForm.endValue" type="date" placeholder="課程結束時間"
format="YYYY-MM-DD" value-format="YYYY-MM-DD" />
{{ endValue }}
<span style="color:red">{{endValueErrorMessage}}</span>
</el-form-item>
</div>
<div class="color_area">
<el-form-item label="底色">
<el-color-picker v-model="scheduleForm.backgroundColor" show-alpha
:predefine="predefineColors" />
</el-form-item>
<el-form-item label="邊框">
<el-color-picker v-model="scheduleForm.borderColor" show-alpha
:predefine="predefineColors" />
</el-form-item>
<el-form-item label="文字顏色">
<el-color-picker v-model="scheduleForm.textColor" show-alpha
:predefine="predefineColors" />
</el-form-item>
</div>
</div>
<div v-show="scheduleForm.allDay === 'false'">
<el-form-item class="time_area">
<span>開始時間</span>
<el-select v-model="scheduleForm.conversionStartTime" class="startTime" placeholder="Select"
size="large">
<el-option v-for="(startTime,index) in 24" :key="index" :label="startTime +':00'"
:value="startTime + ':00'" @click="getStartTime(startTime)" />
</el-select>
<span>結束時間</span>
<el-select v-model="scheduleForm.conversionEndTime" class="endTime" placeholder="Select"
size="large">
<el-option v-for="(endTime,index) in 24" :key="index" :label="endTime +':00'"
:value="endTime + ':00'" @click="getEndTime(endTime)" />
</el-select>
<span style="color:red">{{ selectTimeErrorMessage }}</span>
</el-form-item>
<el-form-item label="邊框">
<el-color-picker v-model="scheduleForm.borderColor" show-alpha
:predefine="predefineColors" />
</el-form-item>
</div>
<div class="curriculum_content">
<el-form-item label="課程簡介" prop="content">
<el-input v-model="scheduleForm.content" type="textarea" />
</el-form-item>
</div>
<div class="btn_area">
<el-button @click="resetForm(ruleFormRef)">取消</el-button>
<el-button @click="saveSchedule" class="addSave" type="primary">新增</el-button>
</div>
</div>
</el-form>
</div>
</el-dialog>
<!--刪除-->
<el-dialog class="openDelScheduleDialog" v-model="openDelScheduleDialog" :title="openScheduleDialogTitle">
<div class="delDialog">
<div class="sure"><b>你確定要刪除{{ DeleteItem }}課程?</b></div>
<div class="info">
<div><span class="title">課程主題</span>{{ scheduleClickItem.title }}</div>
<div v-show="scheduleClickItem.allDay"><span class="allday">全天</span>是</div>
<div><span class="start">開始時間</span>{{ scheduleClickItem.start }}</div>
<div><span class="end">結束時間</span>{{ scheduleClickItem.end }}</div>
<span>課程描述</span>
<div class="info_content">{{ scheduleClickItem.content }}</div>
</div>
<div class="btn_area">
<el-button @click="openDelScheduleDialog =false">取消</el-button>
<el-button @click="deleteEventClick" class="addSave" type="primary">刪除</el-button>
</div>
</div>
</el-dialog>
</div>
</template>
<script setup lang='ts'>
import { ref, onMounted } from 'vue';
//FullCalendar引入
import '@fullcalendar/core/vdom' // solve problem with Vite
import FullCalendar, { CalendarOptions, EventApi, DateSelectArg, EventClickArg } from '@fullcalendar/vue3'
import dayGridPlugin from '@fullcalendar/daygrid'
import timeGridPlugin from '@fullcalendar/timegrid'
import interactionPlugin from '@fullcalendar/interaction'
import listPlugin from '@fullcalendar/list'
// Fullcalendar 初始化數據 event-utils
// import { INITIAL_EVENTS, createEventId } from '../event-utils'
//element 表單 Type
import type { FormInstance, FormRules } from 'element-plus';
//element 頁籤 Type
import type { TabsPaneContext } from 'element-plus';
//element 成功或失敗警告訊息 Type
import { ElMessage } from 'element-plus';
//firebase資料庫
import firebase from "@/config/firebaseConfig.js";
//moment時間套件
import moment from 'moment';
//element 表單驗證規則
const ruleFormRef = ref<FormInstance>();
const dialogTableVisible = ref<boolean>(false);
//刪除數據
const openEventClick = (clickInfo: EventClickArg) => {
dialogTableVisible.value = true;
// if (confirm(`你確定 '${clickInfo.event.title}'`)) {
// clickInfo.event.remove()
// }
};
//表單Type scheduleFormType
interface scheduleFormType{
id?: number |null |any,
title?: string | null,
start?: any | null,
thisDay?: any,
endValue?: any,
end?: any | null,
startTime?: any ,
endTime?: any,
conversionStartTime?: any,
conversionEndTime?: any,
startDay?: string | null,
allDay?: any | boolean |null,
backgroundColor?: string | null,
borderColor?: string | null,
textColor?: string | null,
content?: string | null,
}
//設置表單
const scheduleForm = ref<scheduleFormType>({
id: null,
title: '',
start: '',
end: '',
allDay: '',
backgroundColor: '#00ced1',
borderColor: '#ddd',
textColor: '#333',
content: '',
})
//顏色套件
const predefineColors = ref<string[]>([
'#333',
'#ffffff',
'#CACFD2',
'#009999',
'#33cccc',
'#33ccff',
'#6699ff',
'#3366ff',
'#6666ff',
'#9966ff',
'#9900cc',
'#cc3399',
'#cc6699',
'#ff6666',
'#ffcc00',
'#009900',
'#006600',
'#006699',
'#3366cc',
])
//scheduleForm 驗證
const scheduleRules = reactive<FormRules>({
title: [
{ required: true, message: '課程主題不能為空!', trigger: 'blur' },
],
thisDay: [
{ required: true, message: '不能為空!', trigger: 'change', },
],
})
//scheduleForm 驗證
const scheduleRules = reactive<FormRules>({
title: [
{ required: true, message: '課程主題不能為空!', trigger: 'blur' },
],
thisDay: [
{ required: true, message: '不能為空!', trigger: 'change', },
],
})
//新增事件
const handleDateSelect = (selectInfo: DateSelectArg) => {
let title = prompt('請為您的活動輸入新標題')
let calendarApi = selectInfo.view.calendar
calendarApi.unselect() //清除日期選擇
if (title) {
calendarApi.addEvent({
id: Math.floor(Date.now() / 1000),
title: scheduleForm.value.title,
start: moment.unix(scheduleForm.value.startTime).format("yyyy-MM-DDTHH:mm"),
end: moment.unix(scheduleForm.value.endTime).format("yyyy-MM-DDTHH:mm"),
backgroundColor: scheduleForm.value.backgroundColor,
borderColor: scheduleForm.value.borderColor,
textColor: scheduleForm.value.textColor,
content: scheduleForm.value.content,
})
}
}
//處理事件
const handleEvents = (events: EventApi[]) => {
//currentEvents = events
};
//獲取數據
const GetCalendar = () => {
calendarOptions.events = [];
//轉為陣列
}
//FullCalendar calendarOptions設置
const calendarOptions = ref<any>({
timeZone: 'UTC',
plugins: [
dayGridPlugin,
timeGridPlugin,
interactionPlugin,
listPlugin,// needed for dateClick
],
// 頭標題
headerToolbar: {
//初始設置 left: 'prev,next today',
left: 'prev',
center: 'title',
right: 'next'
},
//螢幕尺寸767以下顯示
initialView: window.screen.width < 767 ? 'listWeek' : 'dayGridMonth',
//高度設置
height: window.screen.width < 767 ? 800 : 800,
//*****初始化,新增事件初始化改為空值陣列,
initialEvents: [],
//新增以後將獲得的事件陣列數據放回events,
events: scheduleCalendarList.value,
//時間設置
eventTimeFormat: {
hour: '2-digit',
minute: '2-digit',
hour12: false
},
//刪除事件
eventClick: openDeleteEvent,
//新增事件
select: addSchedule,
editable: false,//允許編輯
droppable: false, //允許將事情放到日曆上
selectable: true, //允許選擇
selectMirror: true,//允許選擇鏡像
dayMaxEvents: true,//允許一天最多事件時就顯示彈出窗口
weekends: true,//顯示週末
eventsSet:handleEvents,
drop: dropEvents;
// 更新遠程數據庫
// eventAdd:
// eventChange:
// eventRemove:
})
//onMounted
onMounted(() => {
GetCalendar();
});
</script>
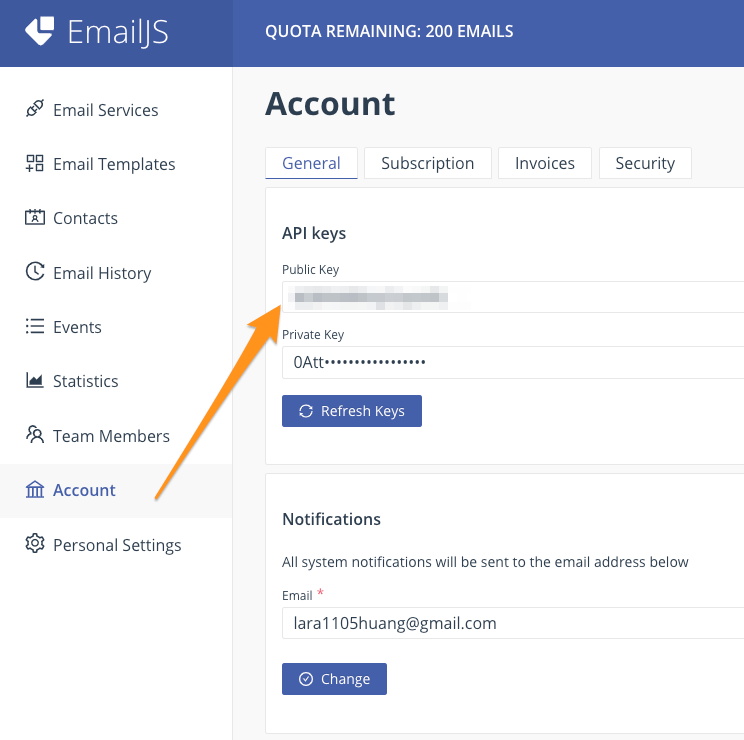
|
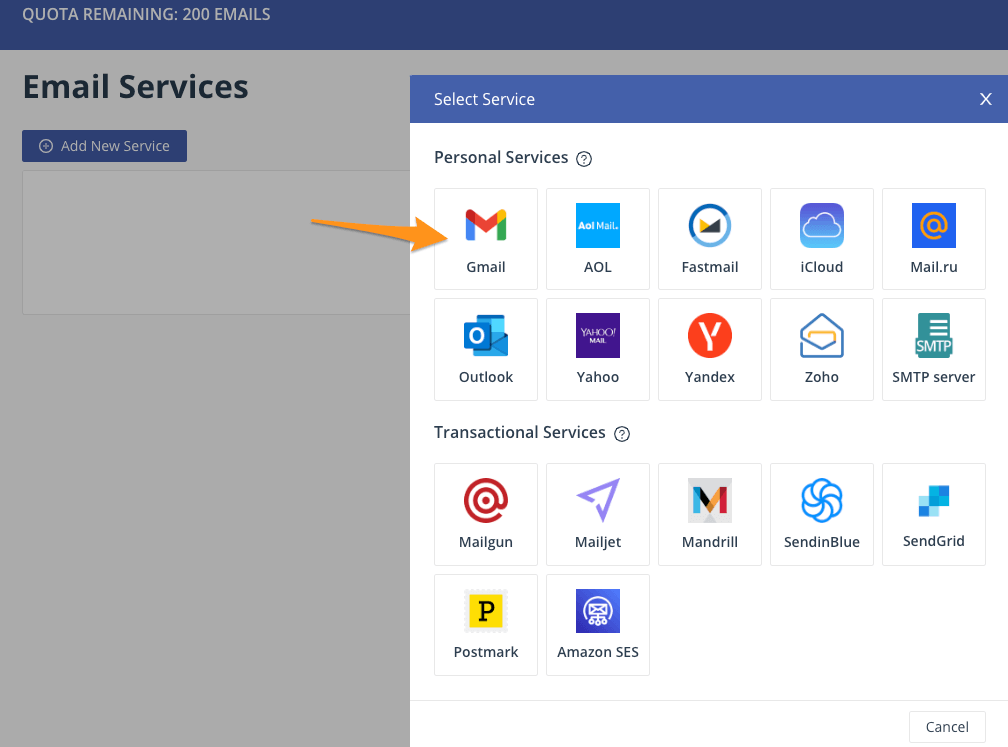
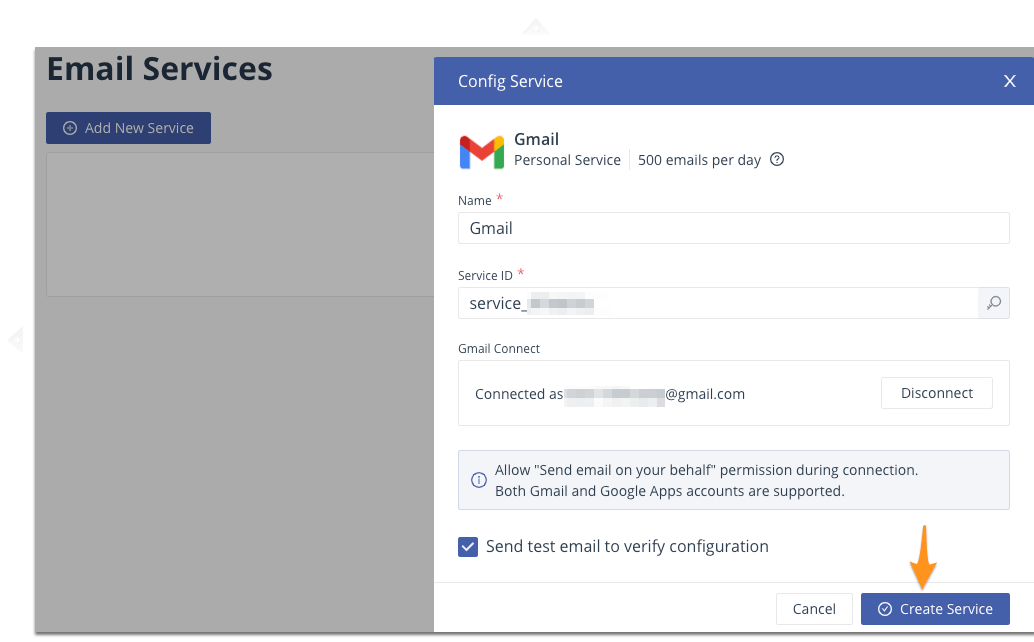
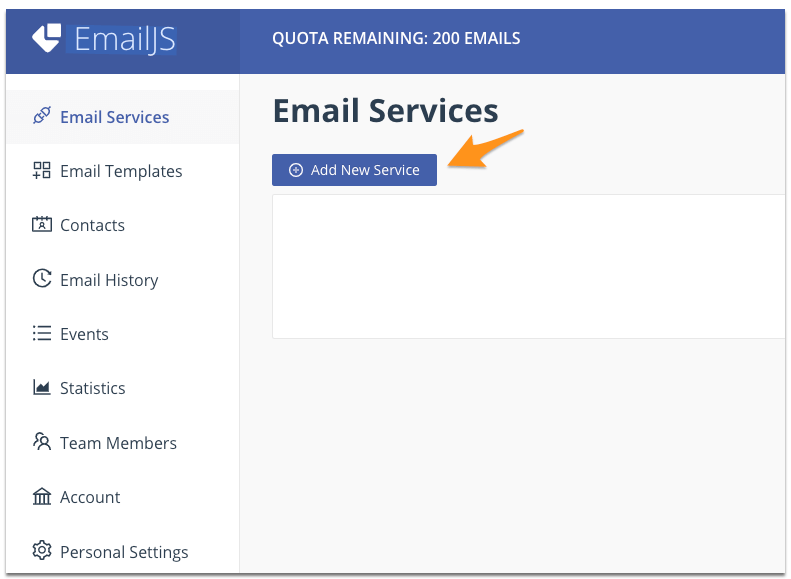 選擇Gmail