1
2
3
4
5
6
7
8
9
10
11
12
13
14
15
16
17
18
19
20
21
22
23
24
25
26
27
28
29
30
31
32
33
34
35
36
37
38
39
40
41
42
43
44
45
46
47
48
49
50
51
52
53
54
55
56
57
58
59
60
61
62
63
64
65
66
67
68
69
70
71
72
73
74
75
76
77
78
79
80
81
82
83
84
85
86
87
88
89
90
91
92
93
94
95
96
97
98
99
100
101
102
103
104
105
106
107
108
109
110
111
112
| import { Component } from '@angular/core';
import { FormsModule } from '@angular/forms';
import { environment } from '../../environments/environment';
import { addListsType } from '../Type/toDo';
import { ToDoHeaderComponent } from '../components/to-do-header/to-do-header.component';
import { ToDOComponent } from '../components/to-do/to-do.component';
@Component({
selector: 'app-home',
imports: [FormsModule,ToDoHeaderComponent,ToDOComponent],
templateUrl: './home.component.html',
styleUrl: './home.component.scss'
})
export class HomeComponent {
newTask: string = '';
header:any= {
'Content-Type': 'application/json',
}
//新增
addItem(newTask: string) {
if (newTask.length>0) {
const vm = this;
const api = `${environment.apiUrl}/api/toDo`;
let query: any = {
title: newTask,
buildDate: Date.now(),
updataDate: Date.now(),
}
console.log('query', query)
fetch(api, { method: 'POST', headers: vm.header, body: JSON.stringify(query) })
.then((res) => res.json())
.then((data) => {
//unshift(data) 新增到第一個
//push(data)新㽪到最後一個
vm.addLists.unshift(data)
})
} else {
alert('沒有填寫新增項目')
}
};
//獲取
addLists: addListsType[] = [];
getAddLists() {
const vm = this;
const api = `${environment.apiUrl}/api/toDoLists`;
fetch(api, { method: 'GET' })
.then((res) => {return res.json();})
.then((res) => {
res.map(function (item: addListsType) {
let query: any = {
_id: item._id,
title: item.title,
Editing: false, // 編輯
Status: false, //選取狀態
CanEdit:true, //可以編輯
buildDate: item.buildDate,
updataDate: item.updataDate,
}
return vm.addLists.push(query);
/*Sort()排列*/
vm.addLists.sort(function (a, b) {
return b.buildDate - a.buildDate
})
return vm.addLists;
})
})
.catch((error) => {
console.log(`Error: ${error}`);
})
}
//刪除
deleteItem(item: any) {
const vm = this;
const api = `${environment.apiUrl}/api/toDo/${item._id}`
fetch(api, {method: 'DELETE',headers: this.header})
.then((res) => res.json())
.then((data) => {
const index = vm.addLists.findIndex(task => task._id === item._id);
vm.addLists.splice(index, 1)
});
}
//編輯
editItem(item: any) {
console.log('editItem', item)
const vm = this;
const api = `${environment.apiUrl}/api/toDo/${item._id}`;
let query: any = {
title: item.title,
buildDate: item.buildDate,
updataDate: Date.now(),
}
fetch(api, {
method: 'PUT',
headers: vm.header,
body: JSON.stringify(query)
})
.then((res) => res.json())
.then((data) => {
if (!item.Editing) {
alert("編輯成功")
}
});
}
//全選
selectAll() {
}
ngOnInit(): void {
this.getAddLists();
}
}
|


 scss樣式
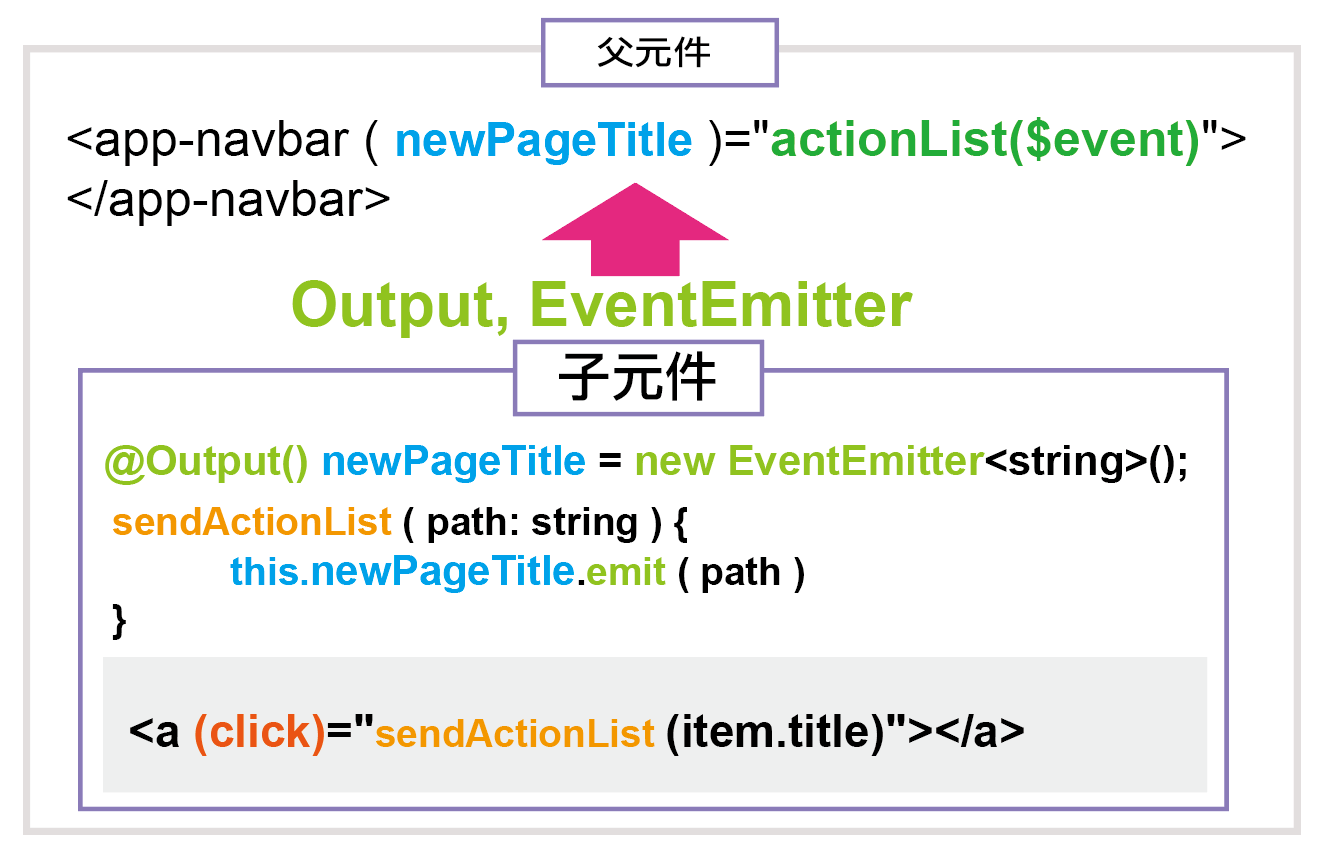
 ### app.component.ts
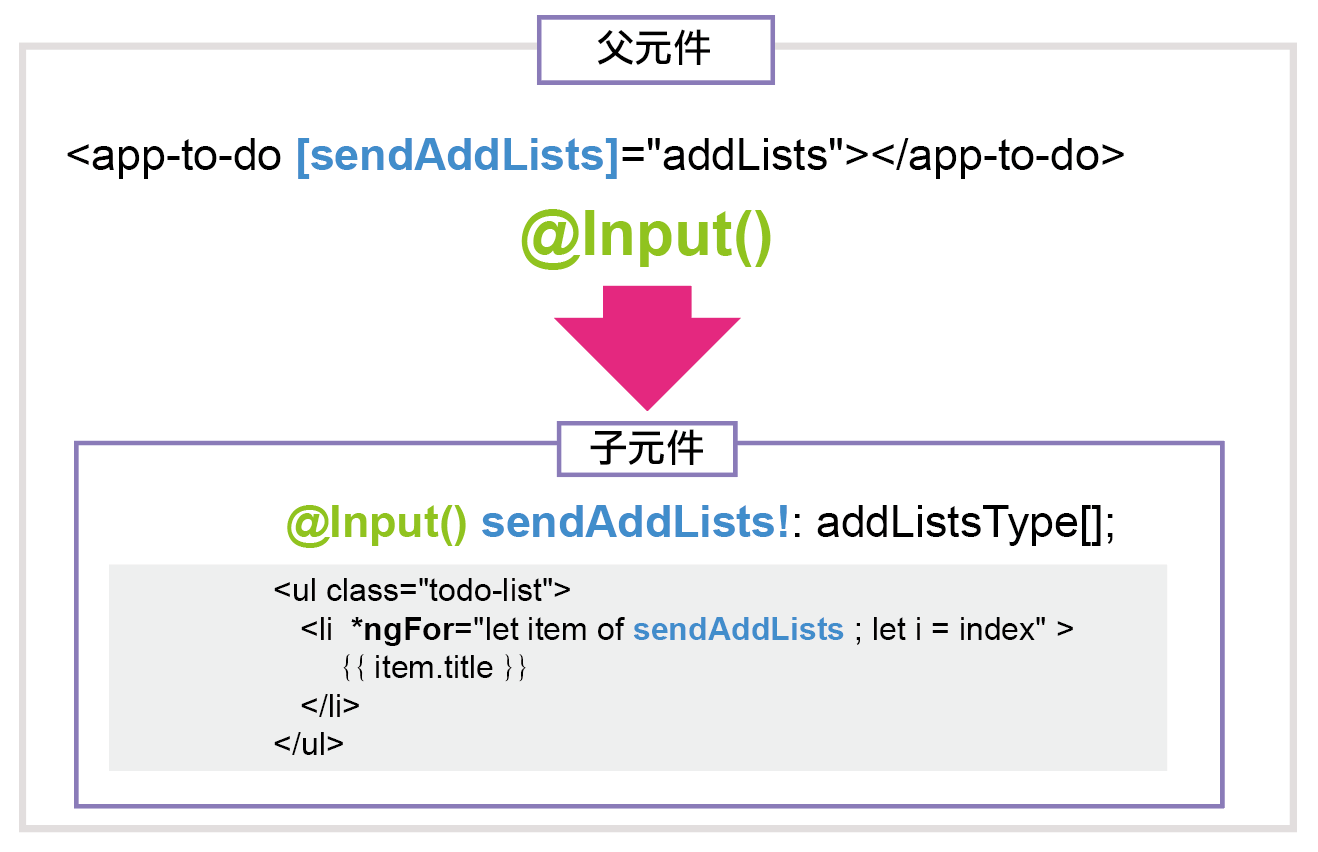
父對子傳值
### app.component.ts
父對子傳值


 //
//