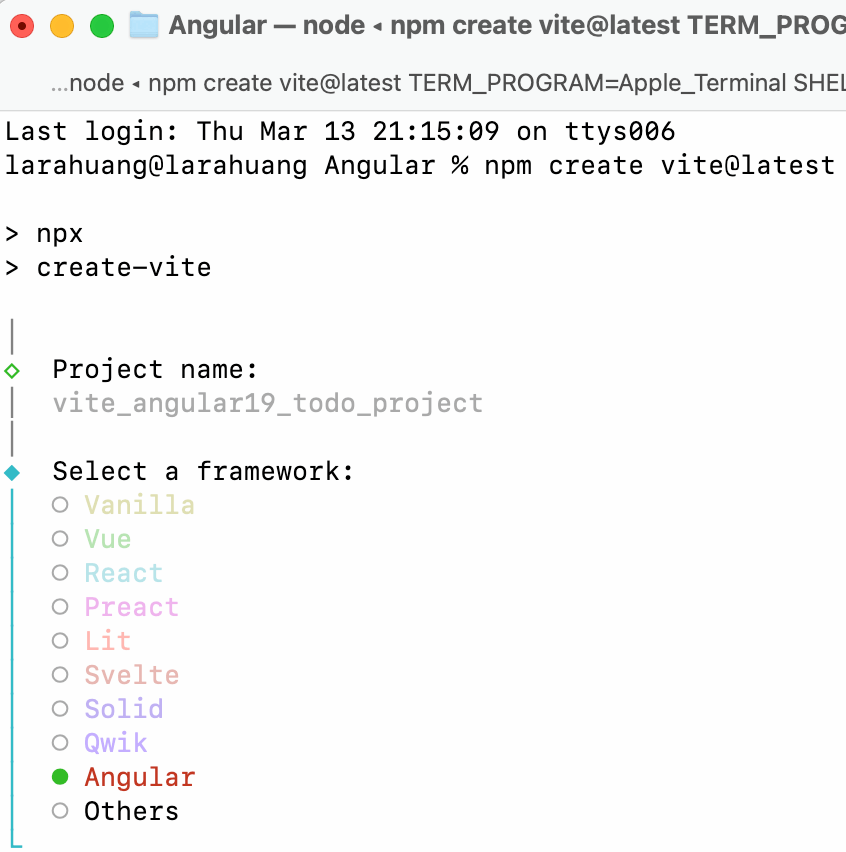
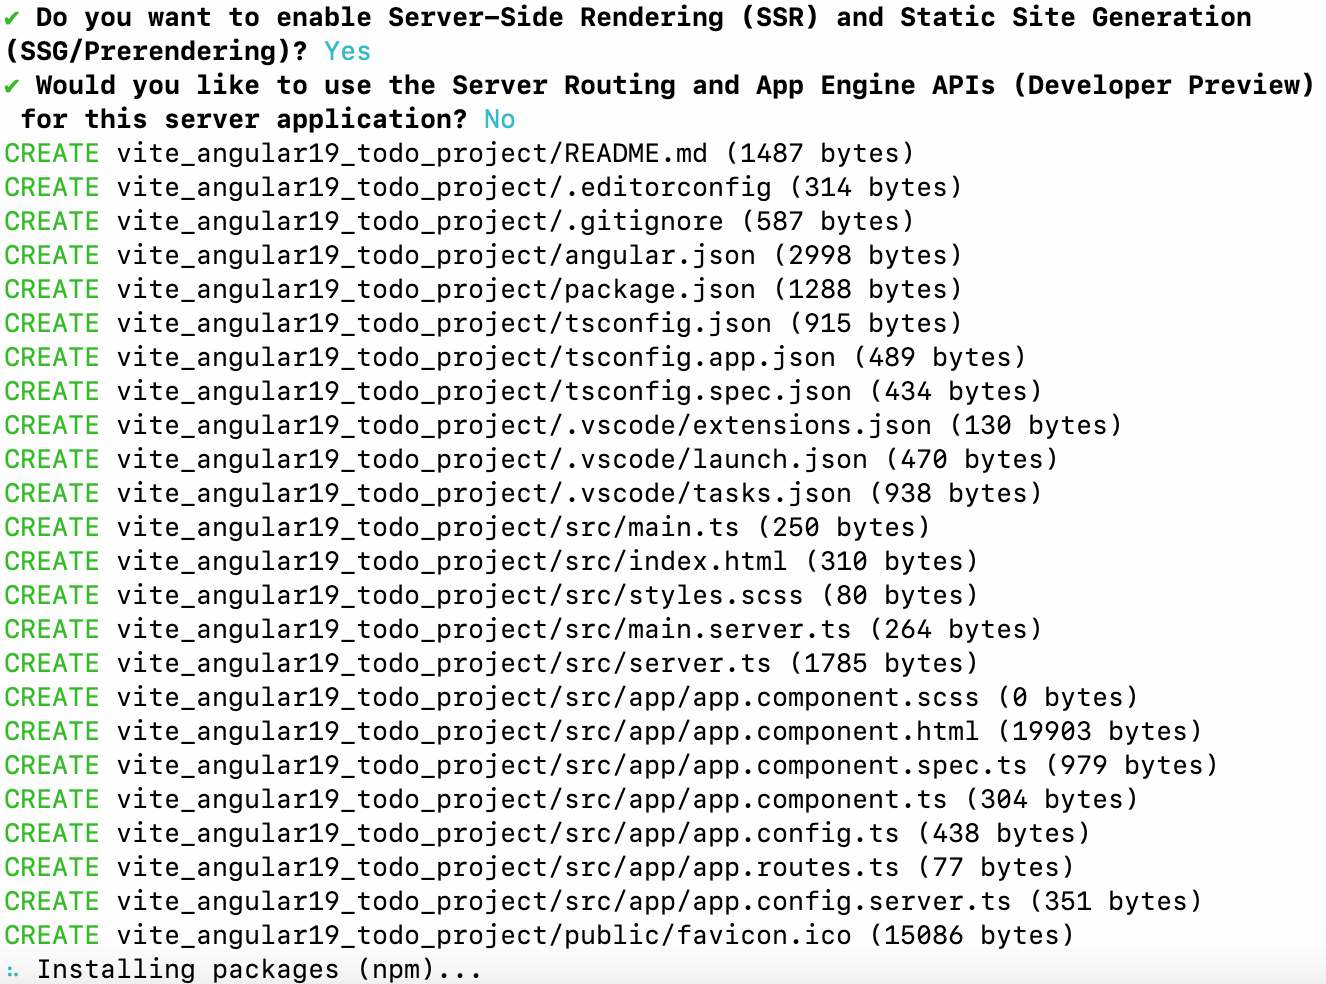
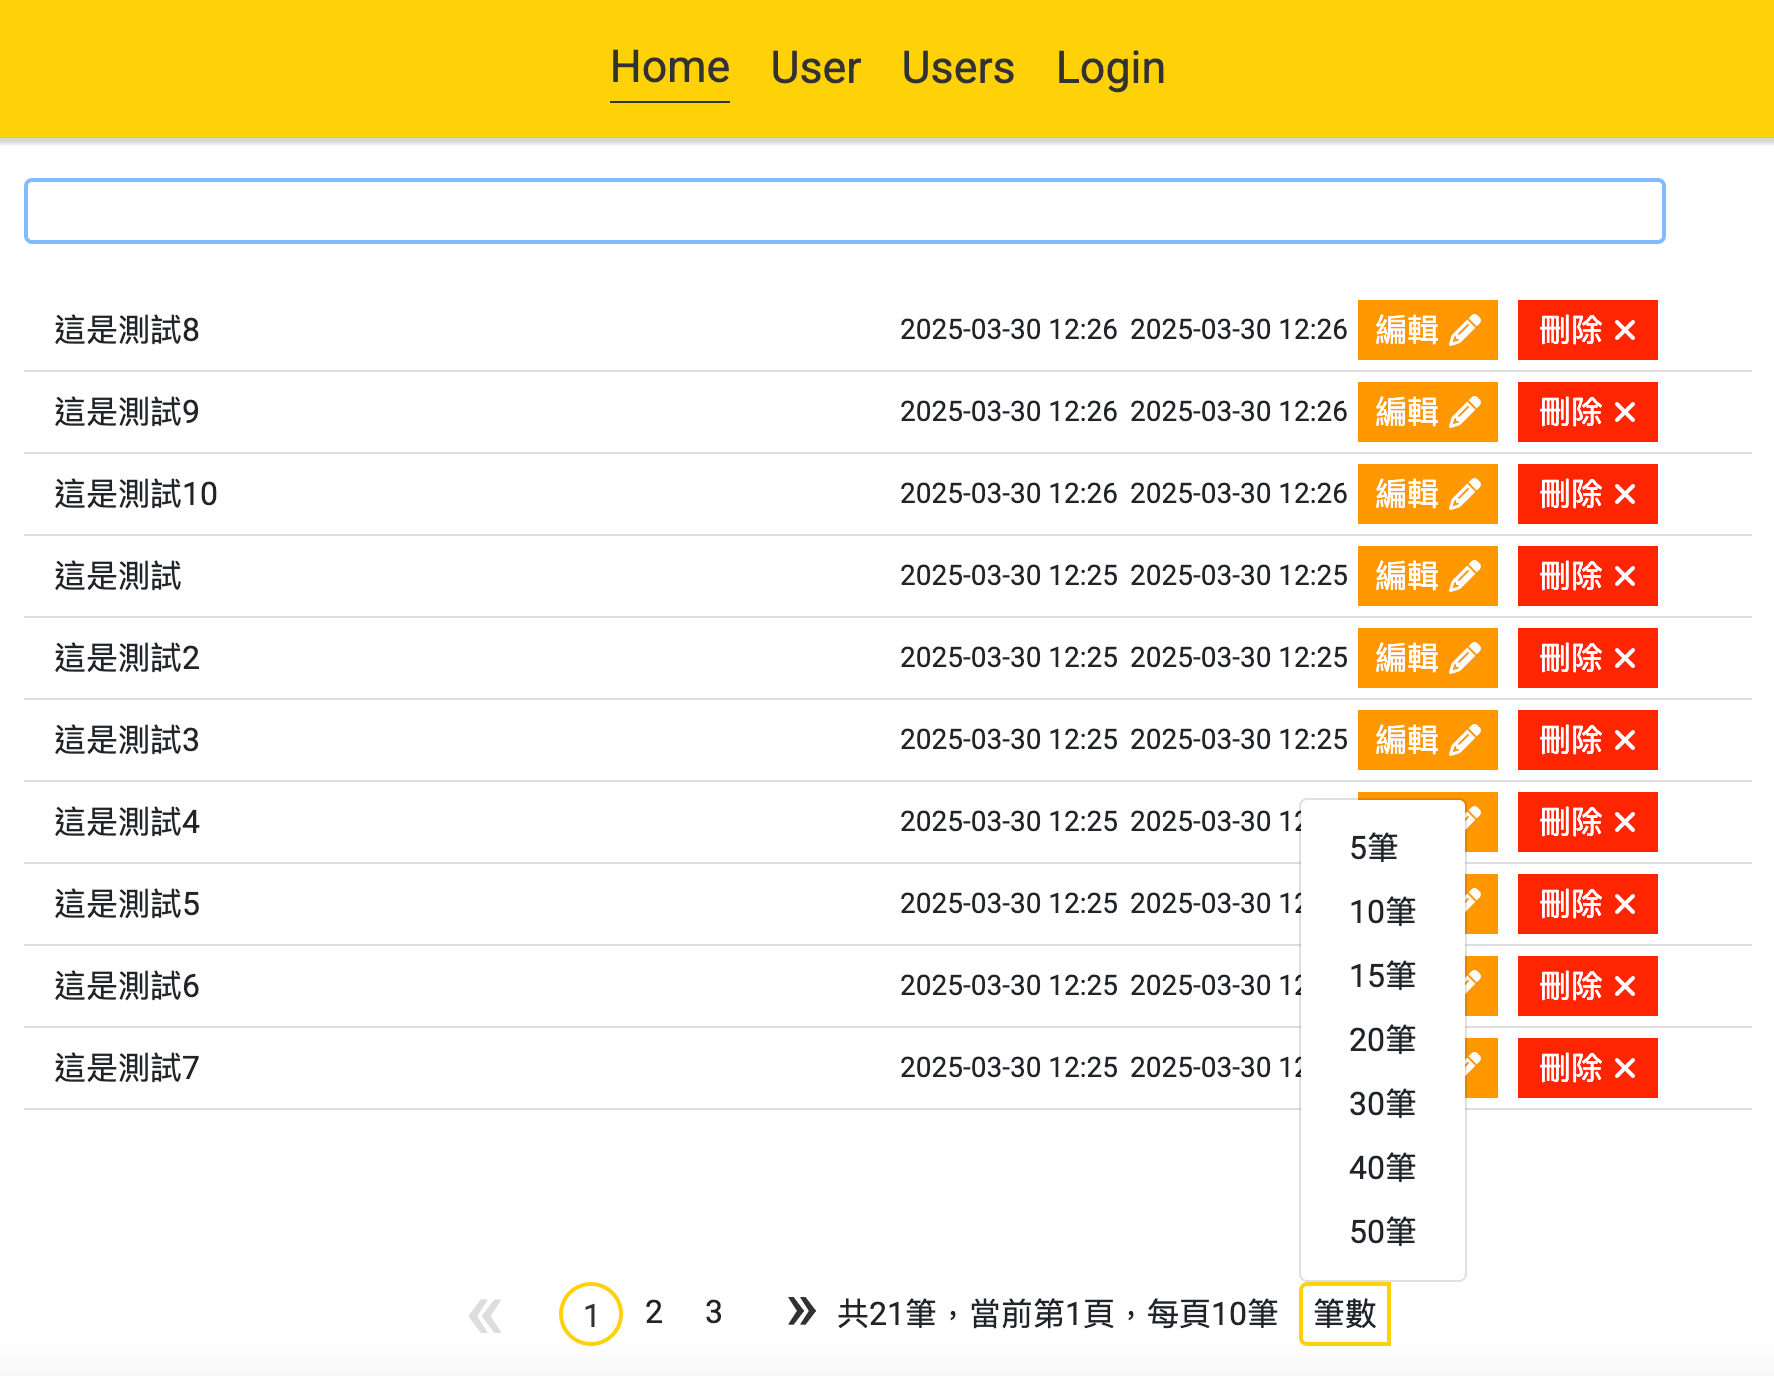
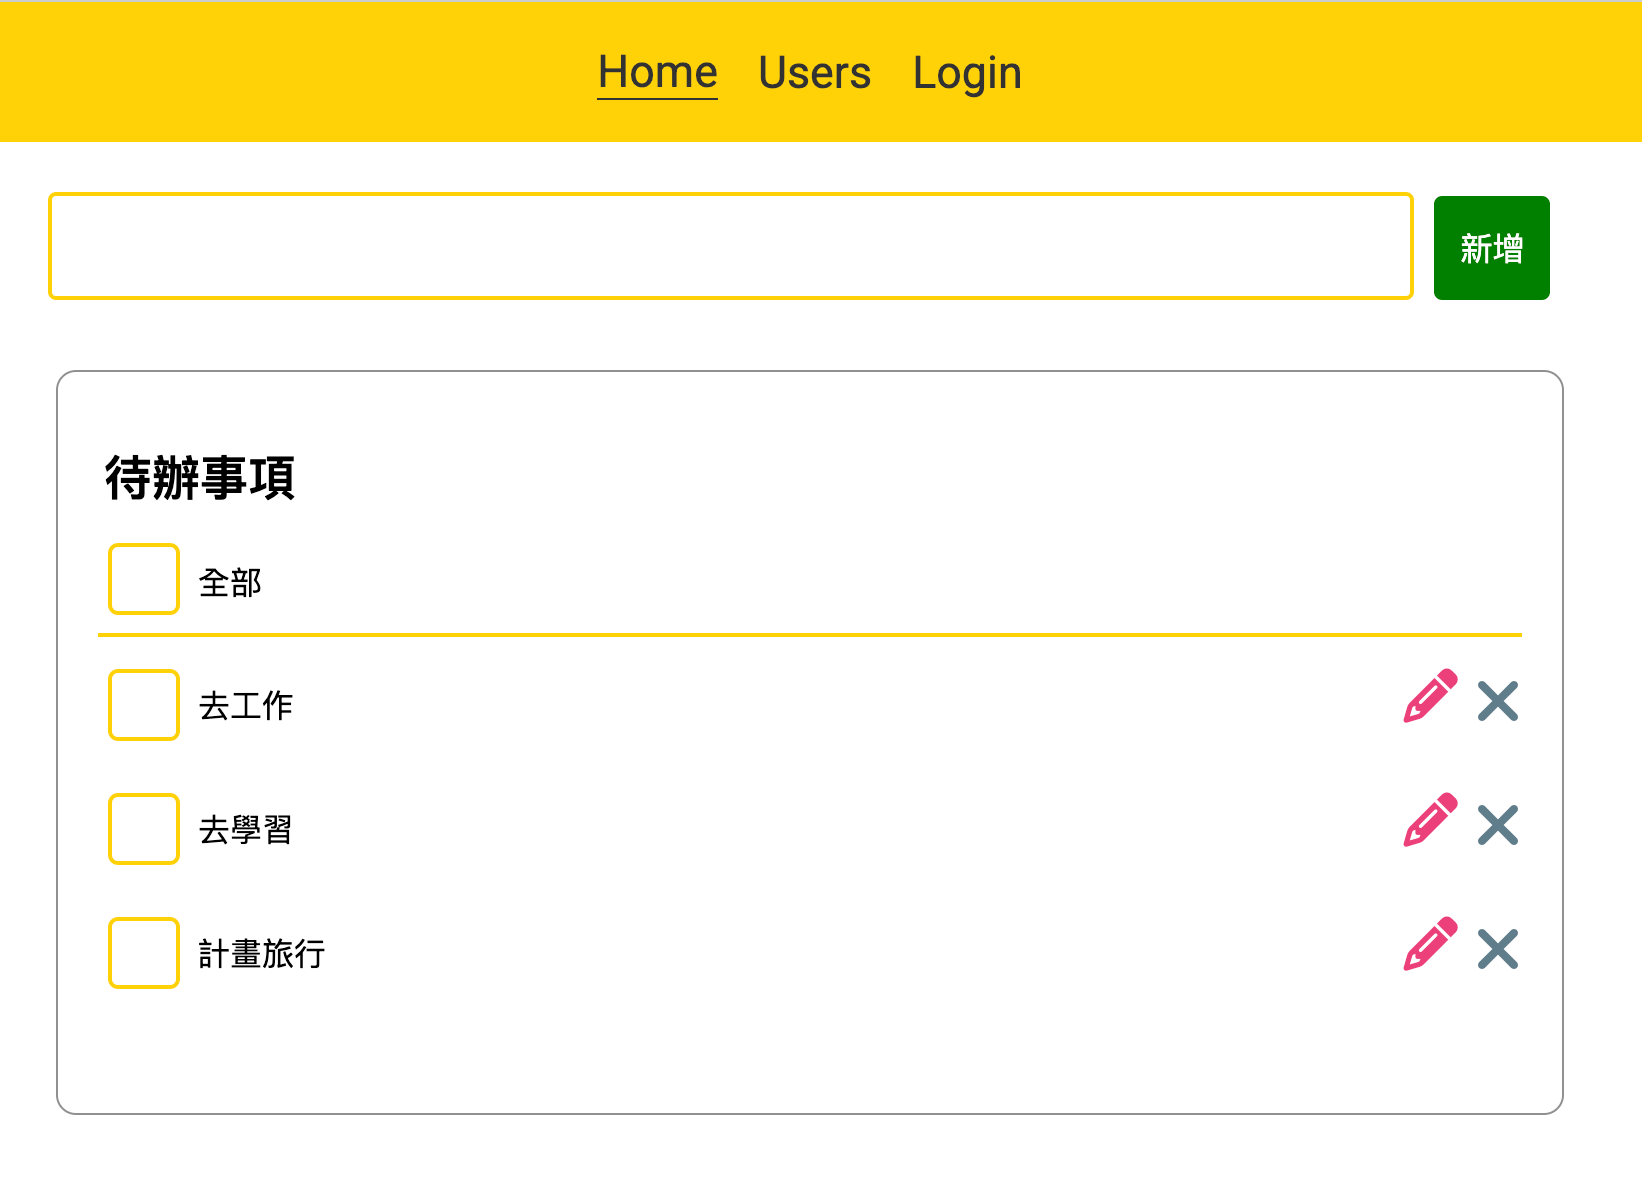
Angular 實戰Todo

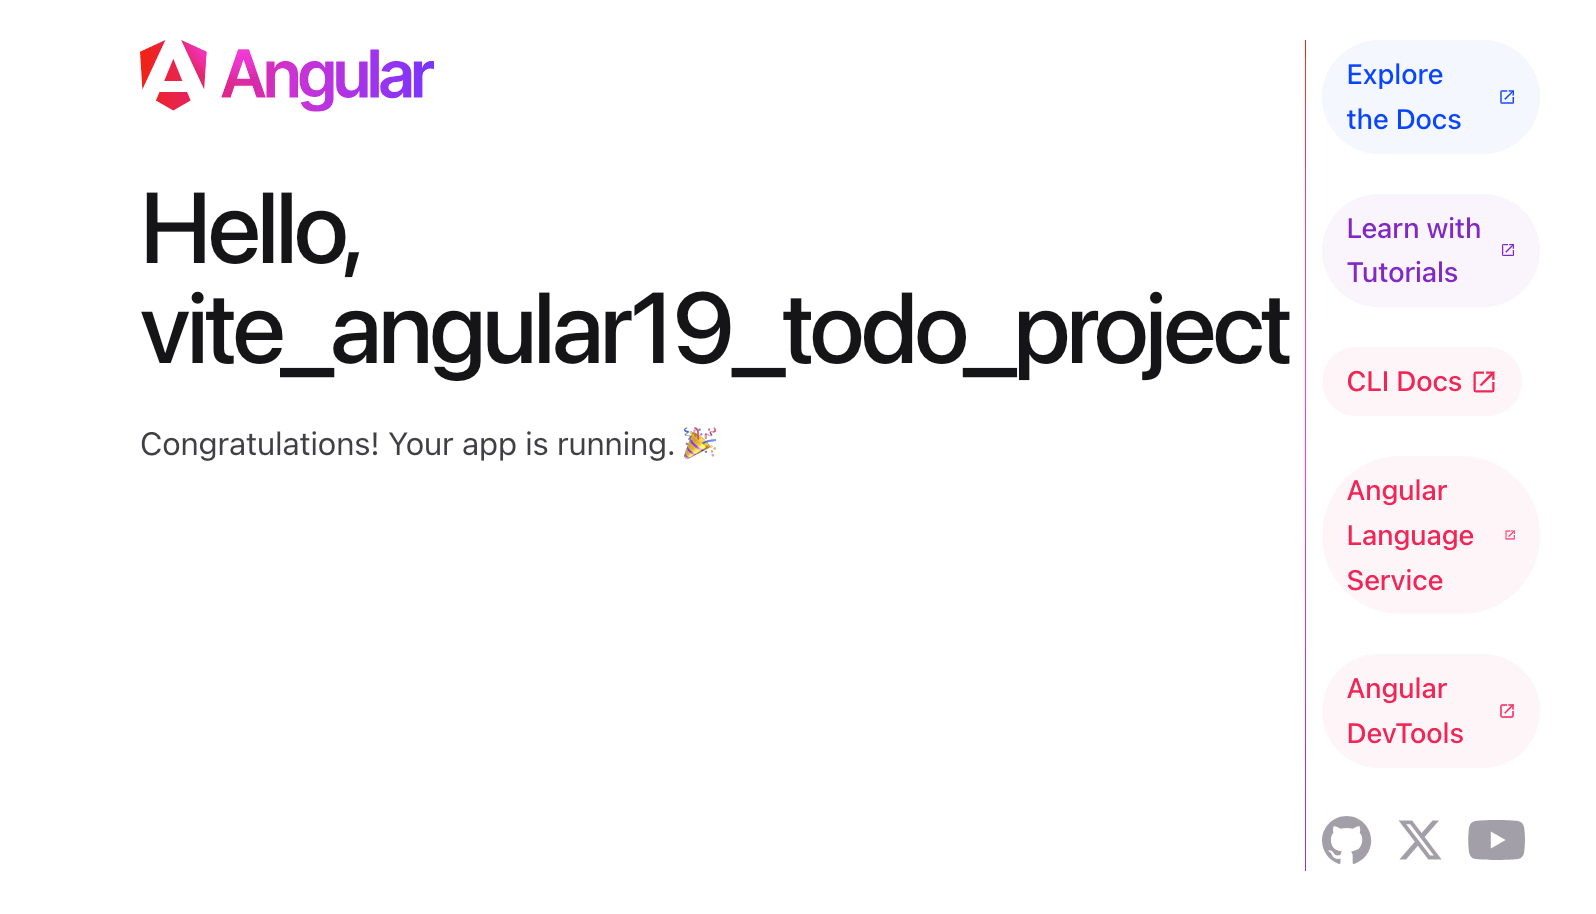
手把手使用Angular,目前版本號是Angular Cli 19.2.0,
Node 安裝 v20.17.0,npm 10.8.2

基礎使用:

  • Router路由
  • 環境變數
  • 使用Angular Material來幫我們快速建立各種元件
  • Angular Binding繫結:
    • 內嵌繫結:使用雙括號將變數宣染
    • 屬性繫結[ ]繫結, [(ngModel)]表單綁定 :
      • styleex.[ngStyle]="{'font-size': 26 + counter + 'px'}";[ngStyle]="{'font-size': 26 + counter + 'px'}";
      • class ex.[ngClass]="{'Hidden':isShowLists}" => [ngClass]="{‘樣式’:動態屬性布林值}"; => 引入 import { NgFor, NgIf,NgClass} from '@angular/common';
      • [id]="item._id"
      • 圖片雙向綁定[src]="item.imgPath"
      • 表單雙向綁定 [(ngModel)]="item.Status" => 引入 import { FormsModule } from '@angular/forms'
    • 事件繫結
      • 點擊事件 (click)="sendEditItem(item)"
      • checkbox表單事件 (change)="isAllSelected()"
      • 鍵盤事件(keyup.enter)="sendAddItem(newTask)"
      • 鍵盤事件(blur)
      • 表單事件(input)
    • 渲染列表 *ngFor => import { NgFor} from '@angular/common';
    • 渲染判斷 *NgIf => import { NgIf} from '@angular/common';
  • 父對子傳遞
  • 子對父傳值

Router路由

src/app/app.routes.ts

1
2
3
4
5
6
7
8
9
10
11
12
13
14
15
16
17
18
19
20
21
22
23
24
25
import { NgModule } from '@angular/core';
import { Routes, RouterModule } from '@angular/router';

import { HomeComponent } from './home/home.component';
import { UsersComponent } from './users/users.component';
import { UserComponent } from './user/user.component';
import { LoginComponent } from './login/login.component';
import { PageNotFoundComponent } from './page-not-found/page-not-found.component';

export const routes: Routes = [
{ path: "", component: HomeComponent },
{ path: "users", component: UsersComponent},
{ path: "user/:userId", component: UserComponent },
{ path: "login", component: LoginComponent},
{ path: '**', component: PageNotFoundComponent },
];
@NgModule({
imports: [
RouterModule.forRoot(routes)
],
exports: [RouterModule]
})
//https://angular.tw/start/start-routing
export class AppRoutingModule { }

環境變數

環境變數

使用Angular Material來幫我們快速建立各種元件

產生一個新的組件

1
ng g c 頁面或是功能

父元件

### app.component.ts 父對子傳值
1
2
3
4
5
6
7
8
9
10
11
12
13
14
15
16
17
18
19
20
21
22
23
24
25
26
27
28
29
30
31
32
33
import { Component } from '@angular/core';
import { RouterOutlet } from '@angular/router';
import { FormsModule } from '@angular/forms';
import { environment } from '../environments/environment';
import { NavbarComponent } from "./components/navbar/navbar.component";
import { navListType } from "./Type/nav";
@Component({
selector: 'app-root',
imports: [
RouterOutlet,
FormsModule,
NavbarComponent,
],
templateUrl: './app.component.html',
styleUrl: './app.component.scss'
})
export class AppComponent {
title = "我的網站";
navLists: navListType[] = [
{ title: 'Home' ,path:'/'},
{ title: 'Users', path: 'user' },
{title:'Login',path:'login'}
]
pageTitle: string = 'Home';
isActive: boolean = false;
actionList(path: string) {
this.pageTitle = path;
}
ngOnInit(): void {
console.log(environment.production ? 'Production' : '開發中')
}
}

子對父傳遞

父對子傳遞

app.component.html

router-outlet 如同Vue 的router-view
1
2
3
4
5
6
7
8
9
10
<app-navbar
[sendNavLists]="navLists"
[sendPageTitle]="pageTitle"
[sendIsActive]="isActive"
(newPageTitle)="actionList($event)"
></app-navbar>

<main class="main">
<router-outlet />
</main>

父元件

父對子傳值

home.component.ts

1
2
3
4
5
6
7
8
9
10
11
12
13
14
15
16
17
18
19
20
21
22
23
24
25
26
27
28
29
30
31
32
33
34
35
36
37
38
39
40
41
42
43
44
45
46
47
48
49
50
51
52
53
54
55
56
57
58
59
60
61
62
63
64
65
66
67
68
69
70
71
72
73
74
75
76
77
78
79
80
81
82
83
84
85
86
87
88
89
90
91
92
93
94
95
96
97
98
99
100
101
102
103
104
105
106
107
108
109
110
111
112
import { Component } from '@angular/core';
import { FormsModule } from '@angular/forms';
import { environment } from '../../environments/environment';
import { addListsType } from '../Type/toDo';
import { ToDoHeaderComponent } from '../components/to-do-header/to-do-header.component';
import { ToDOComponent } from '../components/to-do/to-do.component';
@Component({
selector: 'app-home',
imports: [FormsModule,ToDoHeaderComponent,ToDOComponent],
templateUrl: './home.component.html',
styleUrl: './home.component.scss'
})
export class HomeComponent {
newTask: string = '';
header:any= {
'Content-Type': 'application/json',
}
//新增
addItem(newTask: string) {
if (newTask.length>0) {
const vm = this;
const api = `${environment.apiUrl}/api/toDo`;
let query: any = {
title: newTask,
buildDate: Date.now(),
updataDate: Date.now(),
}
console.log('query', query)
fetch(api, { method: 'POST', headers: vm.header, body: JSON.stringify(query) })
.then((res) => res.json())
.then((data) => {
//unshift(data) 新增到第一個
//push(data)新㽪到最後一個
vm.addLists.unshift(data)
})
} else {
alert('沒有填寫新增項目')
}
};

//獲取
addLists: addListsType[] = [];
getAddLists() {
const vm = this;
const api = `${environment.apiUrl}/api/toDoLists`;
fetch(api, { method: 'GET' })
.then((res) => {return res.json();})
.then((res) => {
res.map(function (item: addListsType) {
let query: any = {
_id: item._id,
title: item.title,
Editing: false, // 編輯
Status: false, //選取狀態
CanEdit:true, //可以編輯
buildDate: item.buildDate,
updataDate: item.updataDate,
}
return vm.addLists.push(query);
/*Sort()排列*/
vm.addLists.sort(function (a, b) {
return b.buildDate - a.buildDate
})
return vm.addLists;
})
})
.catch((error) => {
console.log(`Error: ${error}`);
})
}
//刪除
deleteItem(item: any) {
const vm = this;
const api = `${environment.apiUrl}/api/toDo/${item._id}`
fetch(api, {method: 'DELETE',headers: this.header})
.then((res) => res.json())
.then((data) => {
const index = vm.addLists.findIndex(task => task._id === item._id);
vm.addLists.splice(index, 1)
});
}
//編輯
editItem(item: any) {
console.log('editItem', item)
const vm = this;
const api = `${environment.apiUrl}/api/toDo/${item._id}`;
let query: any = {
title: item.title,
buildDate: item.buildDate,
updataDate: Date.now(),
}
fetch(api, {
method: 'PUT',
headers: vm.header,
body: JSON.stringify(query)
})
.then((res) => res.json())
.then((data) => {
if (!item.Editing) {
alert("編輯成功")
}
});
}

//全選
selectAll() {

}
ngOnInit(): void {
this.getAddLists();
}
}

home.component.html

1
2
3
4
5
6
7
8
9
10
<app-to-do-header
(sendNewTask)="addItem($event)"
>
</app-to-do-header>
<app-to-do
[sendAddLists]="addLists"
(sendChangeDeleteItem)="deleteItem($event)"
(sendChangeEditItem)="editItem($event)"
></app-to-do>

子元件

這是NavBar

components/to-do-header

1
2
3
4
5
6
7
8
9
10
11
12
13
14
15
16
17
18
19
20
21
22
23
24
25
26
27
28
29
30
31
import { Component, EventEmitter, Input, OnInit, Output } from '@angular/core';
import { NgFor } from '@angular/common';
import { CommonModule } from '@angular/common';
import { RouterLink } from '@angular/router';
import { navListType } from '../../Type/nav';
@Component({
selector: 'app-navbar',
imports: [
NgFor,
CommonModule,
RouterLink
],
templateUrl: './navbar.component.html',
styleUrl: './navbar.component.scss',

})

export class NavbarComponent implements OnInit{
@Input() sendNavLists!: navListType[];
@Input() sendPageTitle!: string;
@Input() sendIsActive!: boolean;

@Output() newPageTitle = new EventEmitter<string>();
//點擊頁面按鈕函式
sendActionList(path: string) {
this.newPageTitle.emit(path);
}
ngOnInit(): void {

}
}
1
2
3
4
5
6
7
8
 <ul  class="nav">
<li *ngFor="let item of sendNavLists ; let i = index"
[ngClass]="sendPageTitle === item.title ? 'activeNav' : ''">
<a [routerLink]="item.path"
(click)="sendActionList(item.title)"
class="cursor-pointer">{{item.title}}</a>
</li>
</ul>

這是新增表單區域

子對父傳遞

父對子傳遞

components/to-do-header ### to-do-header.component.ts
1
2
3
4
5
6
7
8
9
10
11
12
13
14
15
16
17
18
19
20
21
22
23
24
25
26
import { Component,Input, OnInit,Output, EventEmitter } from '@angular/core';
import { FormsModule } from '@angular/forms'
@Component({
selector: 'app-to-do-header',
standalone: true,
imports: [ FormsModule ],
templateUrl: './to-do-header.component.html',
styleUrl: './to-do-header.component.scss'
})
export class ToDoHeaderComponent implements OnInit {
@Output() sendNewTask = new EventEmitter<string>();
newTask: string = "";
header:any= {
'Content-Type': 'application/json',
}
//新增
sendAddItem(newTask: string) {
const message = '沒有填寫新增項目';
newTask.length>0?this.sendNewTask.emit(newTask):this.messageAlert(message )
}
messageAlert(message:string) {
alert(message)
}
ngOnInit(): void {
}
}
### to-do-header.component.html
1
2
3
4
5
6
7
8
9
10
<div class="todo_lists_header">
<input type="text"
[(ngModel)]="newTask"
[value]="newTask"
[placeholder]="newTask"
(keyup.enter)="sendAddItem(newTask)" >
<a class="button add_button"
(click)="sendAddItem(newTask)">新增</a>
</div>

## 這是ToDo列表 ### to-do.component.ts
1
2
3
4
5
6
7
8
9
10
11
12
13
14
15
16
17
18
19
20
21
22
23
24
25
26
27
28
29
30
31
32
33
34
35
36
37
38
39
40
41
42
43
44
45
46
import { Component, Input, OnInit, Output, EventEmitter } from '@angular/core';
import { FormsModule } from '@angular/forms'
import { NgFor, NgIf,NgClass} from '@angular/common';
import { addListsType } from '../../Type/toDo';
@Component({
selector: 'app-to-do',
imports: [NgFor,NgIf,NgClass,FormsModule],
templateUrl: './to-do.component.html',
styleUrl: './to-do.component.scss'
})

export class ToDOComponent implements OnInit{
@Input() sendAddLists!: addListsType[];

@Output() sendChangeDeleteItem = new EventEmitter<any>();
@Output() sendChangeEditItem = new EventEmitter<Object>()

sendDeleteItem(item: any) {
this.sendChangeDeleteItem.emit(item)
}
sendEditItem(item: any) {
item.Editing = !item.Editing;
this.sendChangeEditItem.emit(item)
};

masterSelected:boolean= false;
constructor(){}

sendAllChecked() {
for (var i = 0; i < this.sendAddLists.length; i++) {
this.sendAddLists[i].Status = this.masterSelected;
}
}
isAllSelected() {
this.masterSelected = this.sendAddLists.every(function(item:any) {
return item.Status == true;
})
}
isShowLists: boolean = false;
sendDeleteAll() {
this.isShowLists = true;
// this.sendAddLists =[]
}
ngOnInit(): void { }
}

to-do.component.html

1
2
3
4
5
6
7
8
9
10
11
12
13
14
15
16
17
18
19
20
21
22
23
24
25
26
27
28
29
30
31
32
33
34
35
36
37
38
39
40
41
42
43
44
45
46
47
48
49
50
51
52
<div class="todo_lists">
<div class="subject"><b>待辦事項</b></div>
<div class="flex-start">
<label class="all" for="all">全部
<input
type="checkbox"
name="all"
id="all"
[(ngModel)]="masterSelected"
(change)="sendAllChecked()"
>
<span class="round-mark"></span>
</label>
<i *ngIf="masterSelected"
(click)="sendDeleteAll()"
class="fa-solid fa-trash"></i>
</div>
<ul class="todo-list"
[ngClass]="{'Hidden':isShowLists}"
>
<!--*ngFor 陣列-->
<li
*ngFor="let item of sendAddLists ; let i = index">
<label class="checkBox"
[for]="item._id">
<span class="edit_area"
[ngClass]="{'noEditing':item.Editing}"
>
{{item.title}}
</span>
<!-- 選取狀態-->
<input
type="checkbox"
(change)="isAllSelected()"
[id]="item._id"
[(ngModel)]="item.Status"
>
<span class="round-mark"></span>
<div class="edit_area">
<input
type="text"
[(ngModel)]="item.title"
[ngClass]="{'editing':item.Editing}"
[value]="item.title">
</div>
</label>
<!--操作-->
<i (click)="sendEditItem(item)" class="fa-solid fa-pencil"></i>
<i (click)="sendDeleteItem(item)" class="fa-solid fa-xmark" ></i>
</li>
</ul>
</div>

Attribute, class, and style bindings and Two-way binding
參考資料

Vite Vue Line第三方登入

Line
網站上設定使用Line第三方登入的功能,需先到Line進行資料的設定與驗證,並取得「Channel ID」與「Channel secret」後,交由工程師做最後的串接才可使用於網頁中。 申請Line第三方登入之前,必須有一個Line的個人or官方帳號,若沒有則需先申請一組

導向授權頁面的query(Page Mode)
以下為導向各家授權頁面的Base URL

Google:https://accounts.google.com/o/oauth2/v2/auth

Facebook:https://www.facebook.com/v7.0/dialog/oauth

Line:https://access.line.me/oauth2/v2.1/authorize

Vite Vue 第三方登入

Vue Google 第三方登入

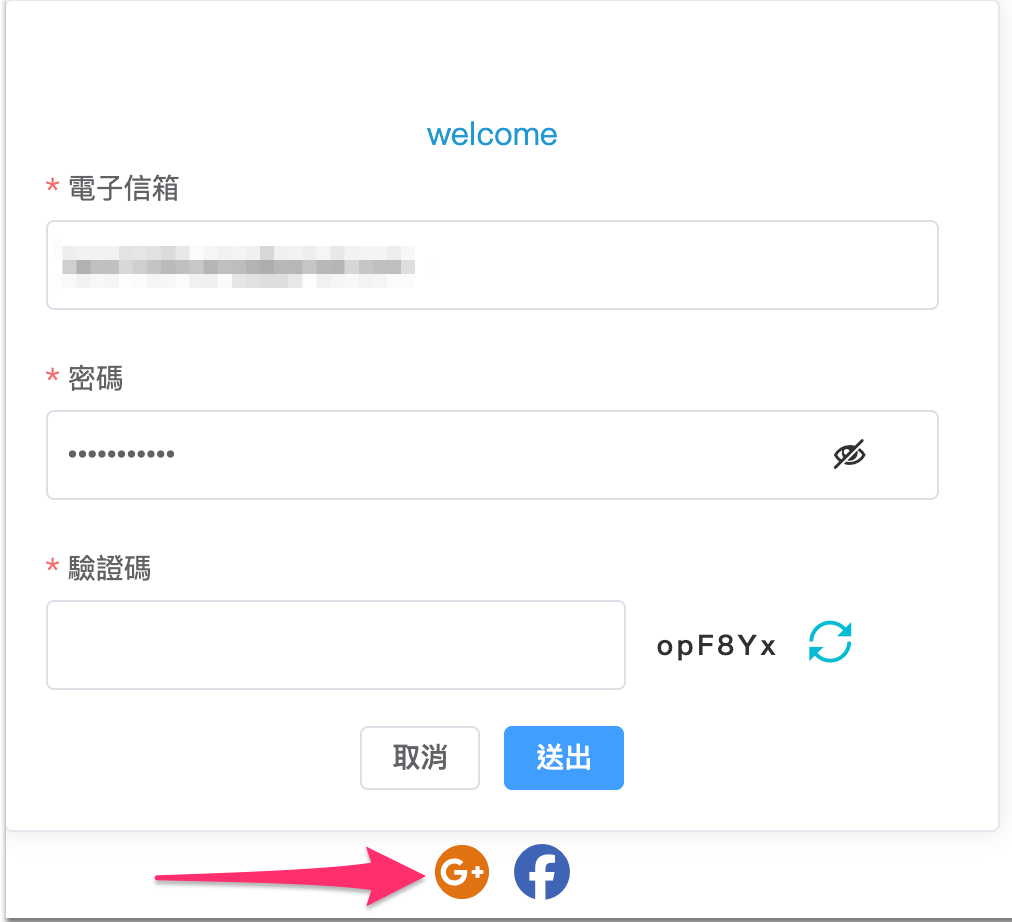
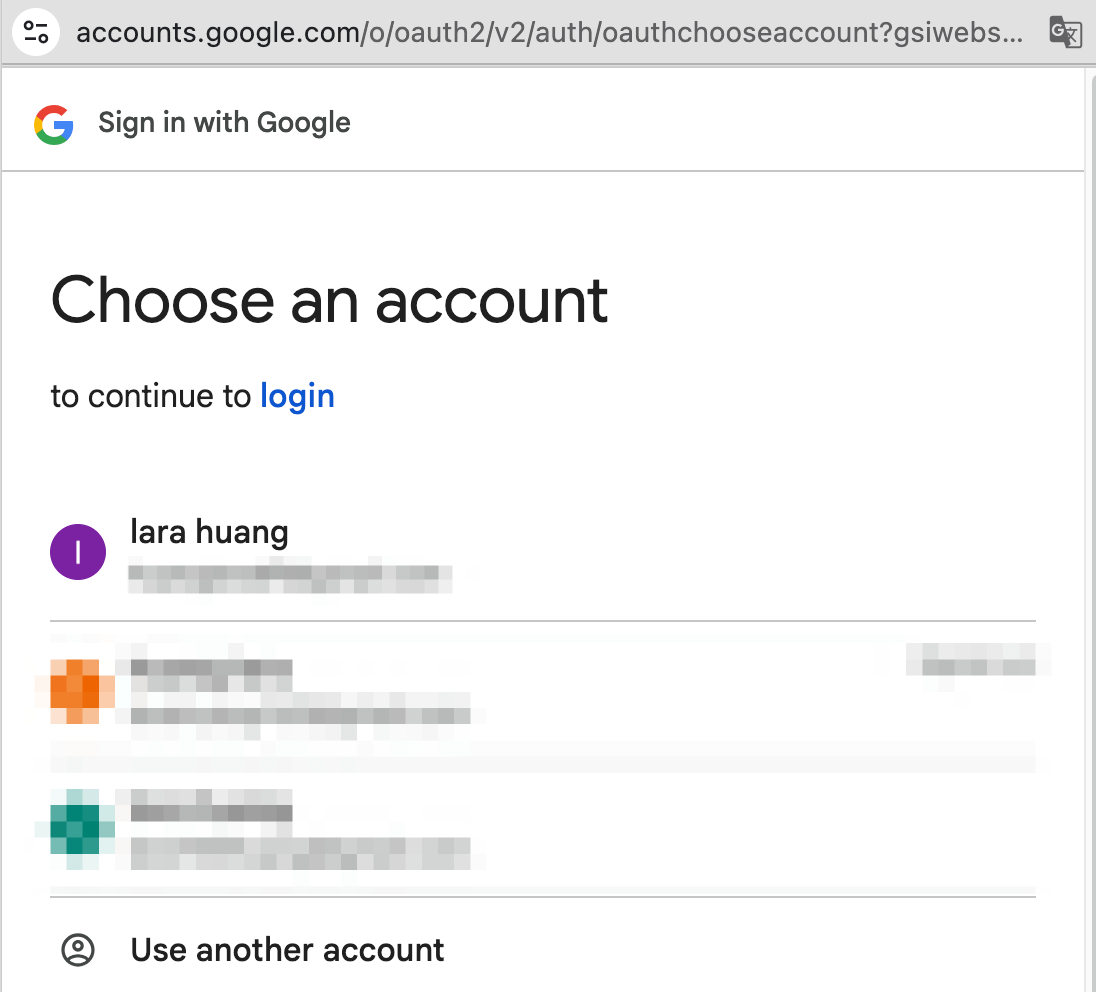
功能說明:第三方登入,按下Google登入按鈕,選擇Google登入的帳號
使用第三方Google登入 需要有一組 Google OAuth 使用的 Client ID, 你可以到 Google Console 新增一個「OAuth 2.0 用戶端 ID」
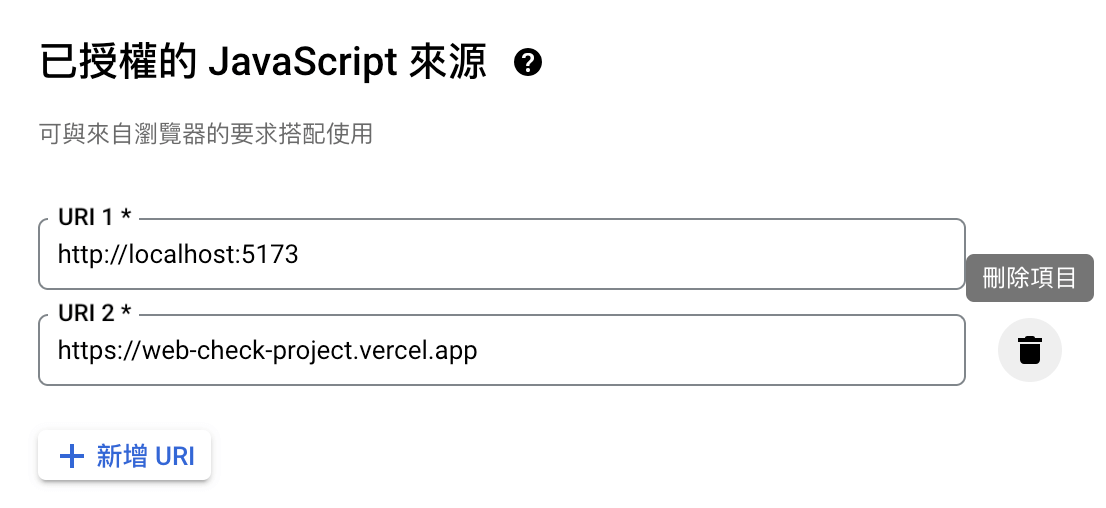
這邊提醒,在建立 OAuth Client ID 時,已授權的 JavaScript 來源,記得填寫上您的正式環境或開發環境的 Domain,且建議使用 HTTPS。
### 申請 Google 認證模式OAuth Google Console 畫面
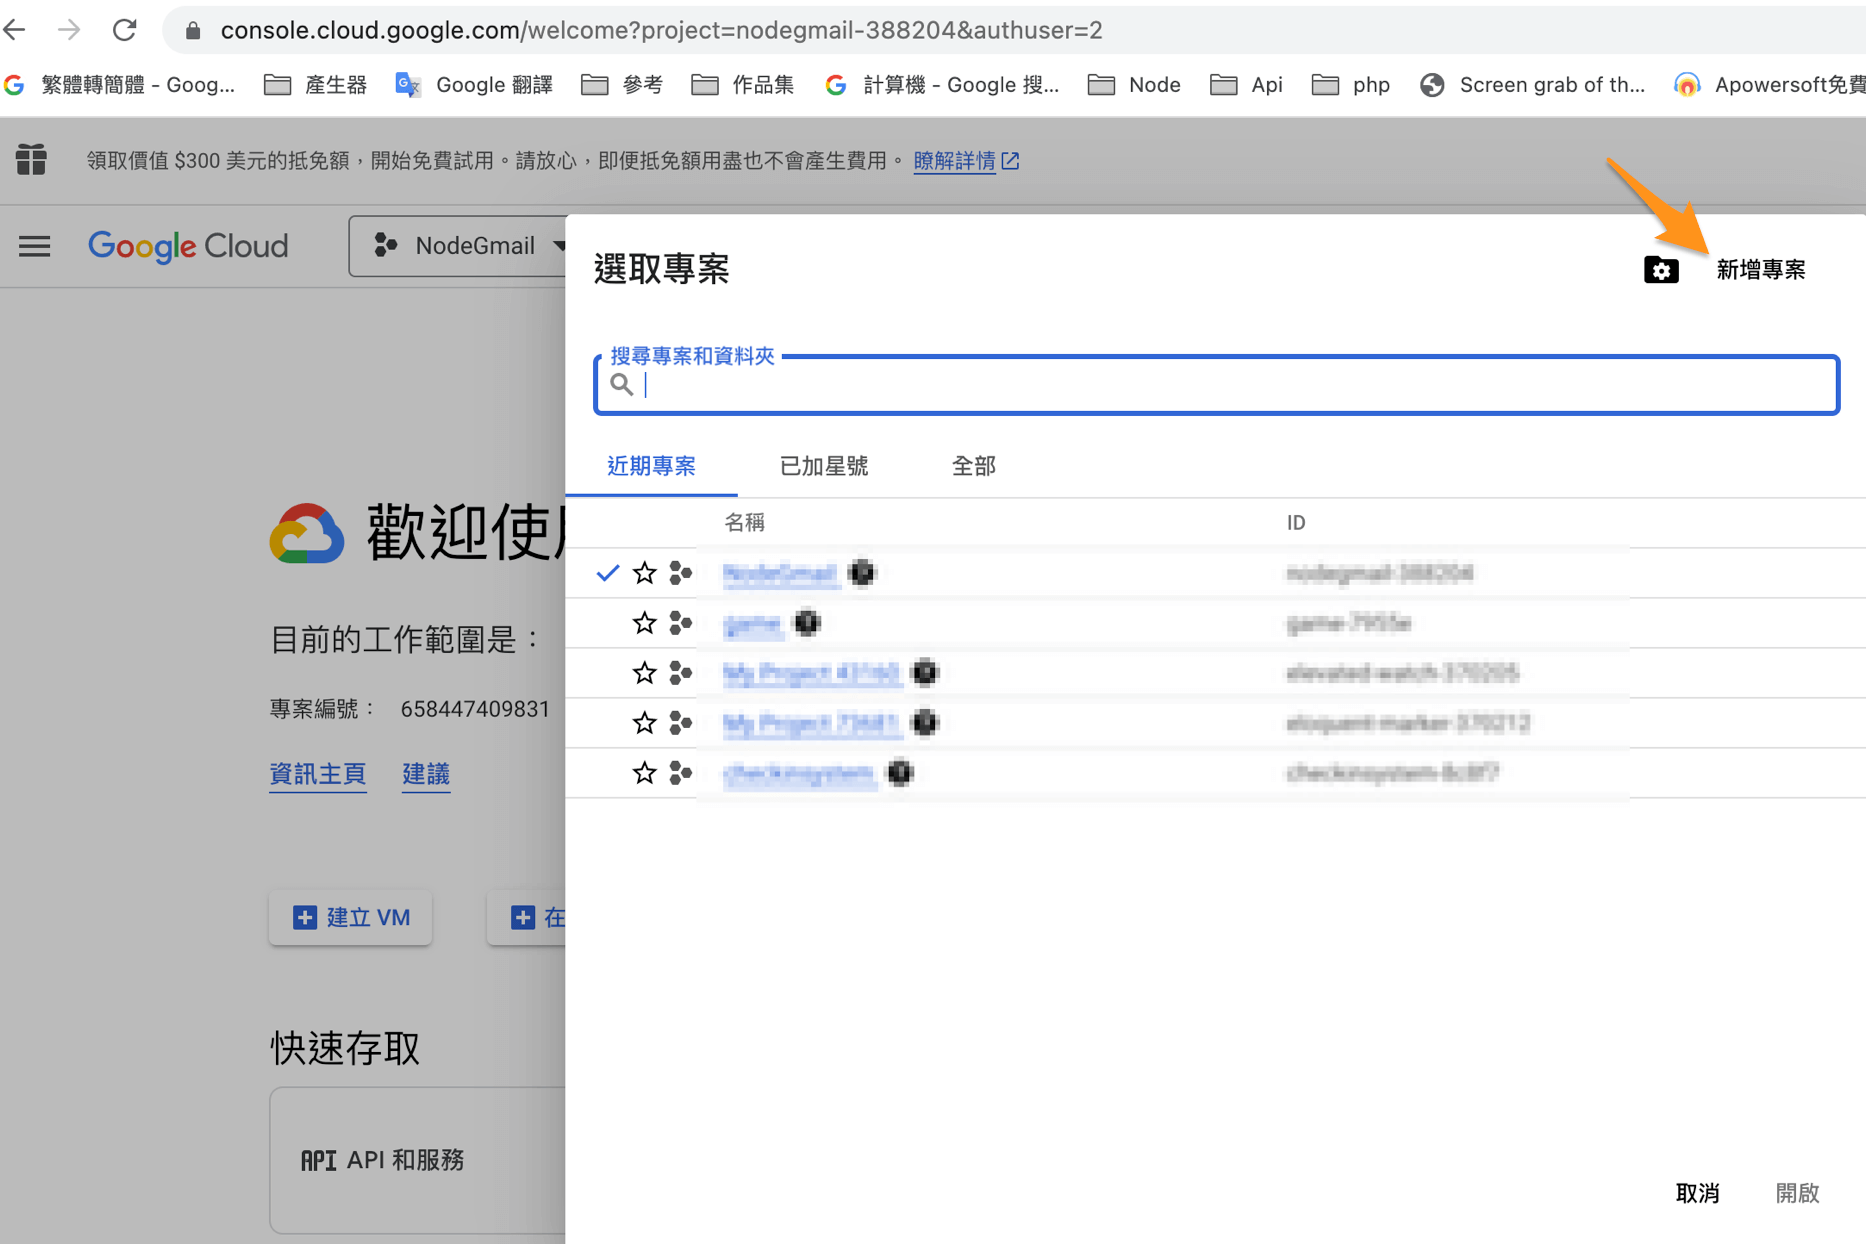
1. 建立一個新專案
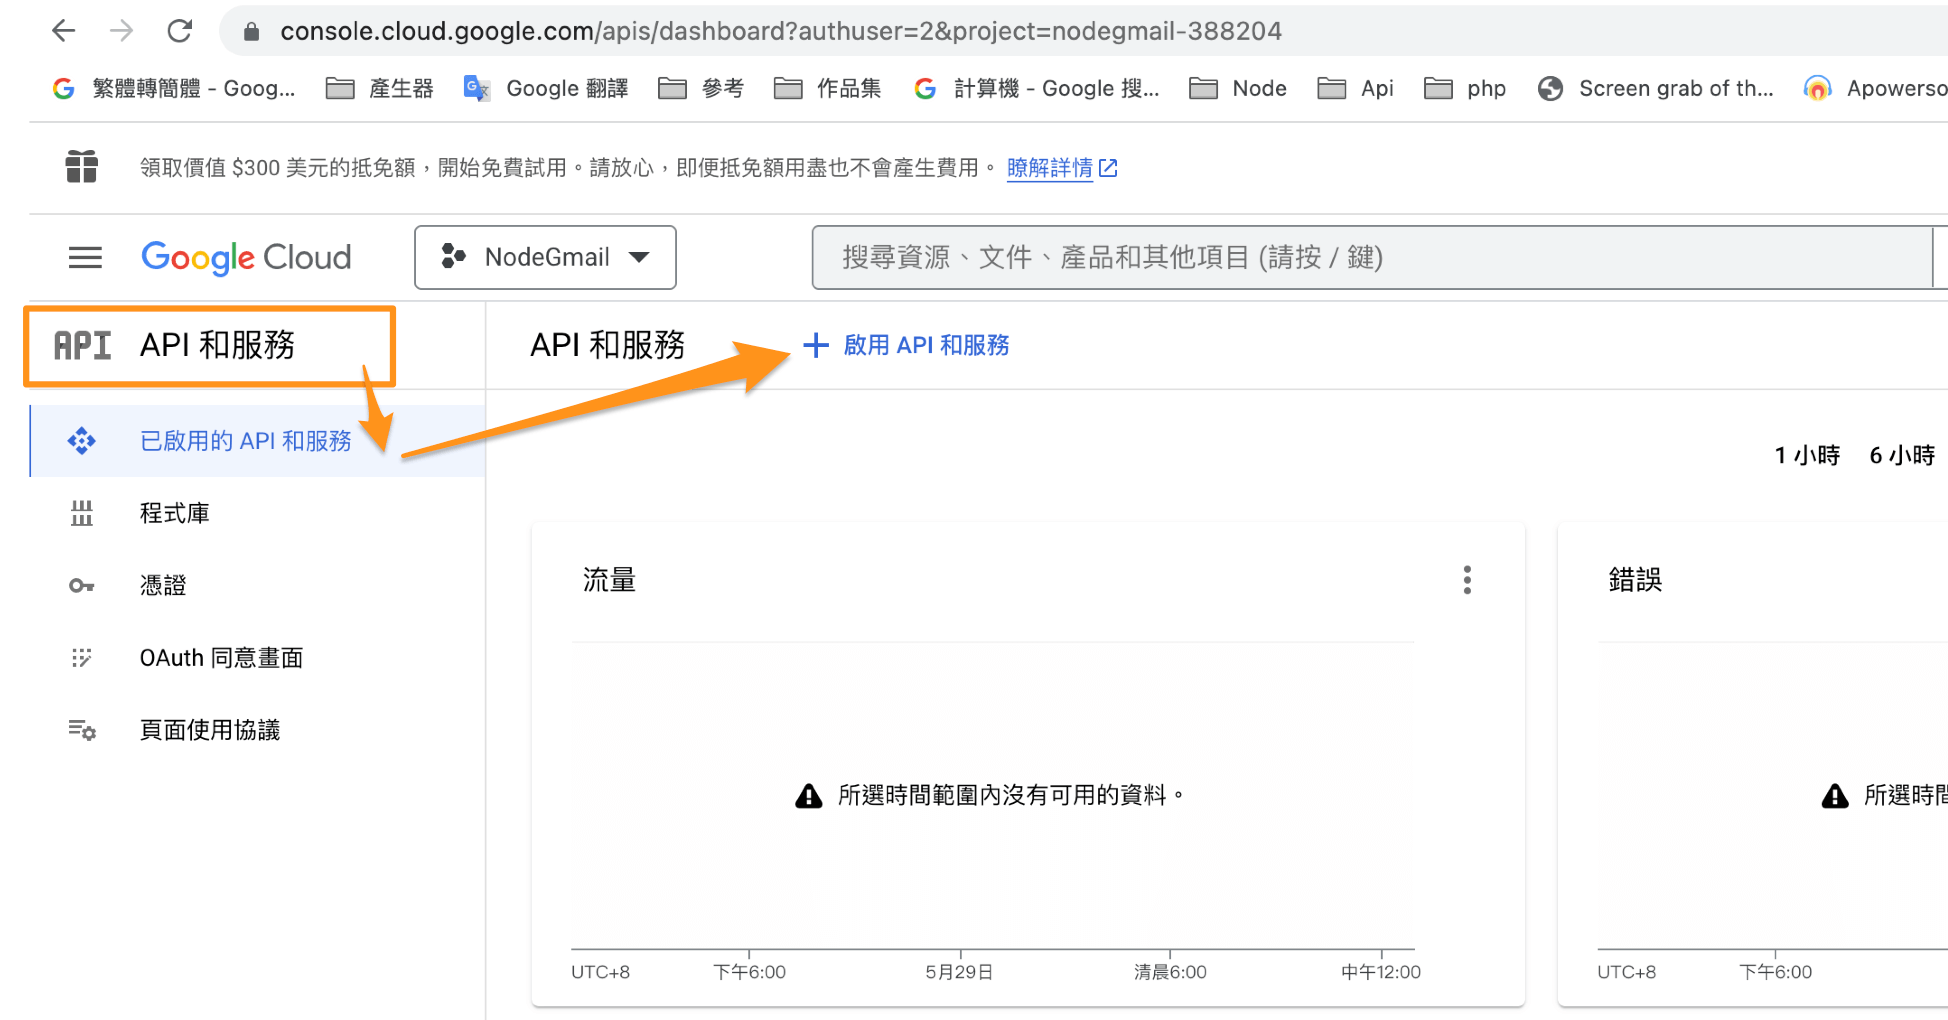
2. 啟用API服務
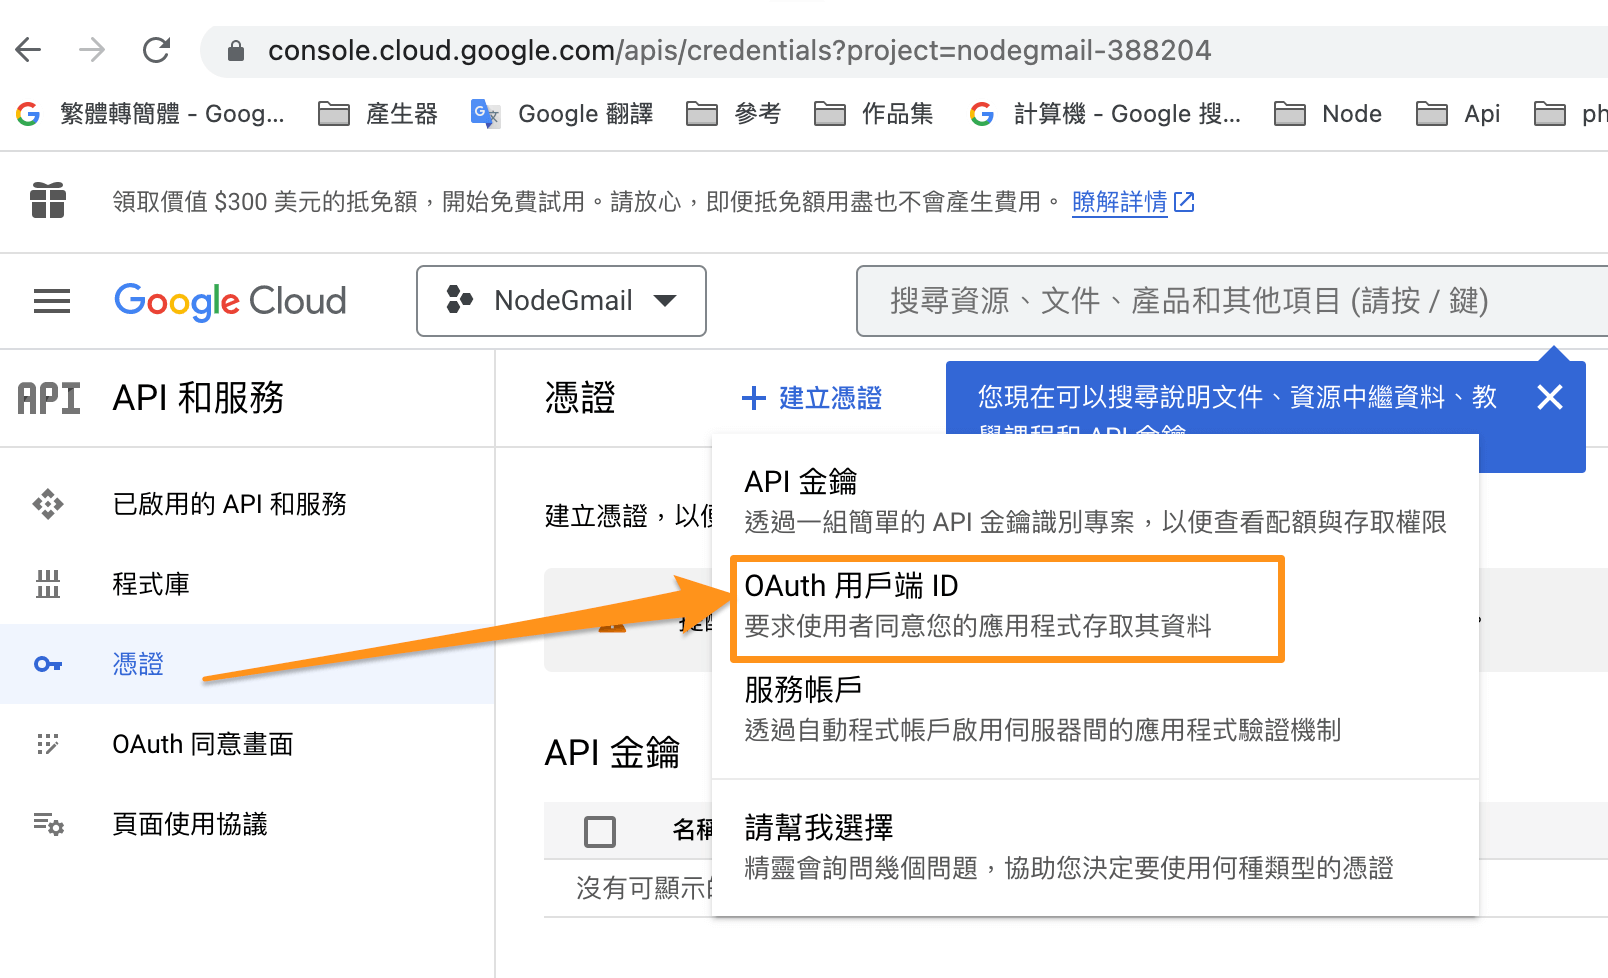
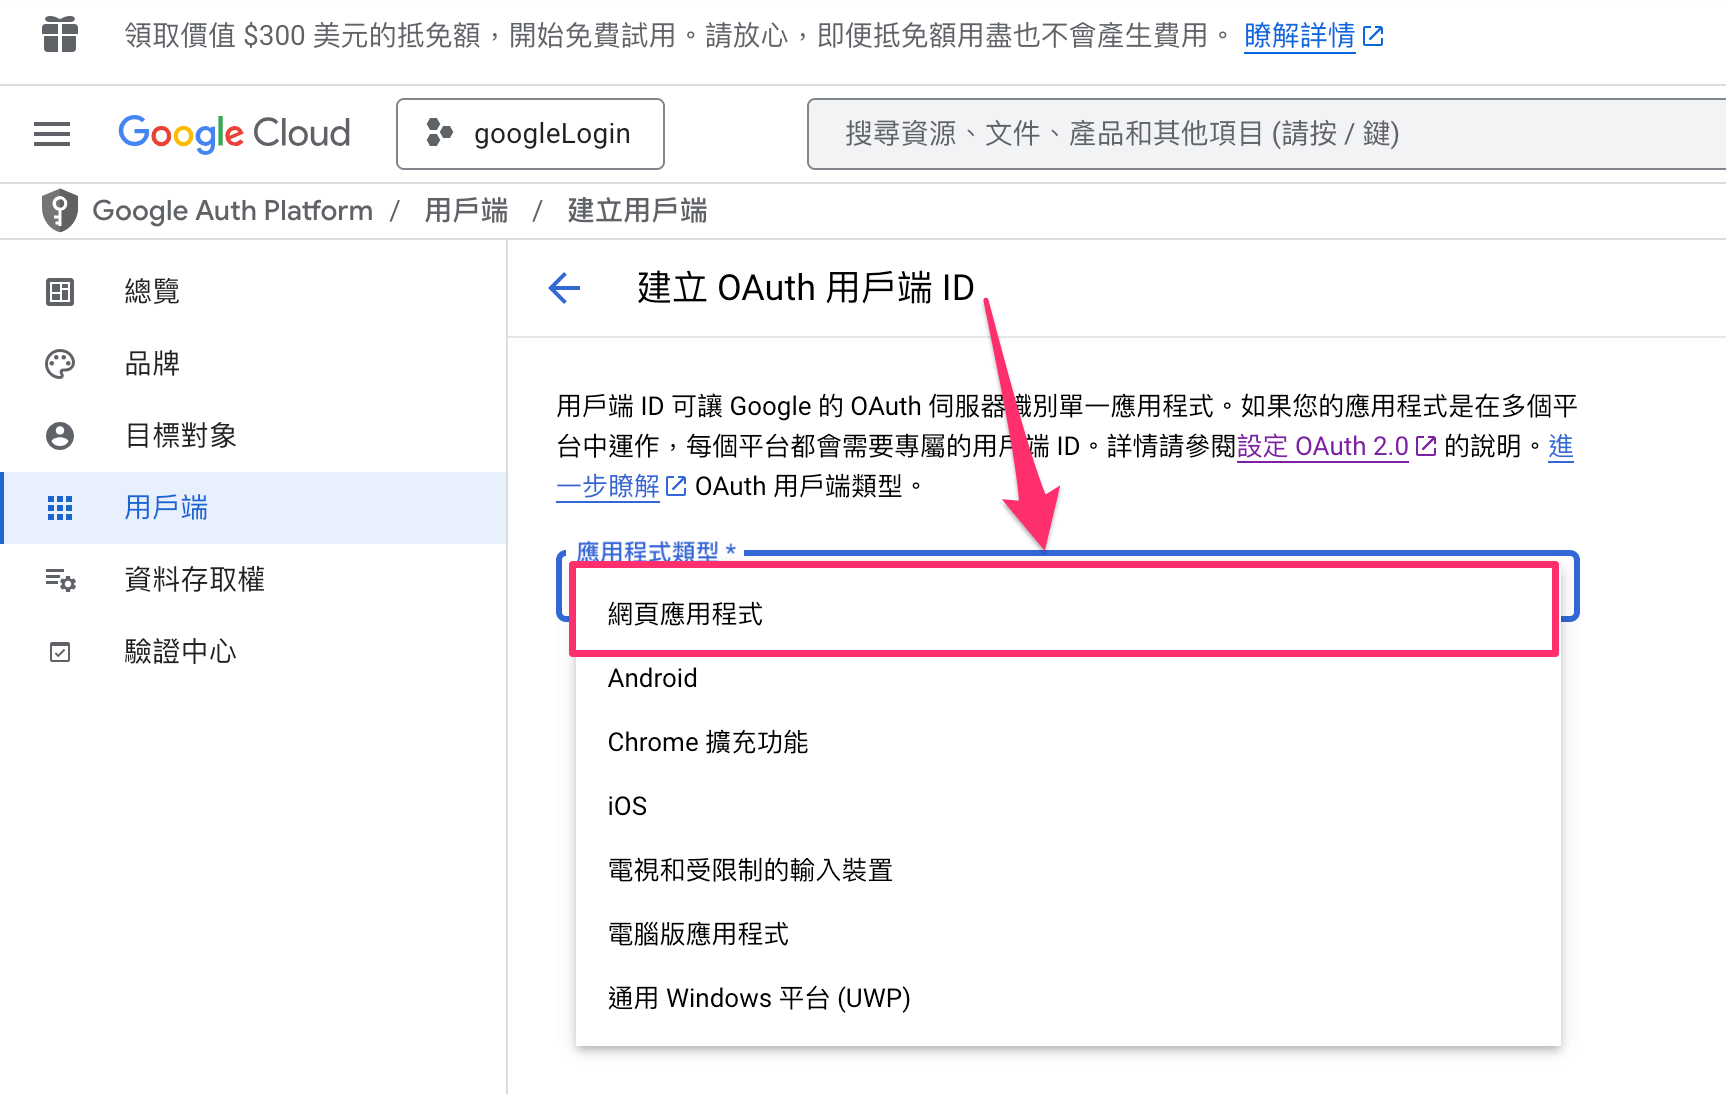
3. 建立憑證 => OAuth用戶端ID
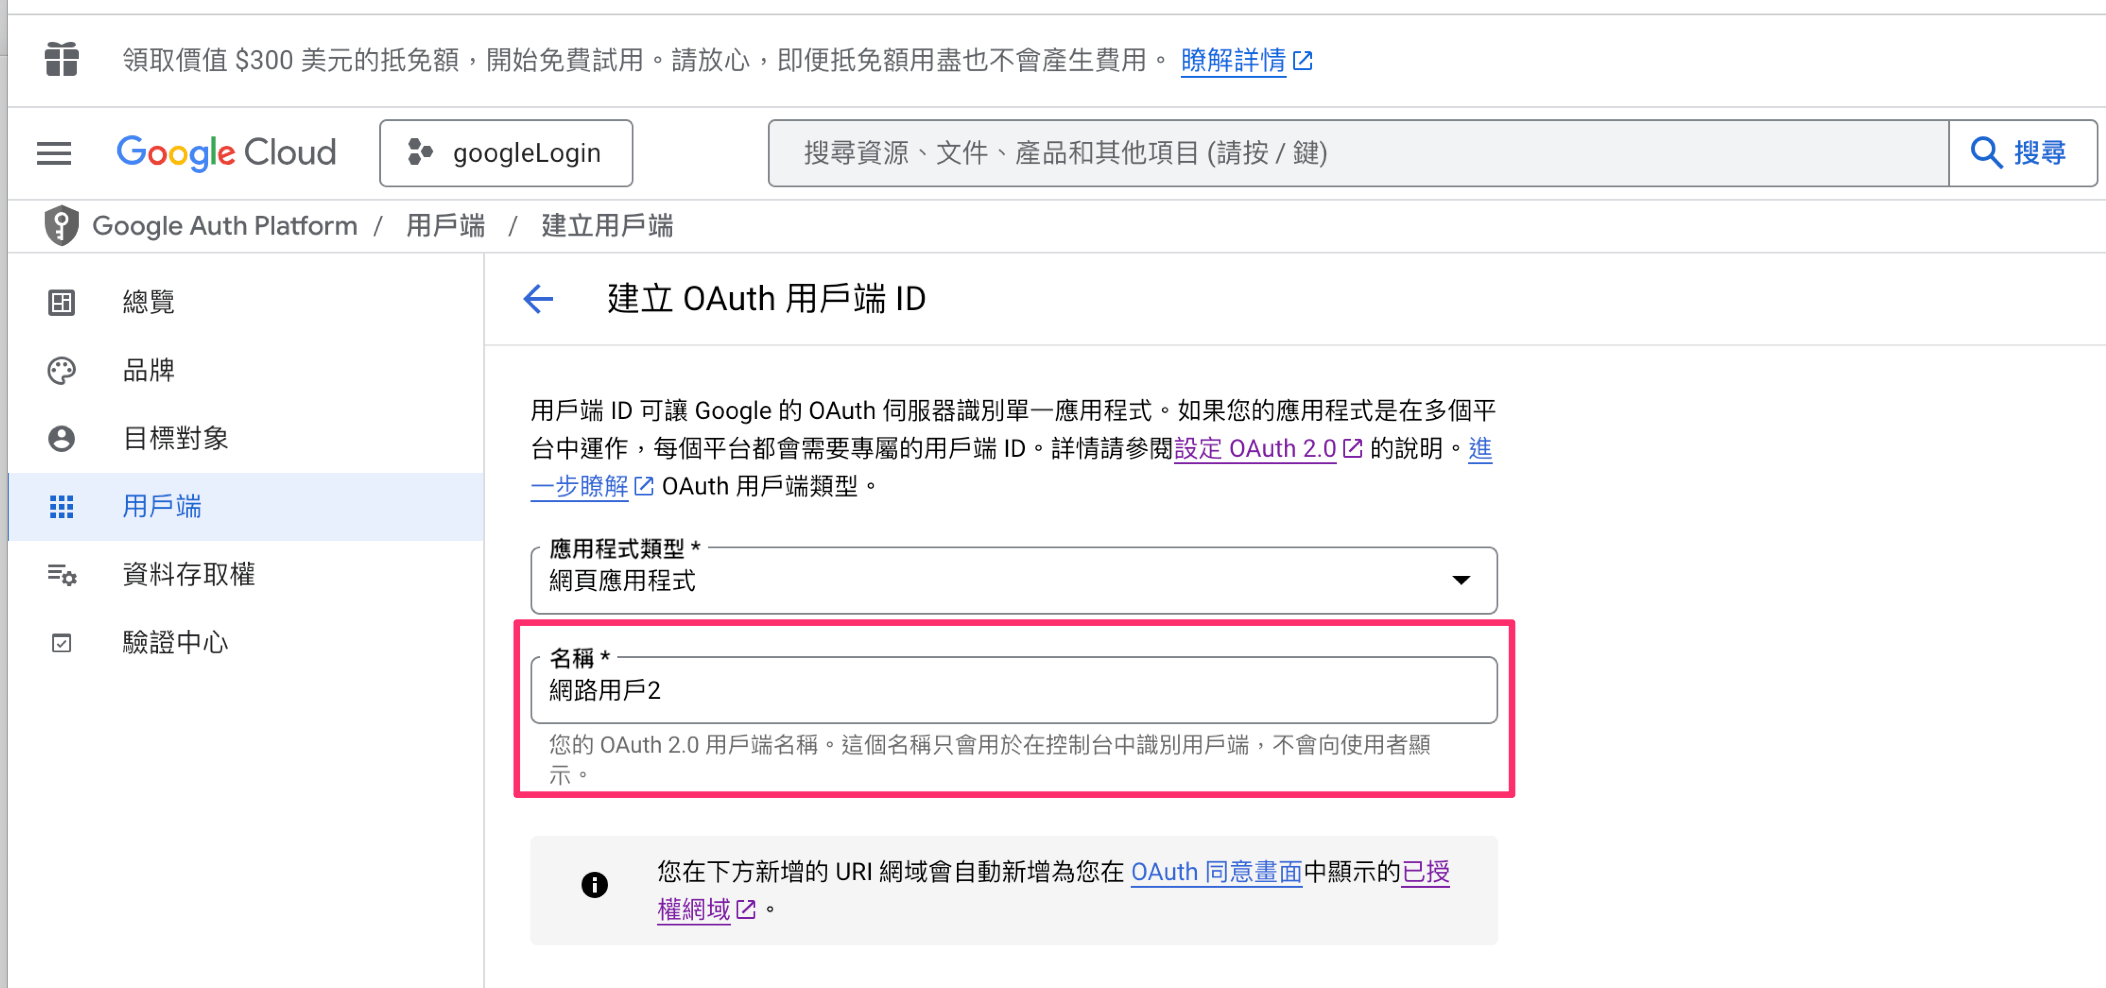
4. OAuth用戶端ID
選取網頁應用程式
填寫名稱
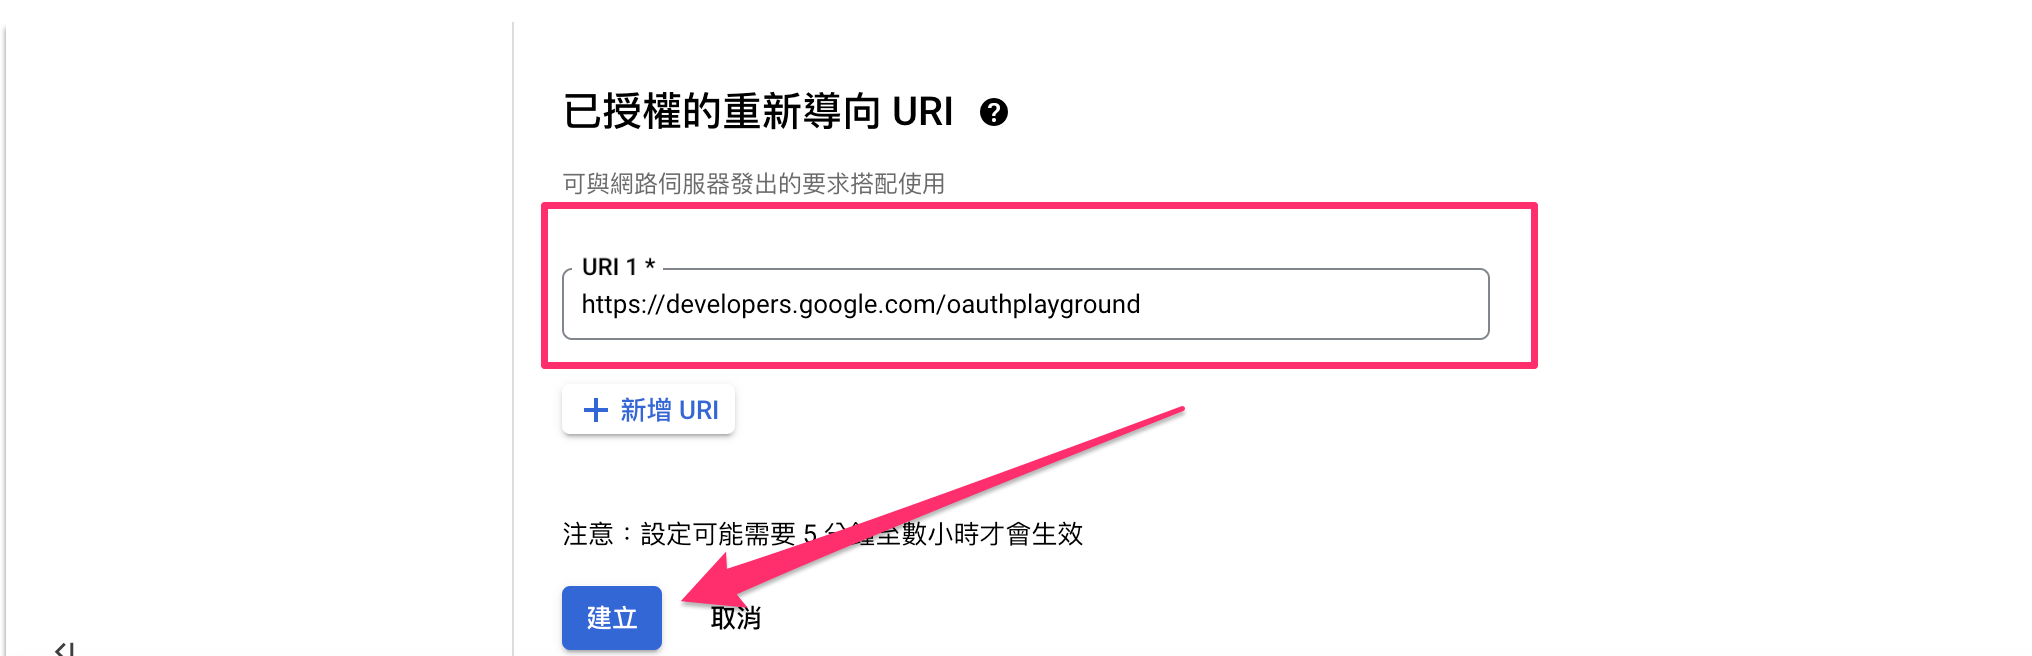
已授權重先導向 =>
https://developers.google.com/oauthplayground

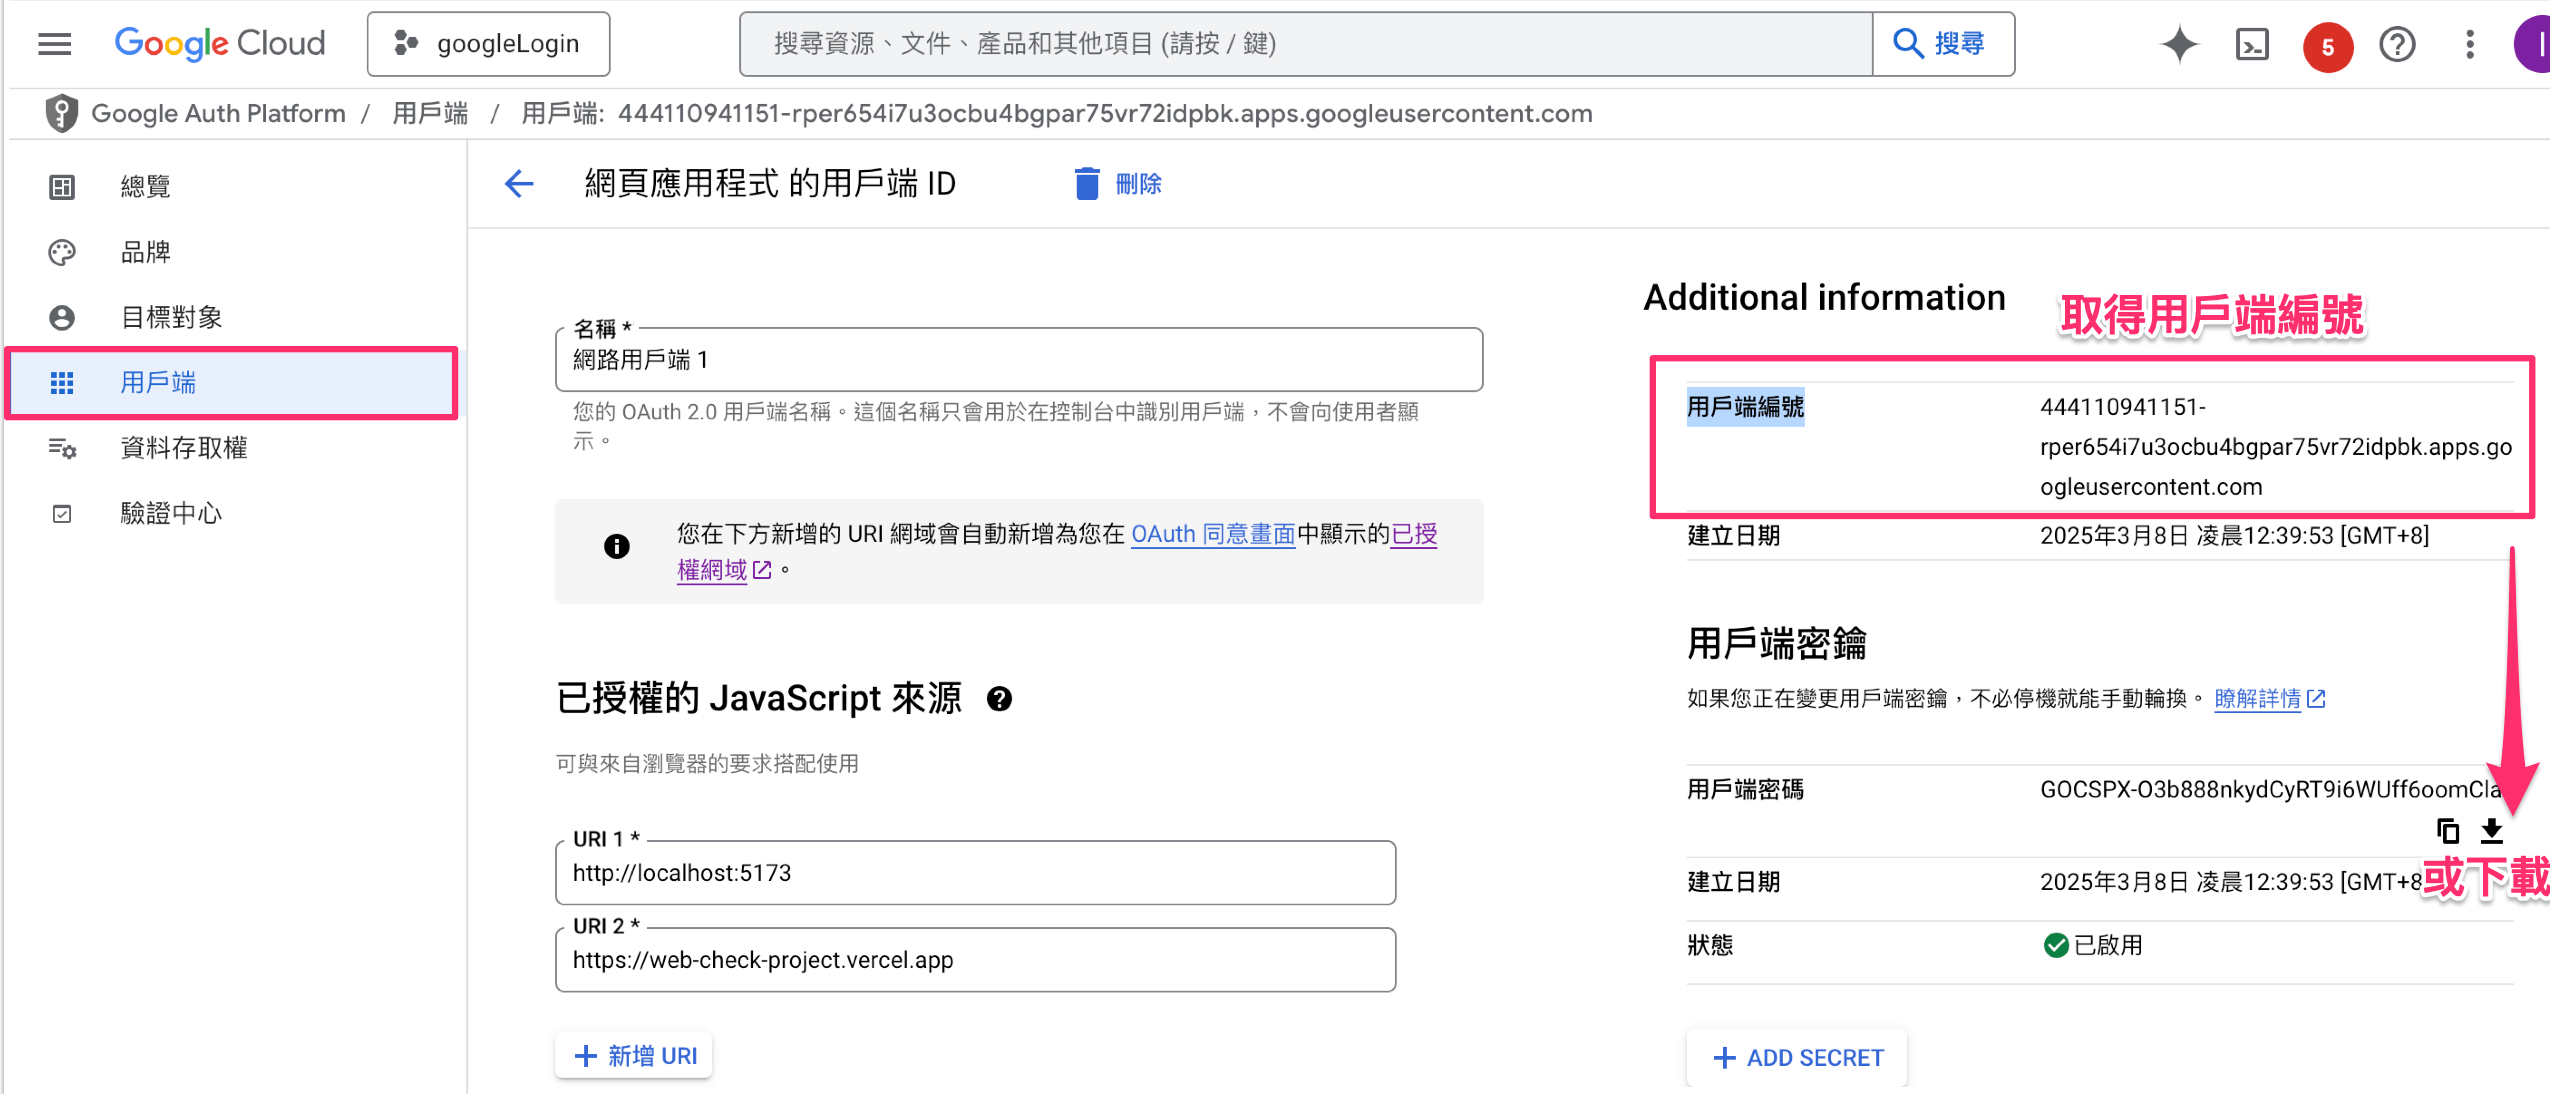
取得Google client_id 用戶端編號

安裝 vue3-google-login

官網參考資料
安裝指令

1
npm install vue3-google-login

到 進入點 main.ts引入vue3-google-login

1
2
3
4
5
6
7
8
9
import { createApp } from 'vue'
+ import vue3GoogleLogin from 'vue3-google-login'
+ const clientId= `${import.meta.env.VITE_GOOGLE_CLIENT_ID}`;
import App from './App.vue'
+ const GoogleLoginOptions = { clientId: clientId}

const app = createApp(App);
+app.use(vue3GoogleLogin,GoogleLoginOptions);
app.mount('#app')

頁面的使用

  • 引入 vue3-google-login 的 googleAuthCodeLogin, googleSdkLoaded
  • clientId 就是Google OAuth的 Client ID
  • ** googleSdkLoaded 內的 google.accounts.oauth2.initCodeClient 是 client_id: clientId.value,
  • scope: 'email profile openid https://www.googleapis.com/auth/userinfo.profile https://www.googleapis.com/auth/userinfo.email',
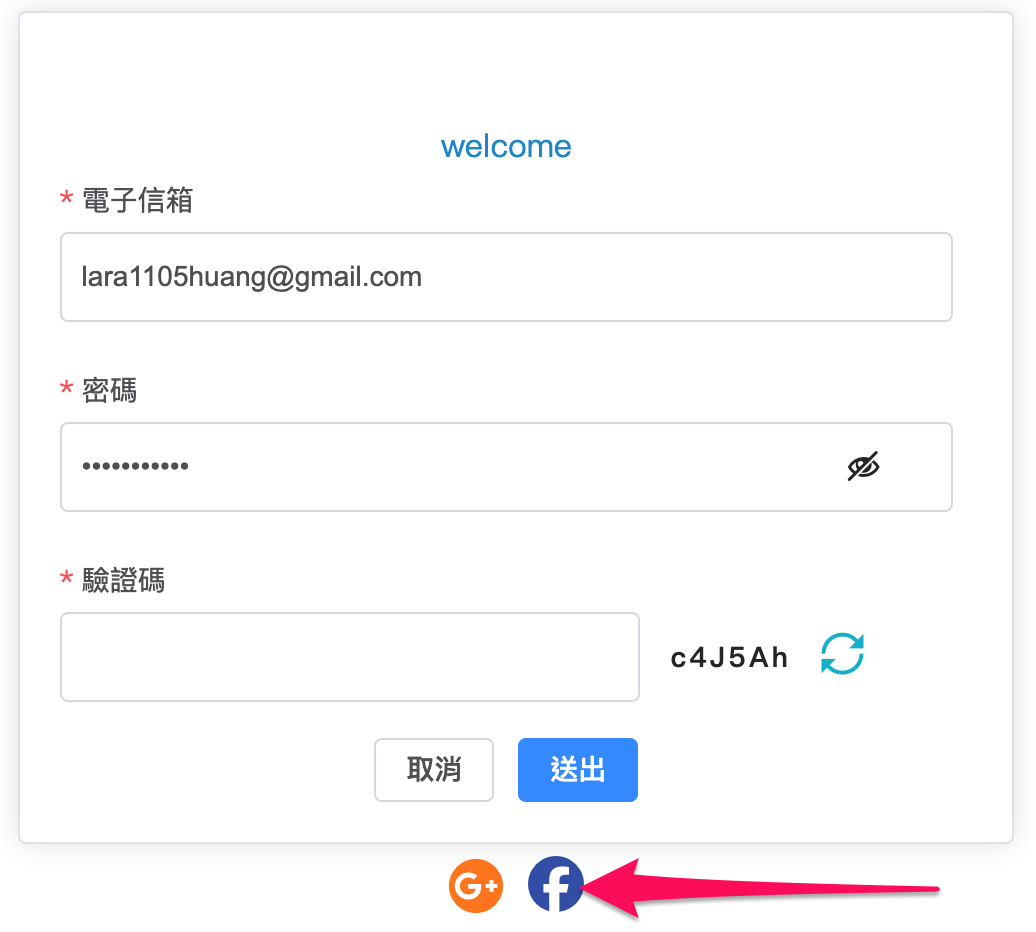
功能說明:第三方登入,按下Google登入按鈕,選擇Google登入的帳號
1. 按下登入按鈕
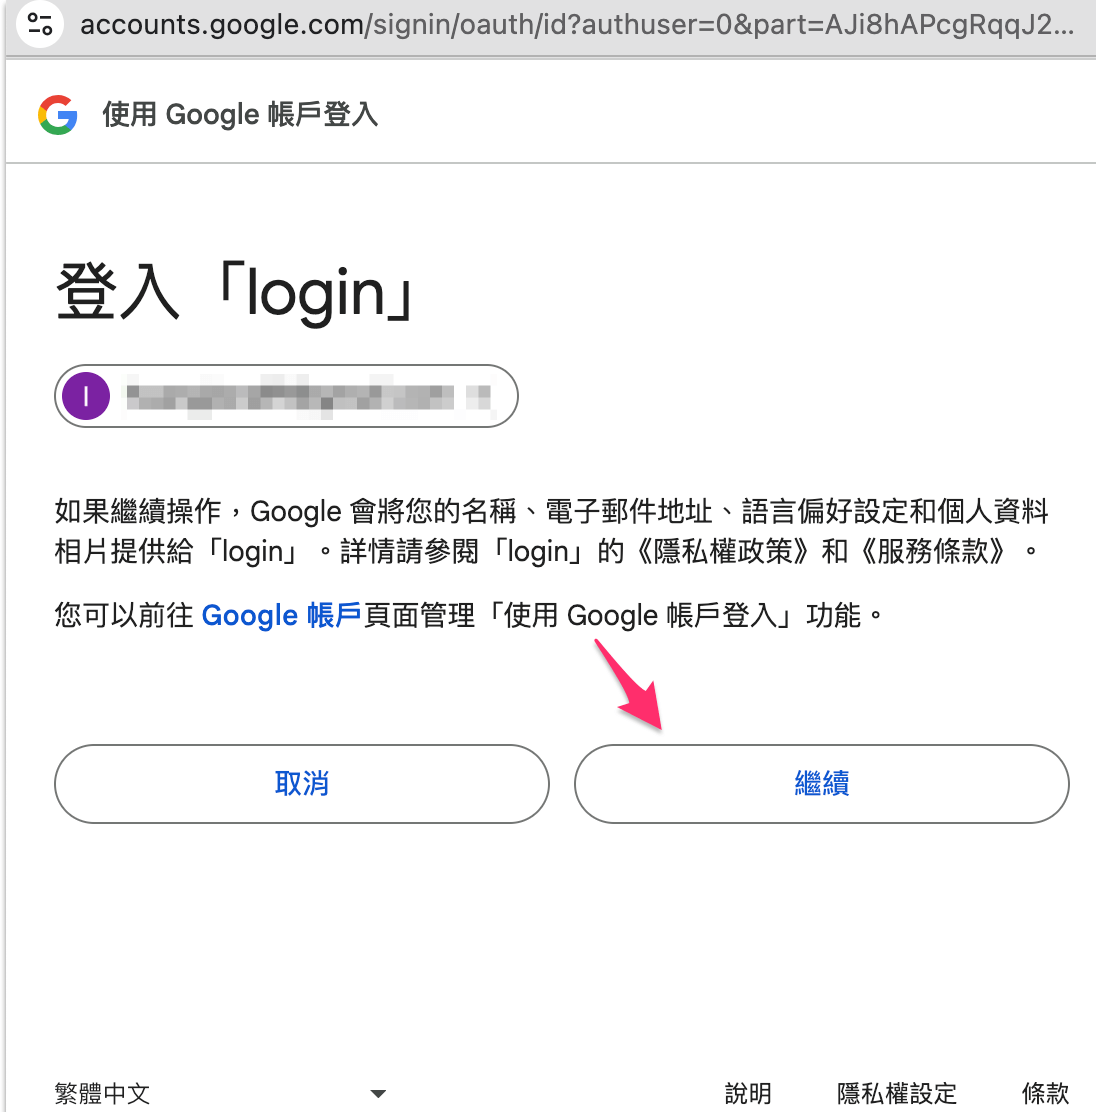
2. 選擇Google登入的帳號
3. 如果如圖就是已經成功串接到 Google OAuth,按下繼續
1
2
3
4
5
6
7
8
9
10
11
12
13
14
15
16
17
18
19
20
21
22
23
24
25
26
27
28
29
30
31
32
<template>
<i @click="login" class="fa-brands fa-google-plus" :title="Google 登入"></i>
<i class="fa-brands fa-facebook"></i>
</template>

<route lang="yaml">
meta:
layout: frontLayout
</route>

<script setup lang="ts">
import { ref, onMounted, computed } from 'vue'
mport { googleAuthCodeLogin, googleSdkLoaded } from "vue3-google-login"

const clientId = ref<string>(`${import.meta.env.VITE_GOOGLE_CLIENT_ID}`)

const login = () => {
googleAuthCodeLogin().then((res) => {
console.log("Handle the res", res)
})
}
const loginS = () => {
googleSdkLoaded((google) => {
google.accounts.oauth2.initCodeClient({
client_id: clientId.value,
scope: 'email profile openid https://www.googleapis.com/auth/userinfo.profile https://www.googleapis.com/auth/userinfo.email',
callback: (res) => {
console.log("Handle the res", res)
}
}).requestCode()
})
}
參考資料

Vite FaceBook 第三方登入

FaceBook Sdk 申請

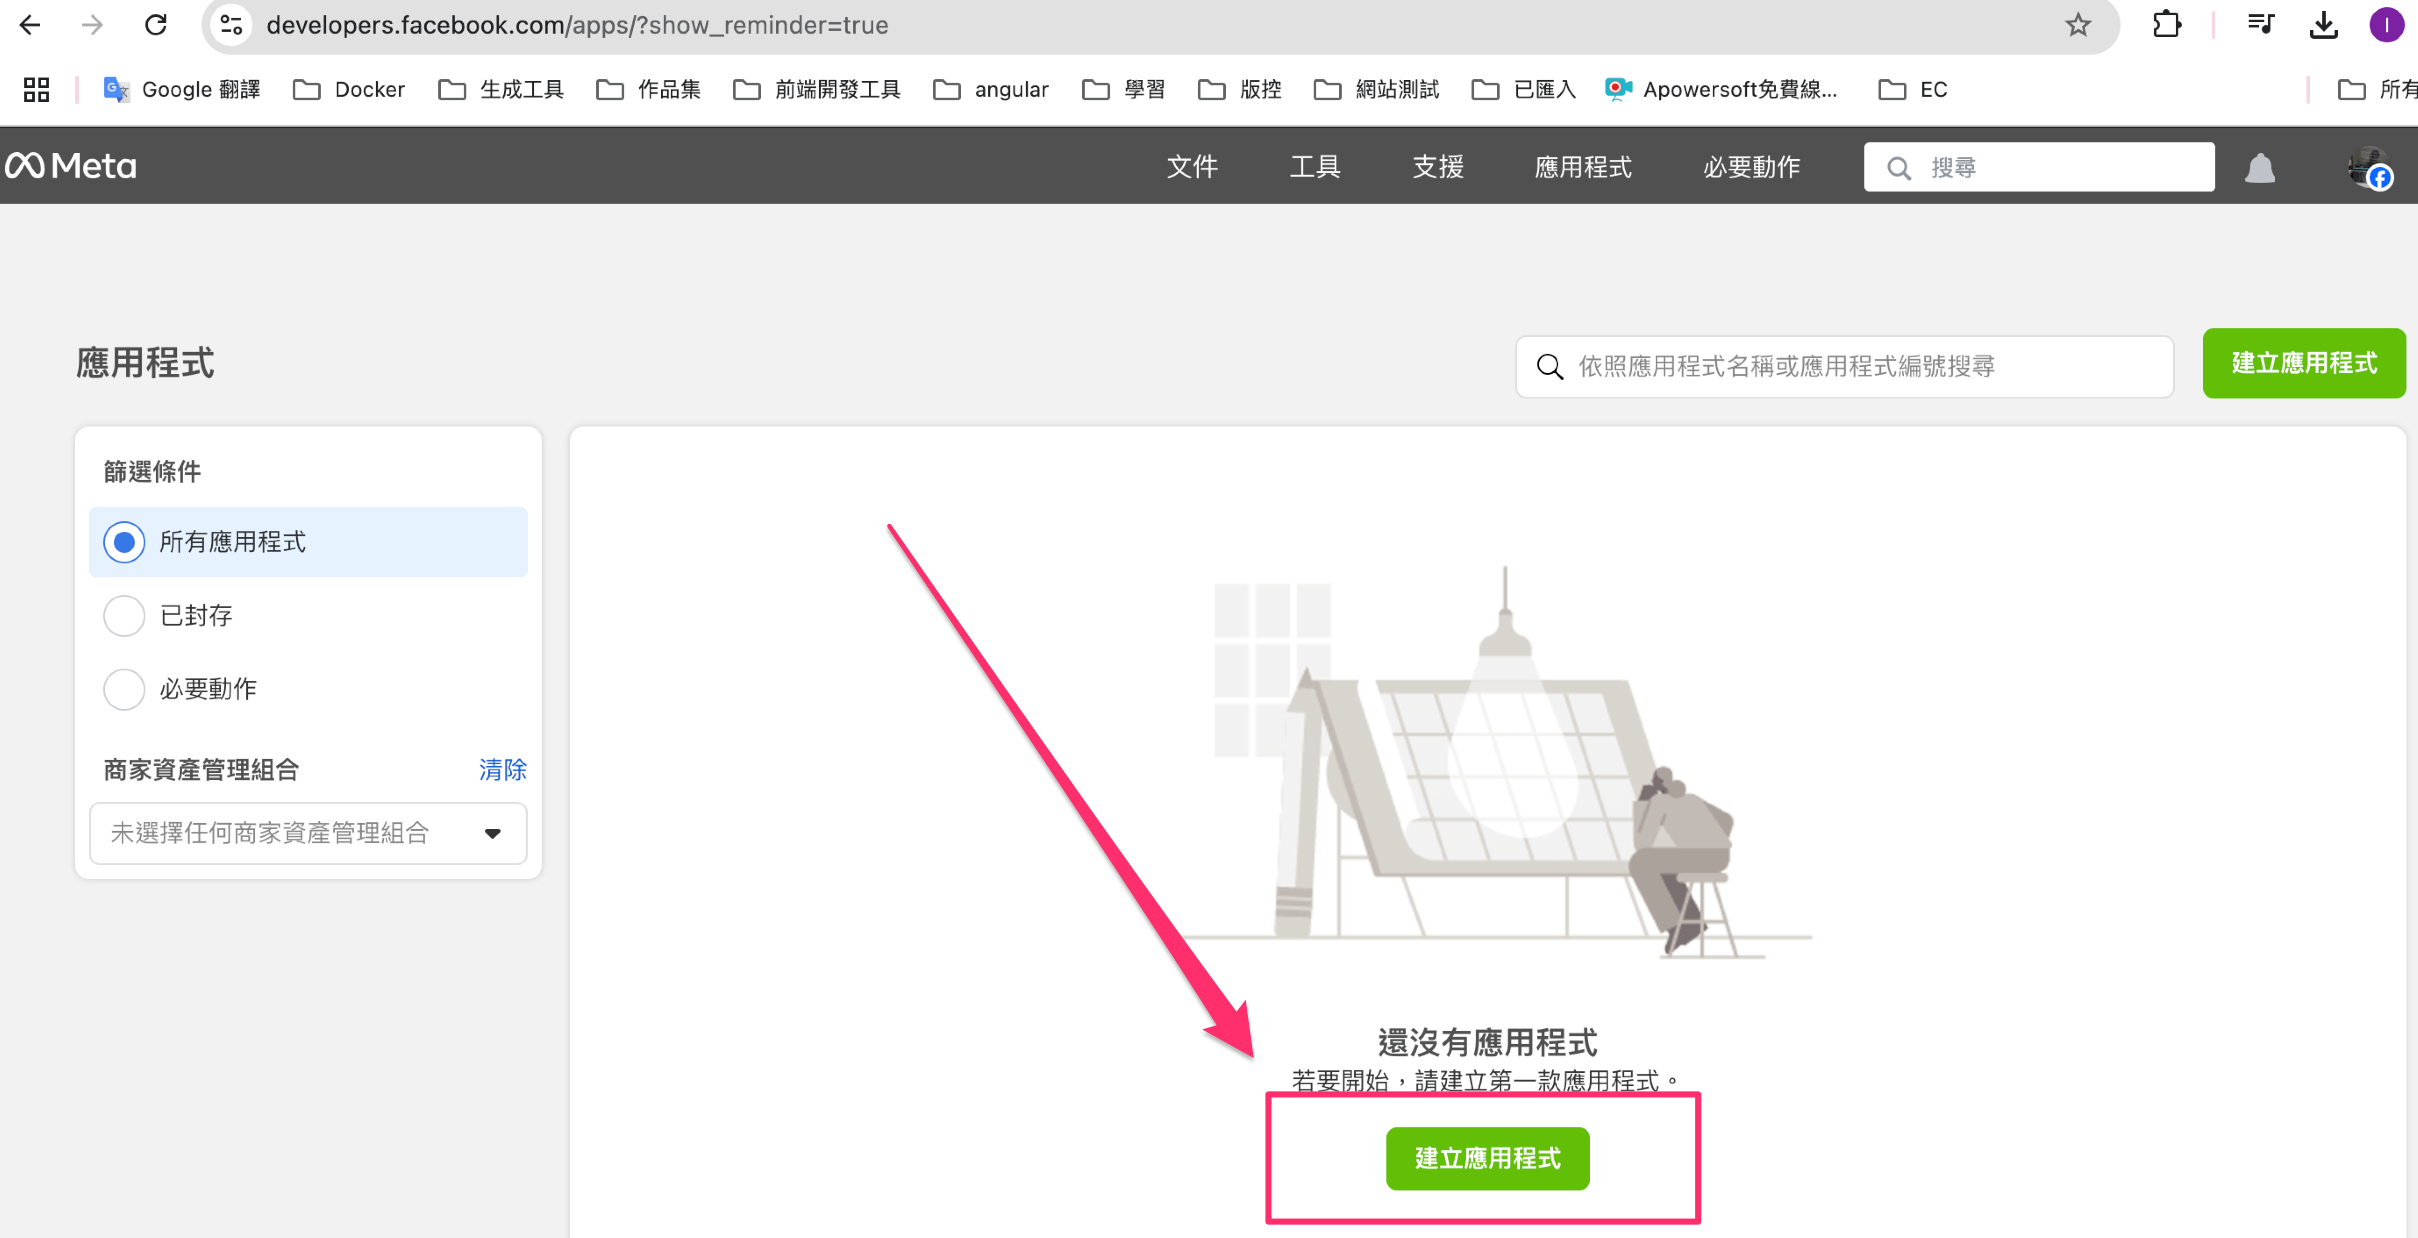
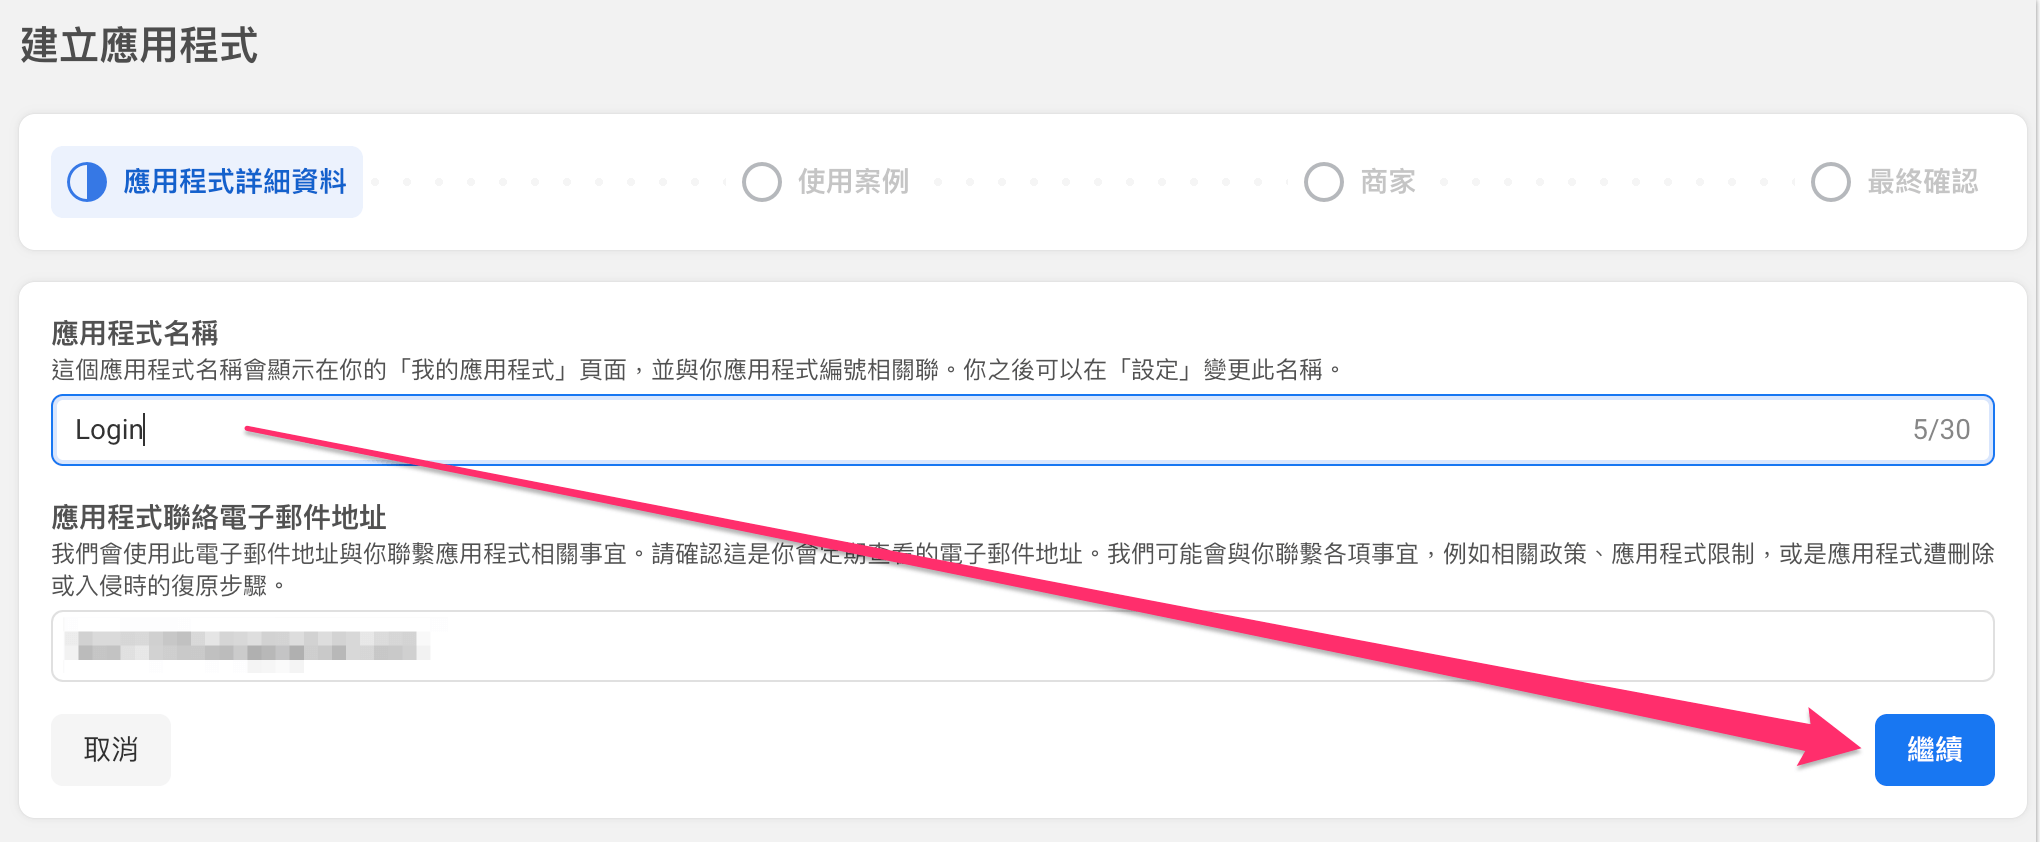
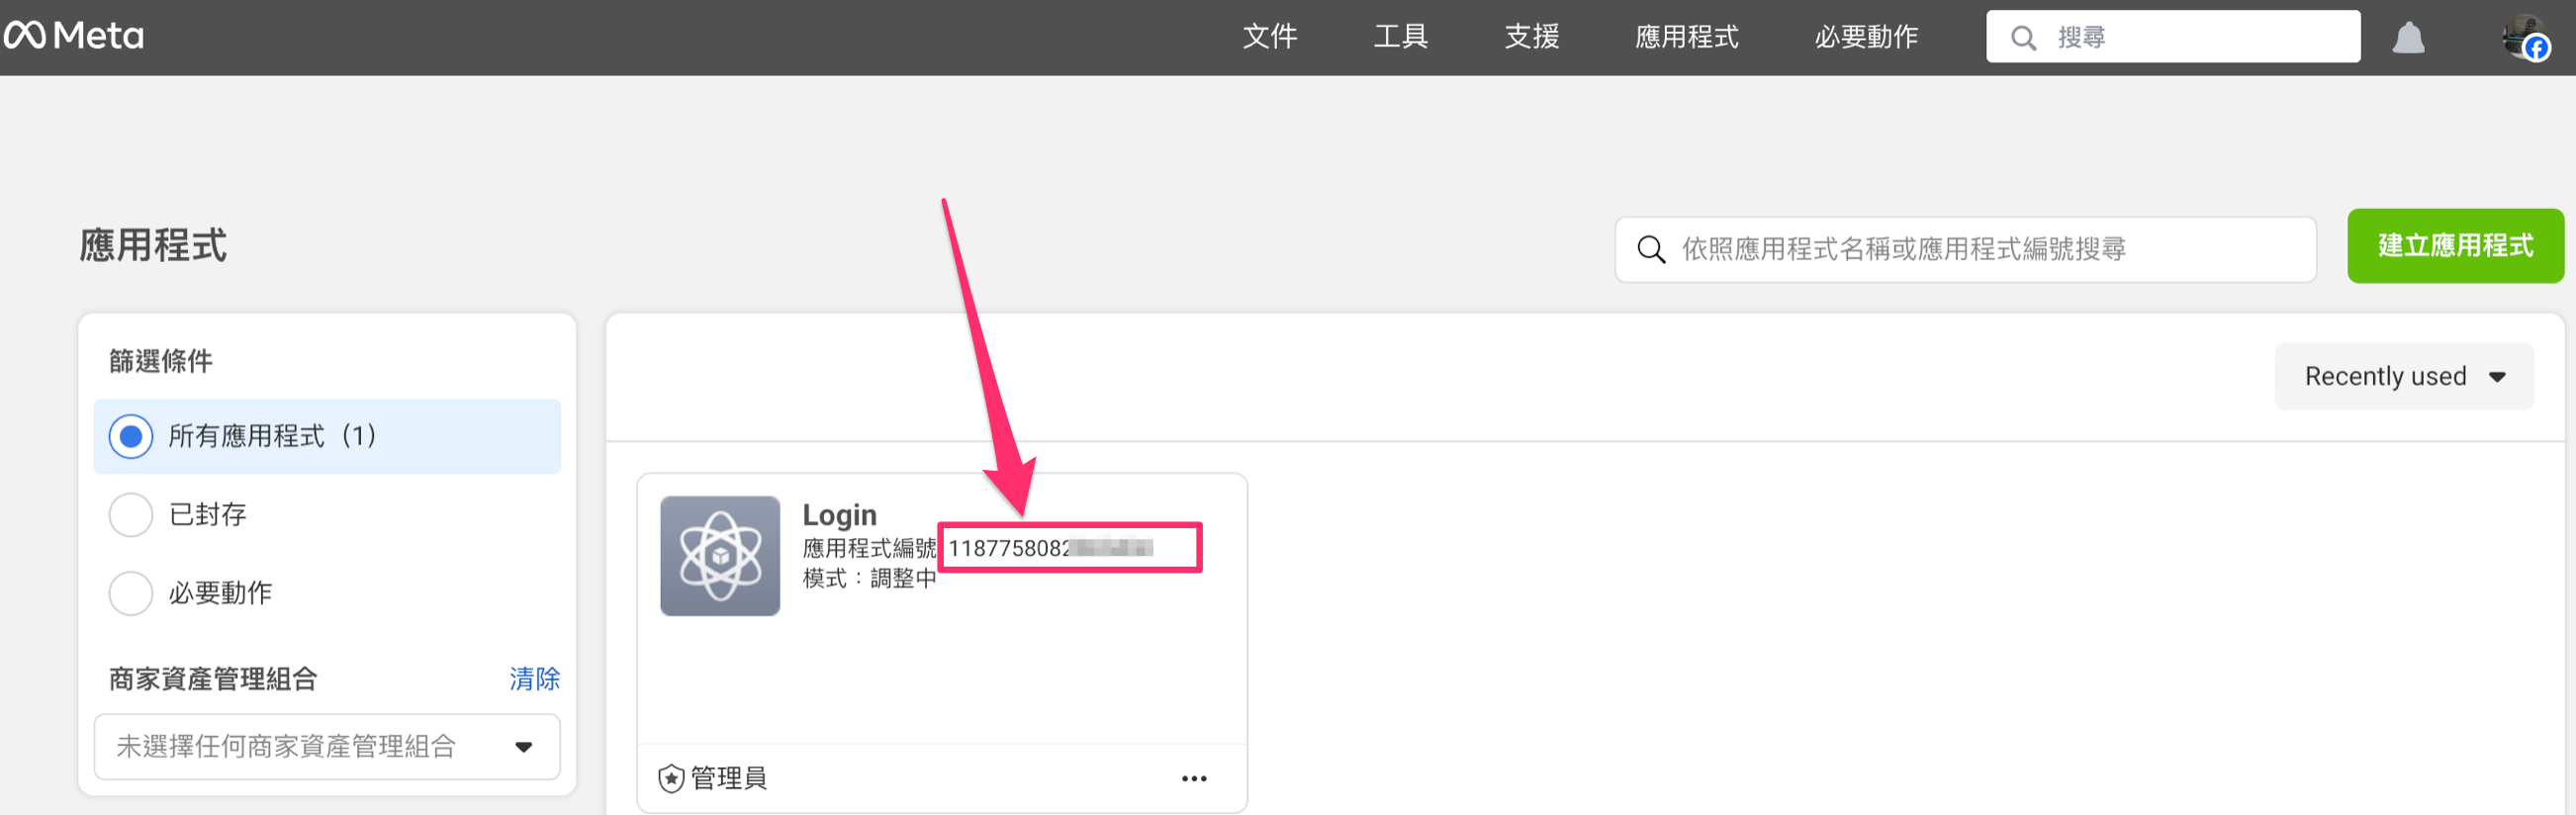
一. 到facebook開發人員網站,點選我的應用程式
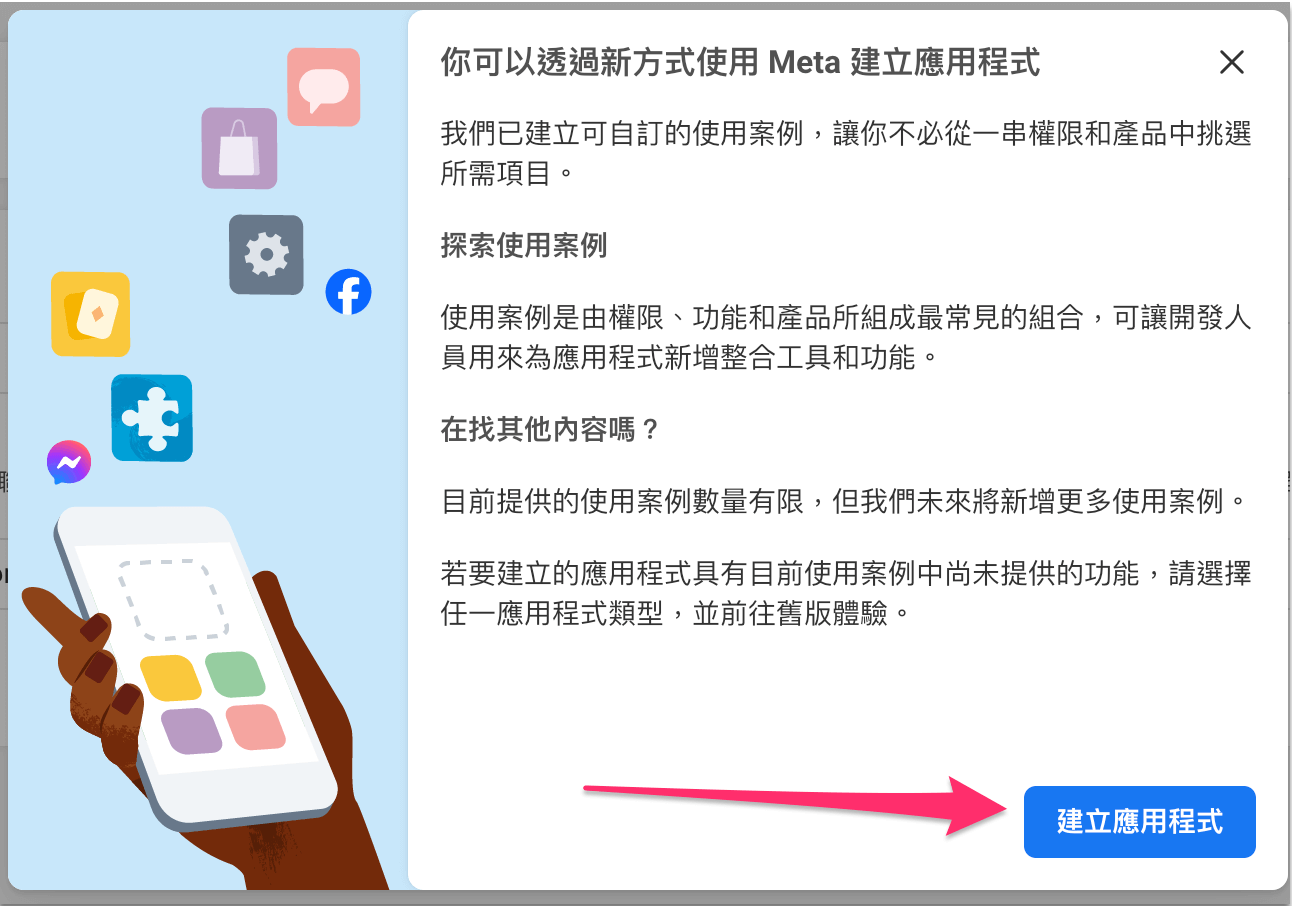
二. 點選建立應用程式
三. 點選建立應用程式
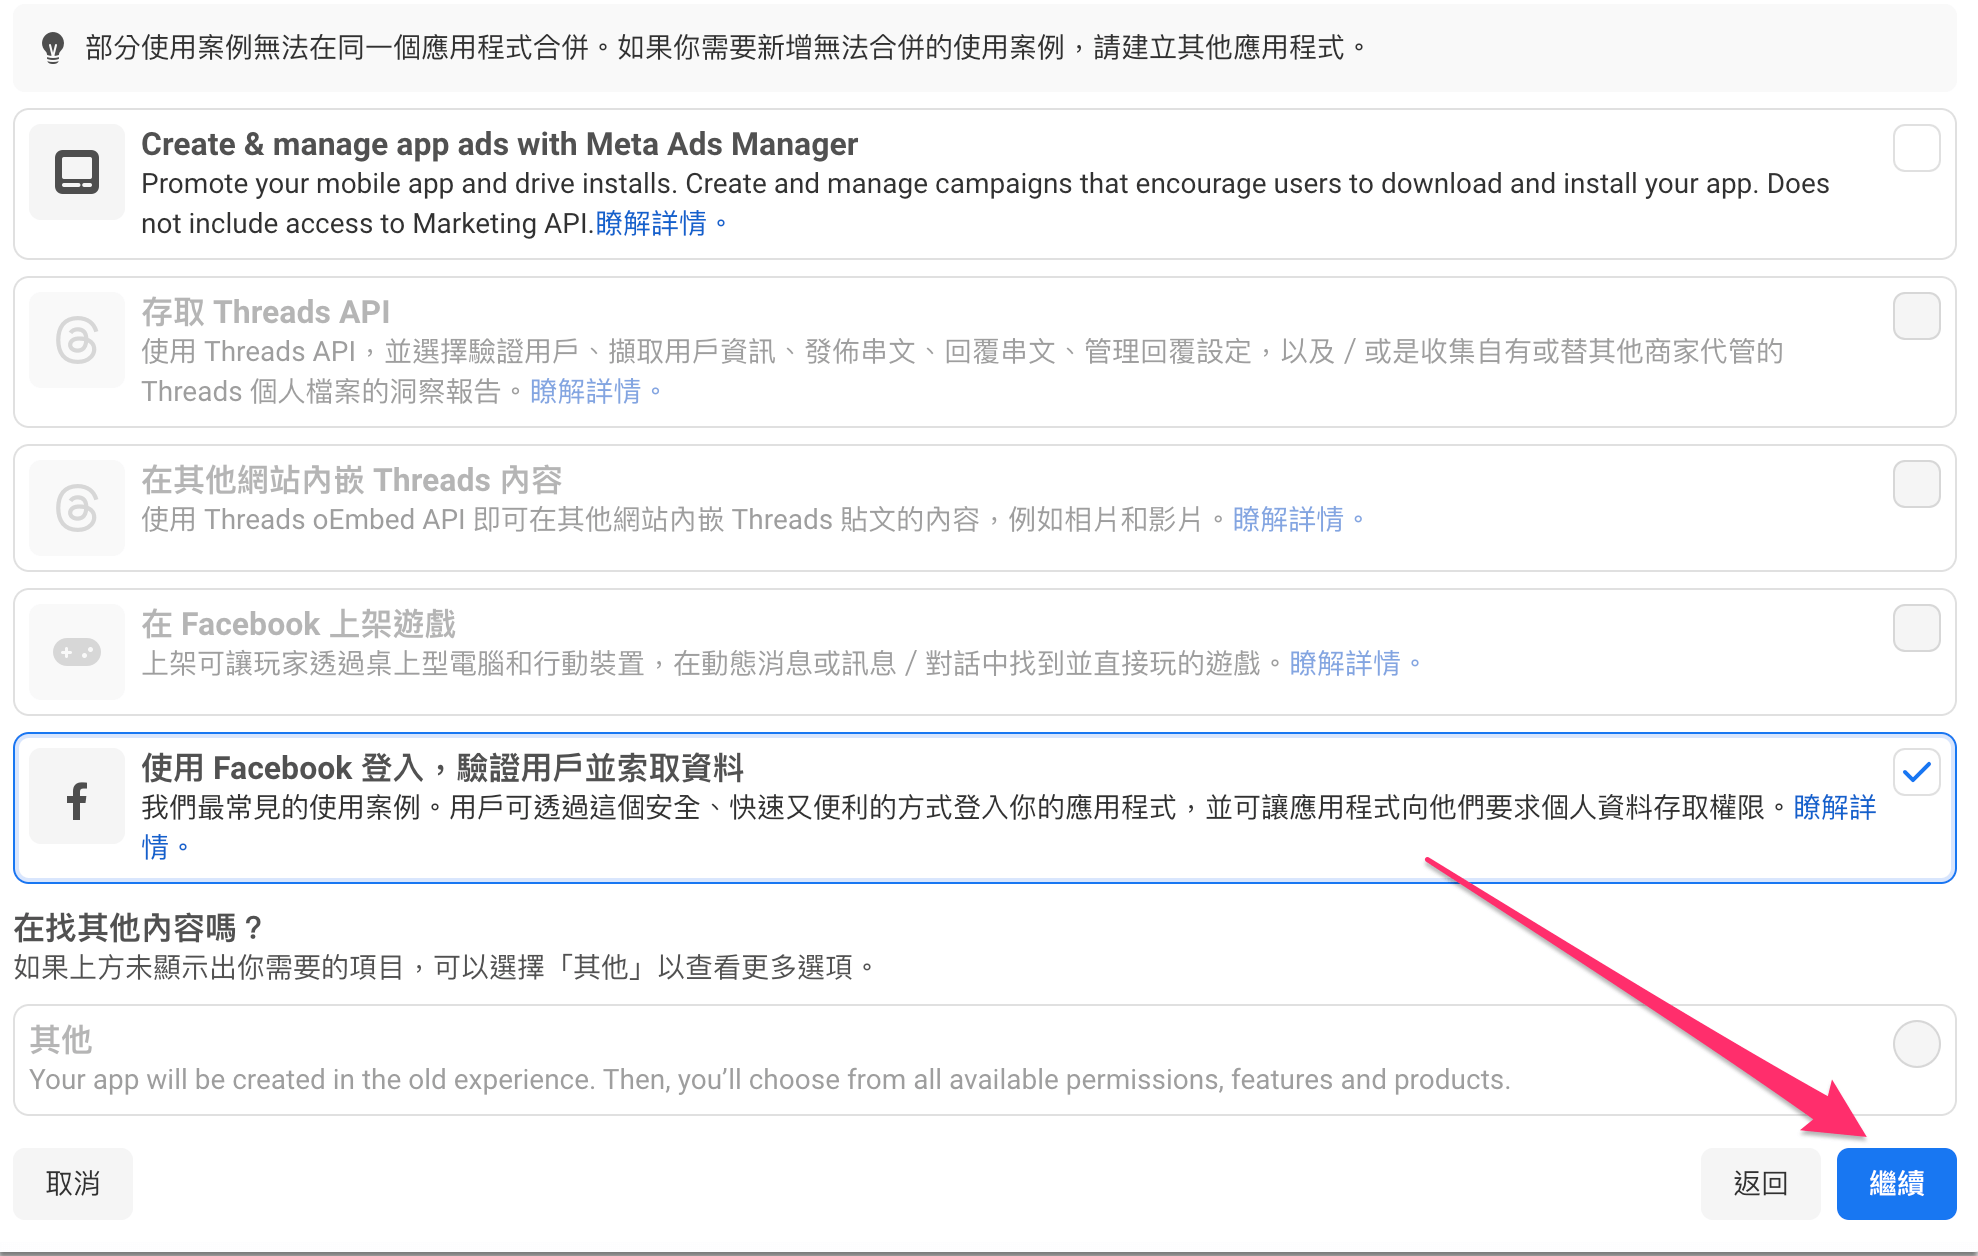
四. 點選使用Fb驗證用戶索取資料,按下確定按鈕
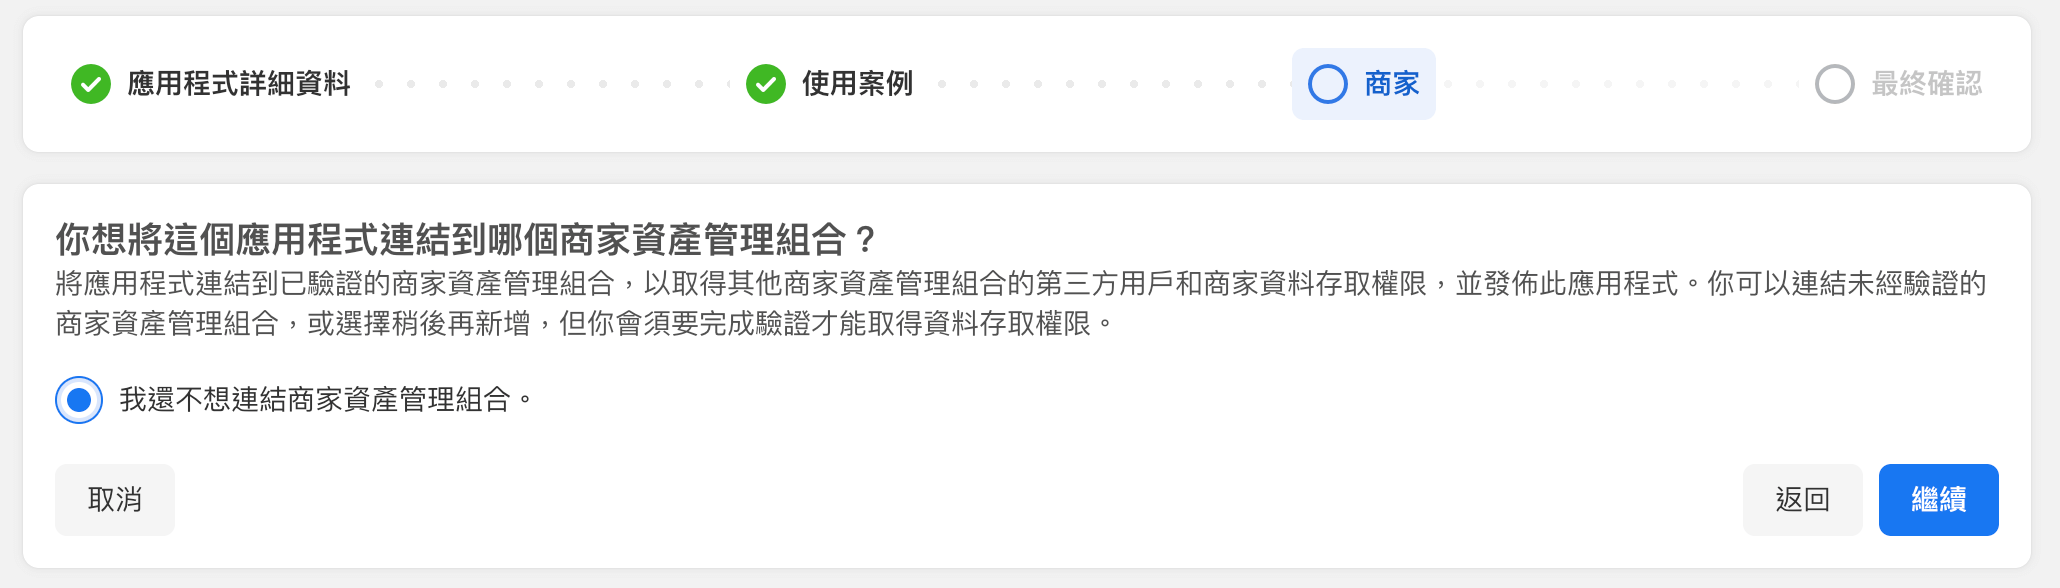
五. 如圖先選『我還不想連結商家資產管理組合』,讓繼續按鈕可以選取
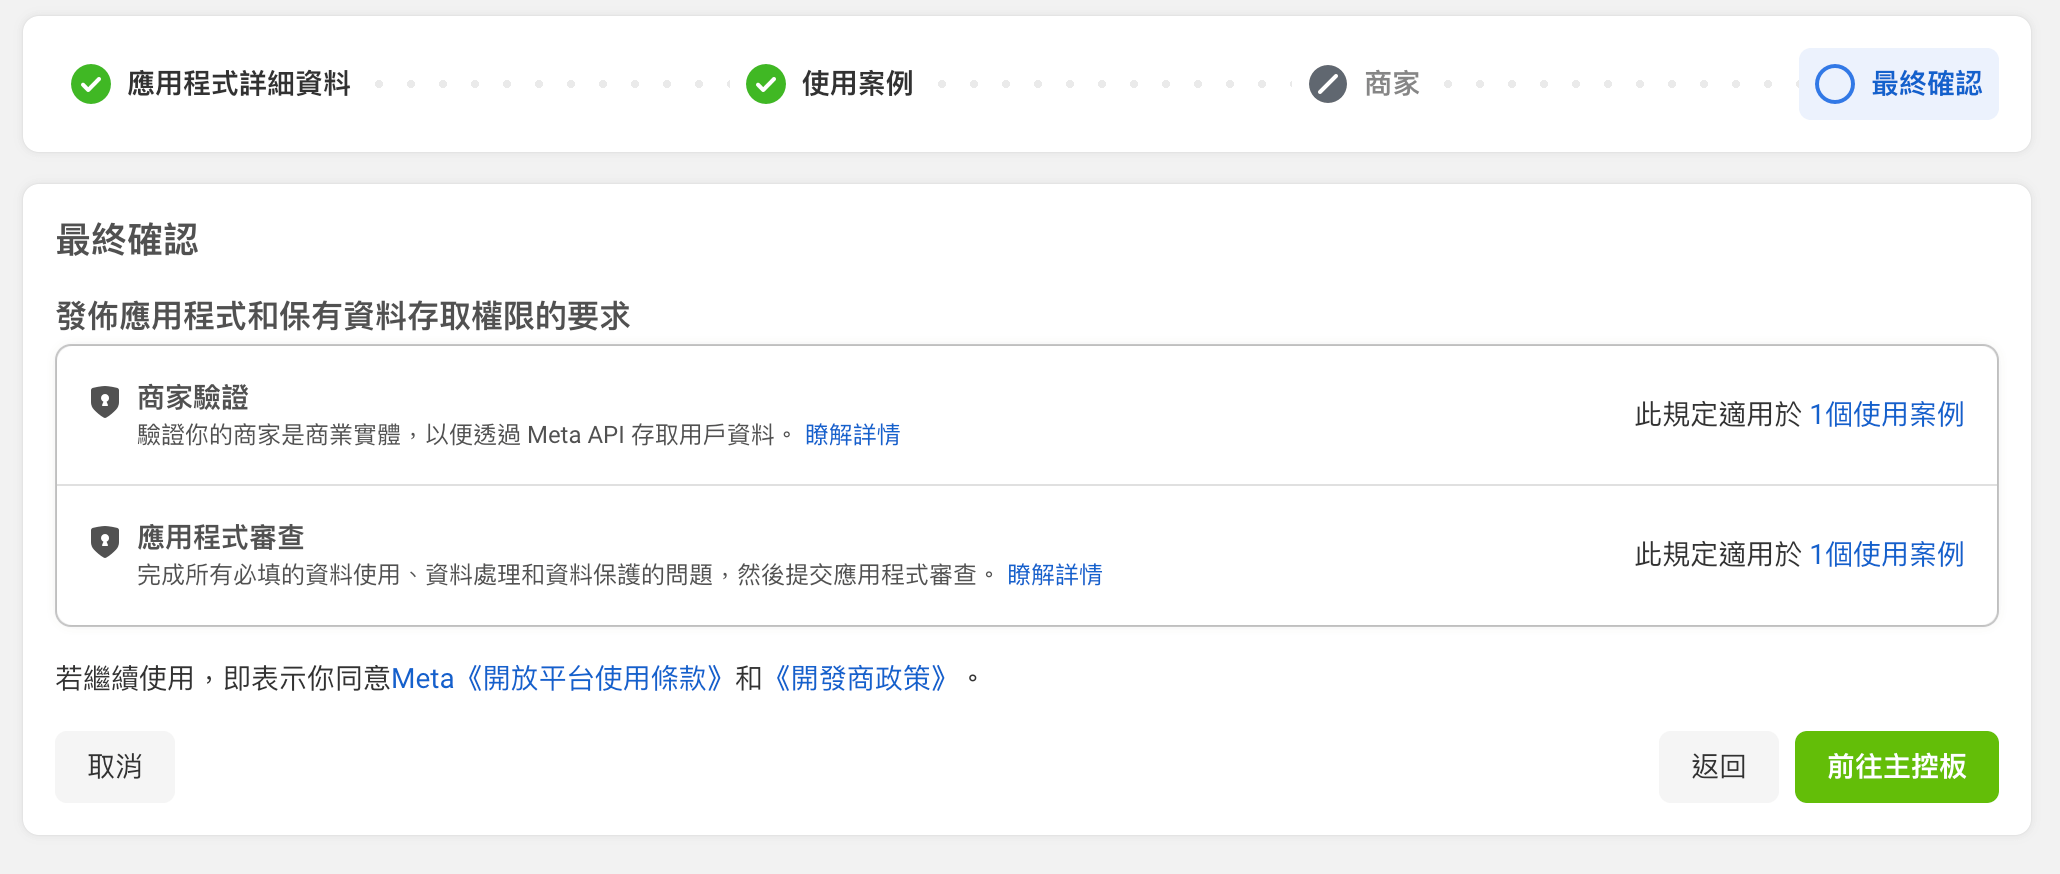
六. 選取『前往主控台』
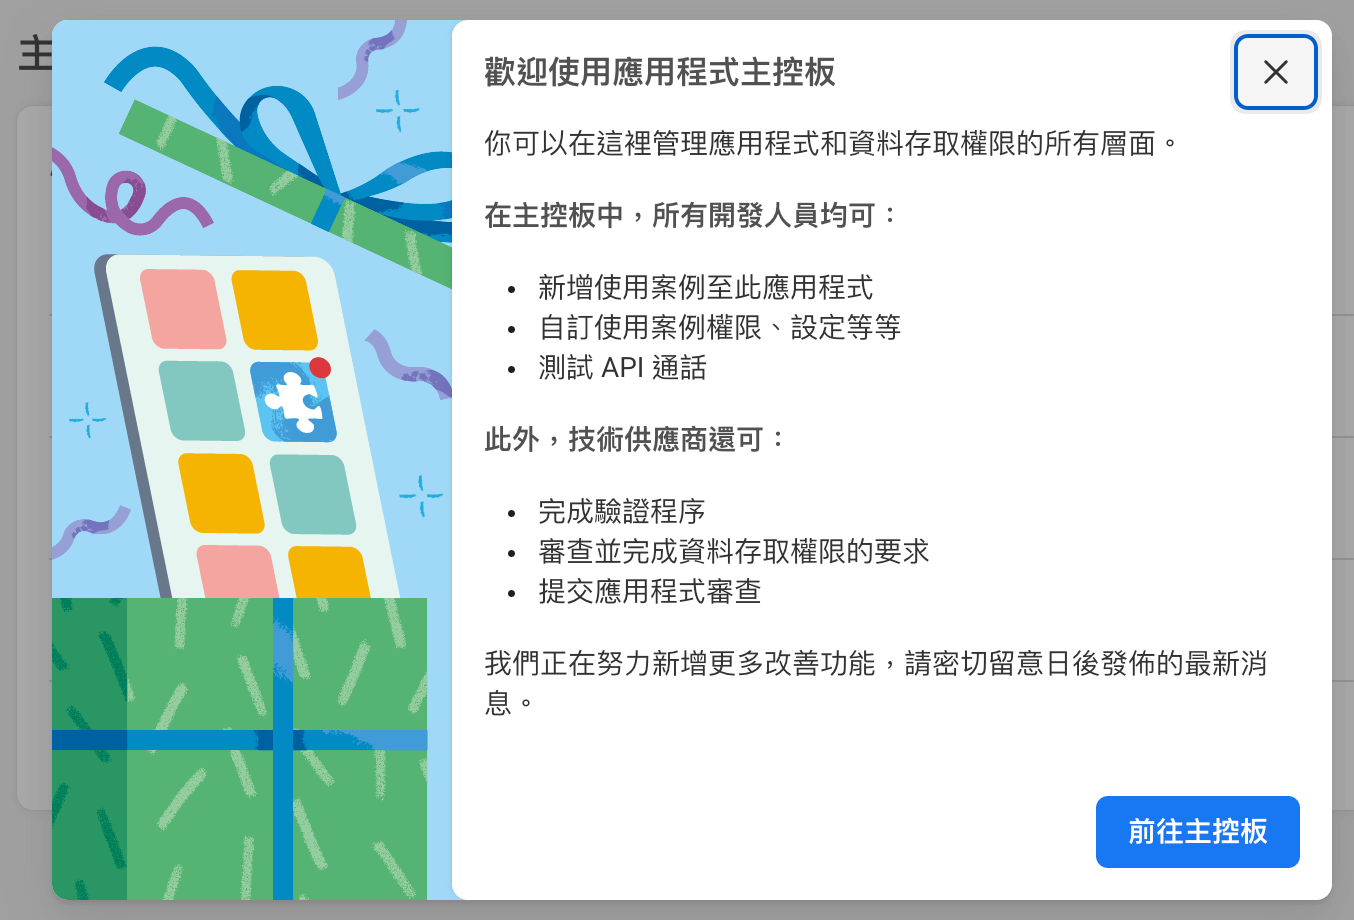
出現跳出框
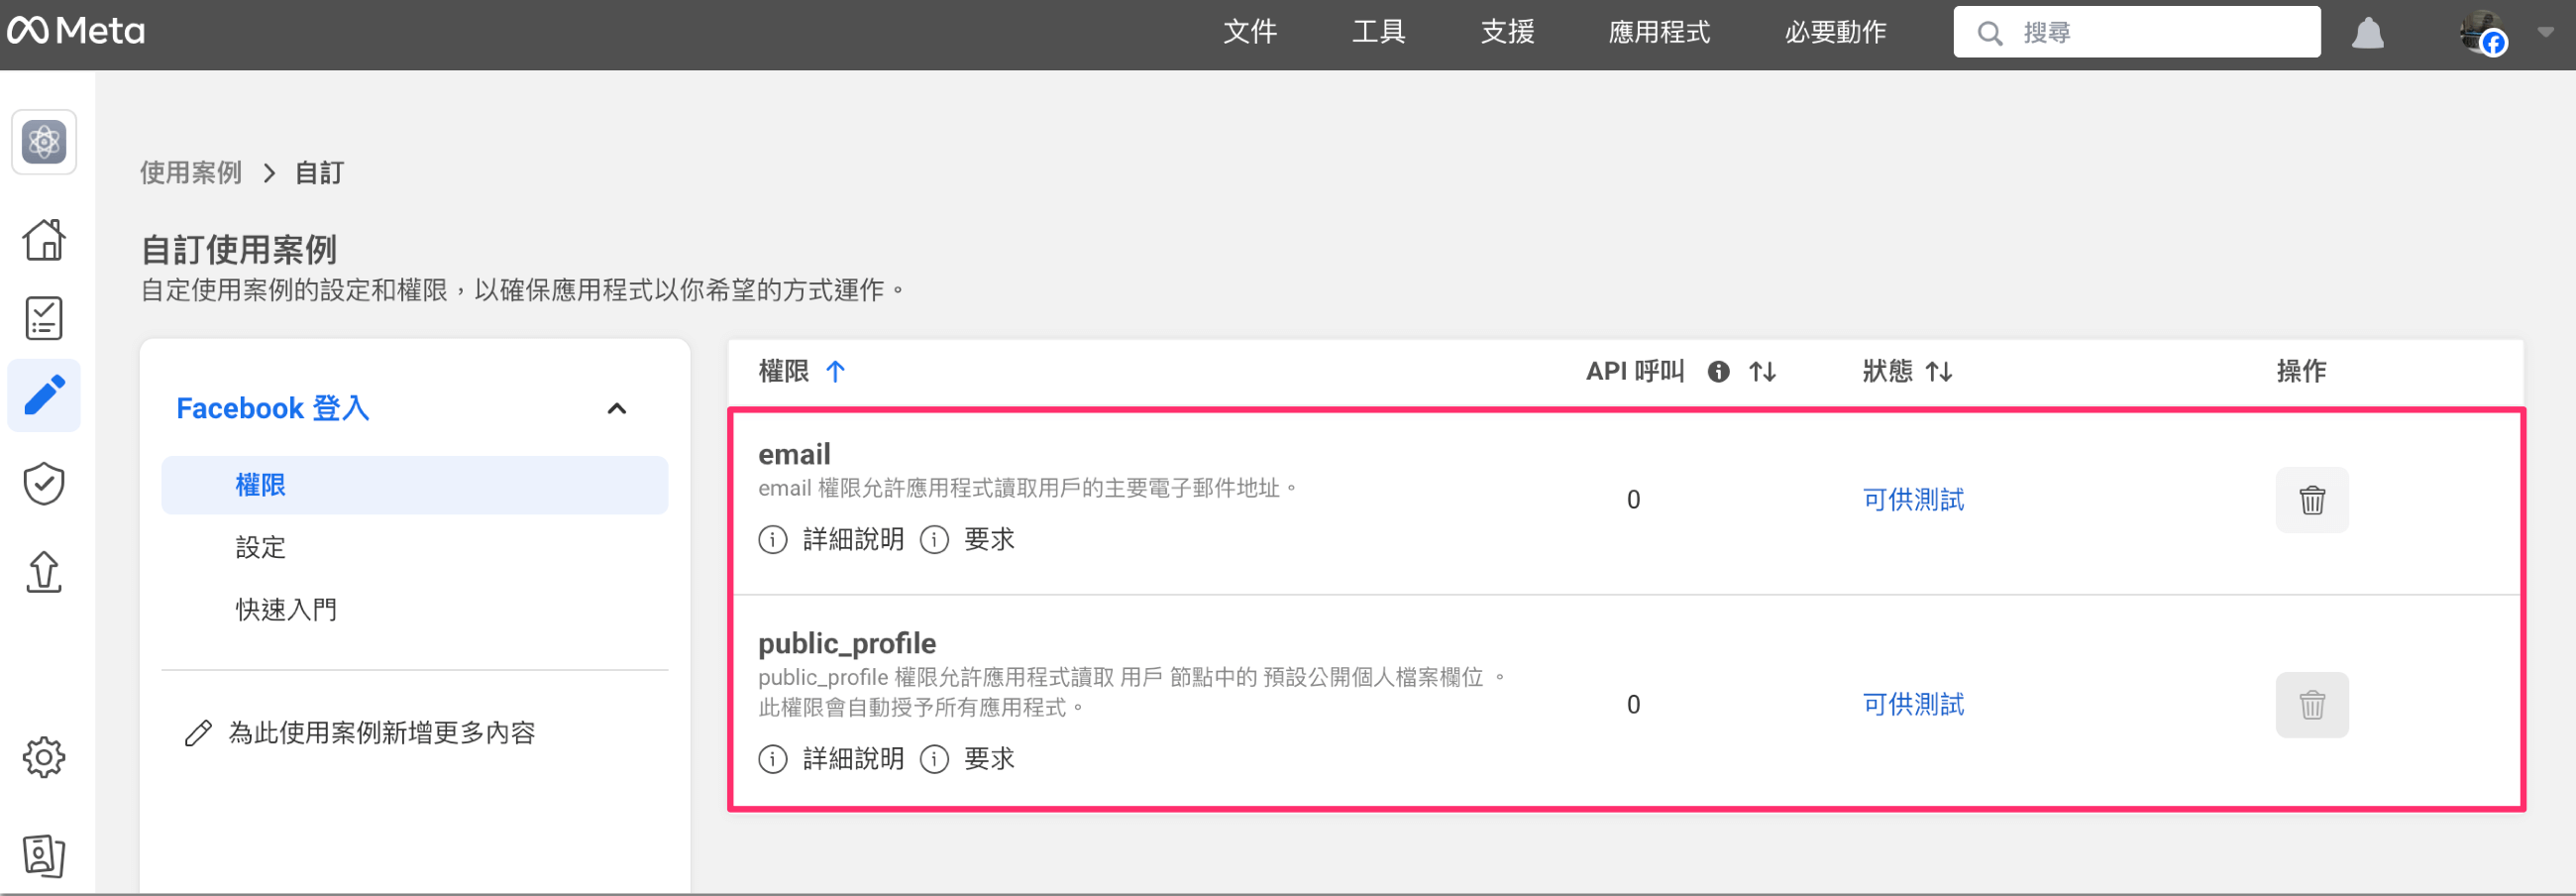
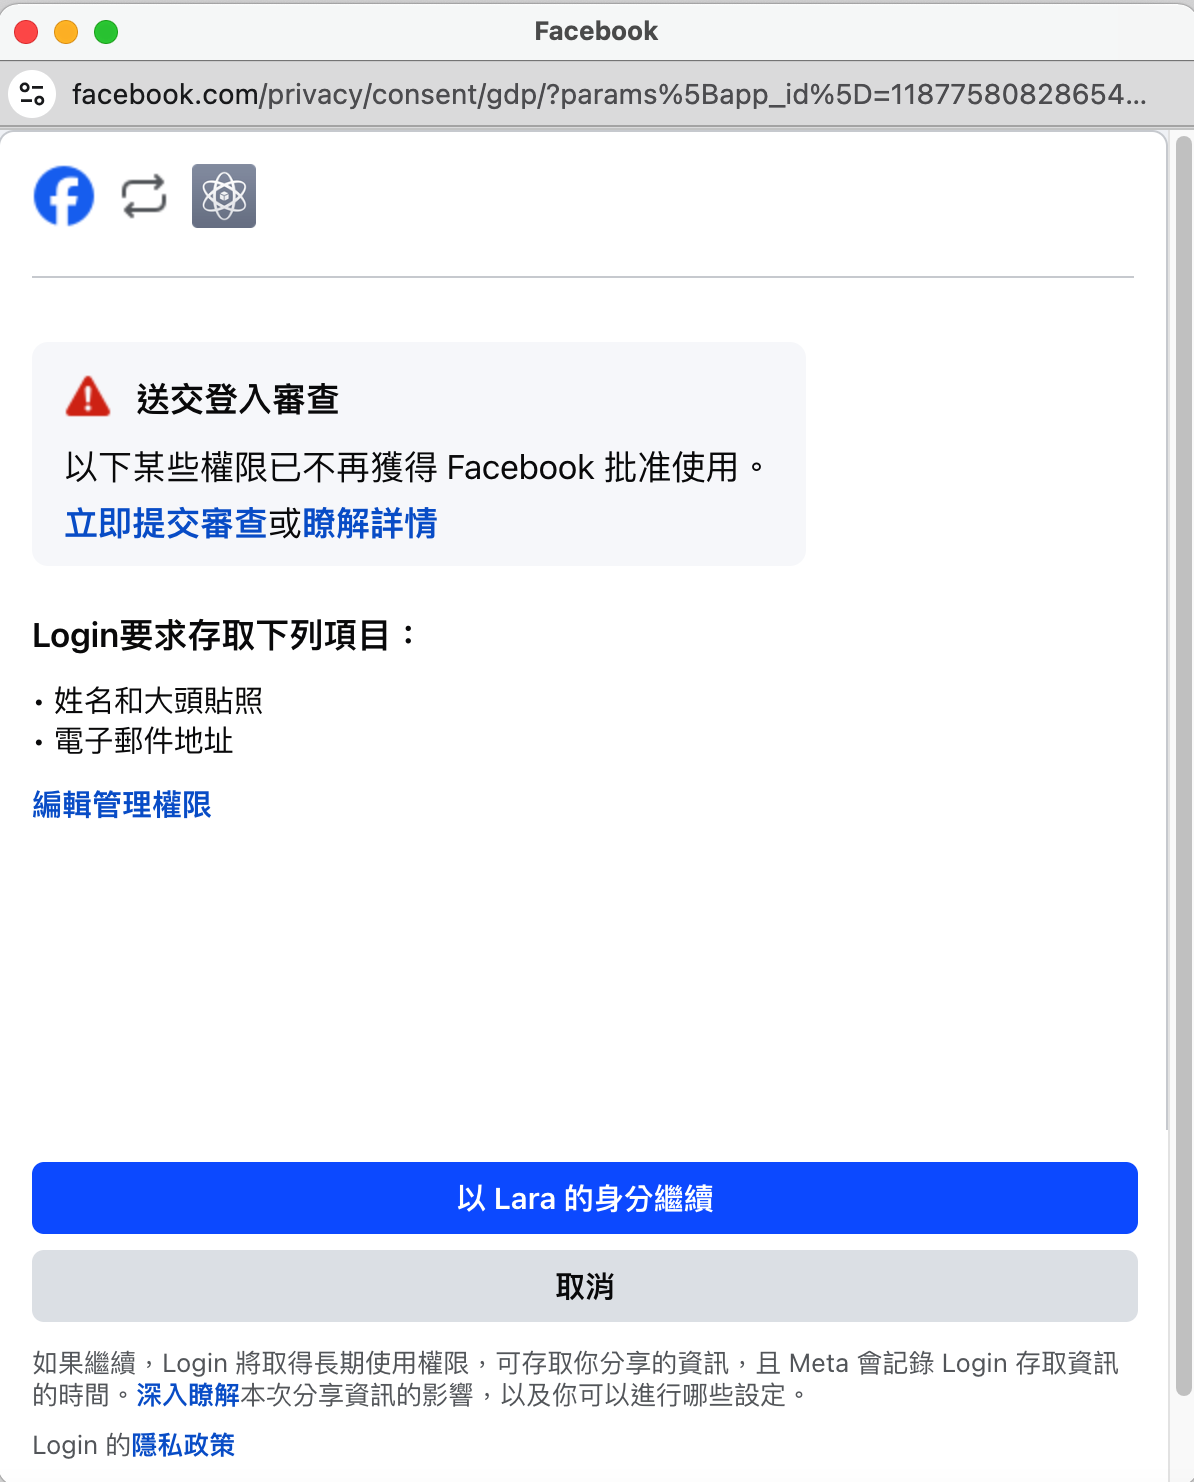
七. 『自訂使用案例』=> Facebook 權限
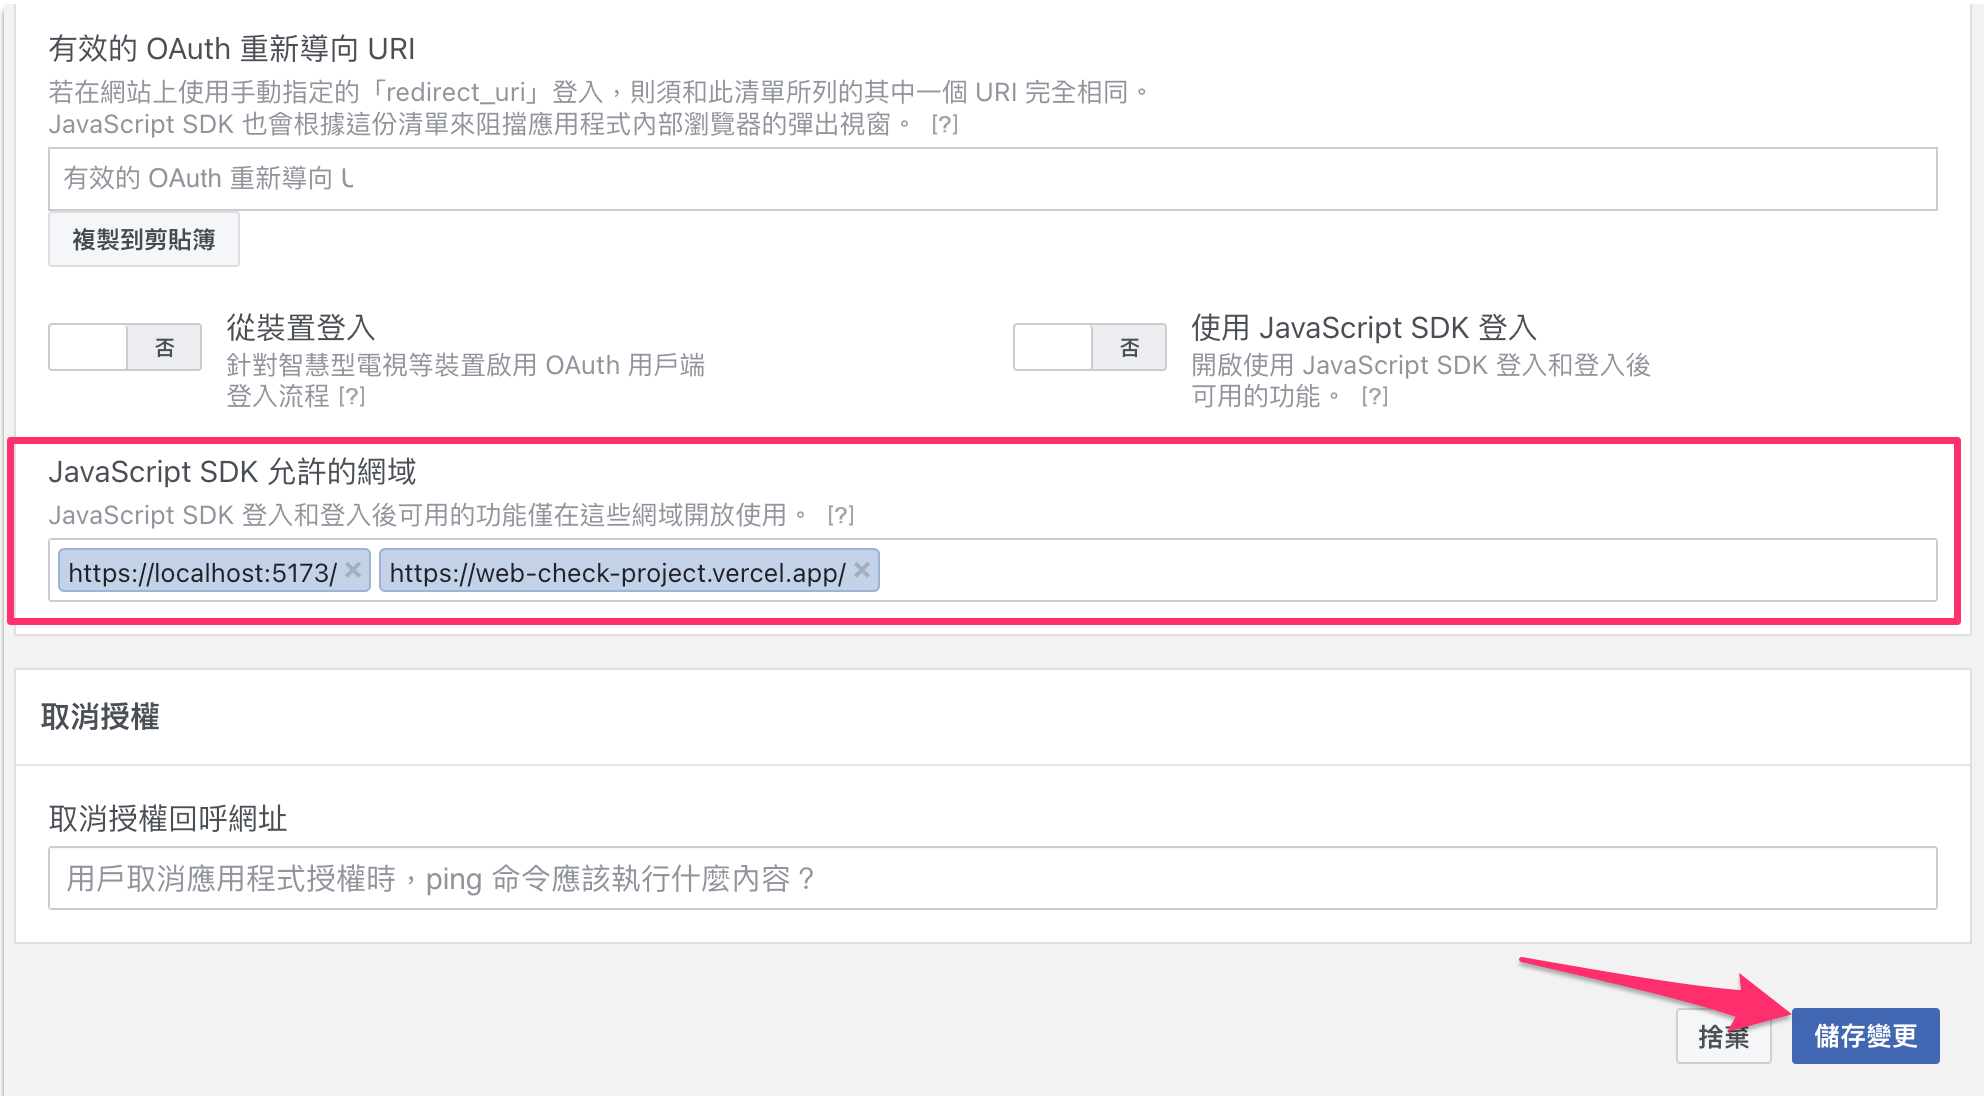
八. 『自訂使用案例』 => Facebook 設定
有效得重新導向
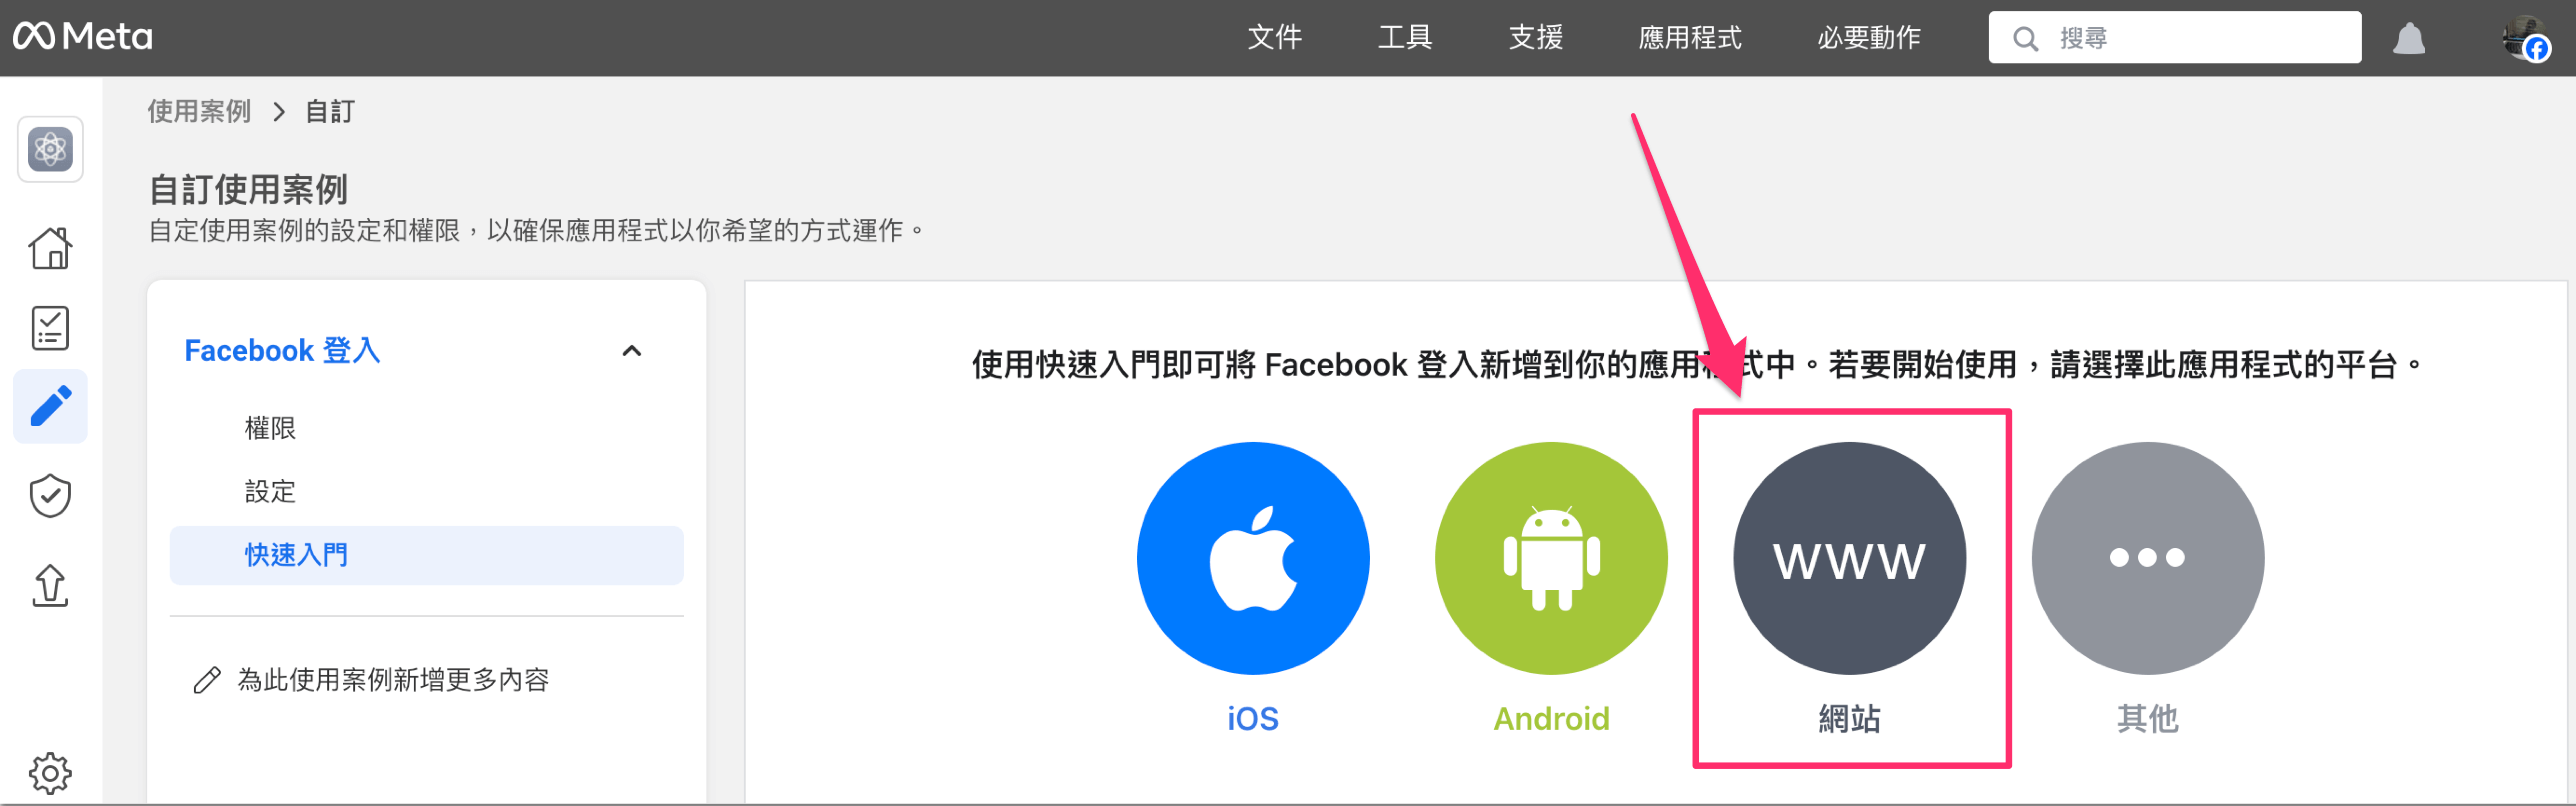
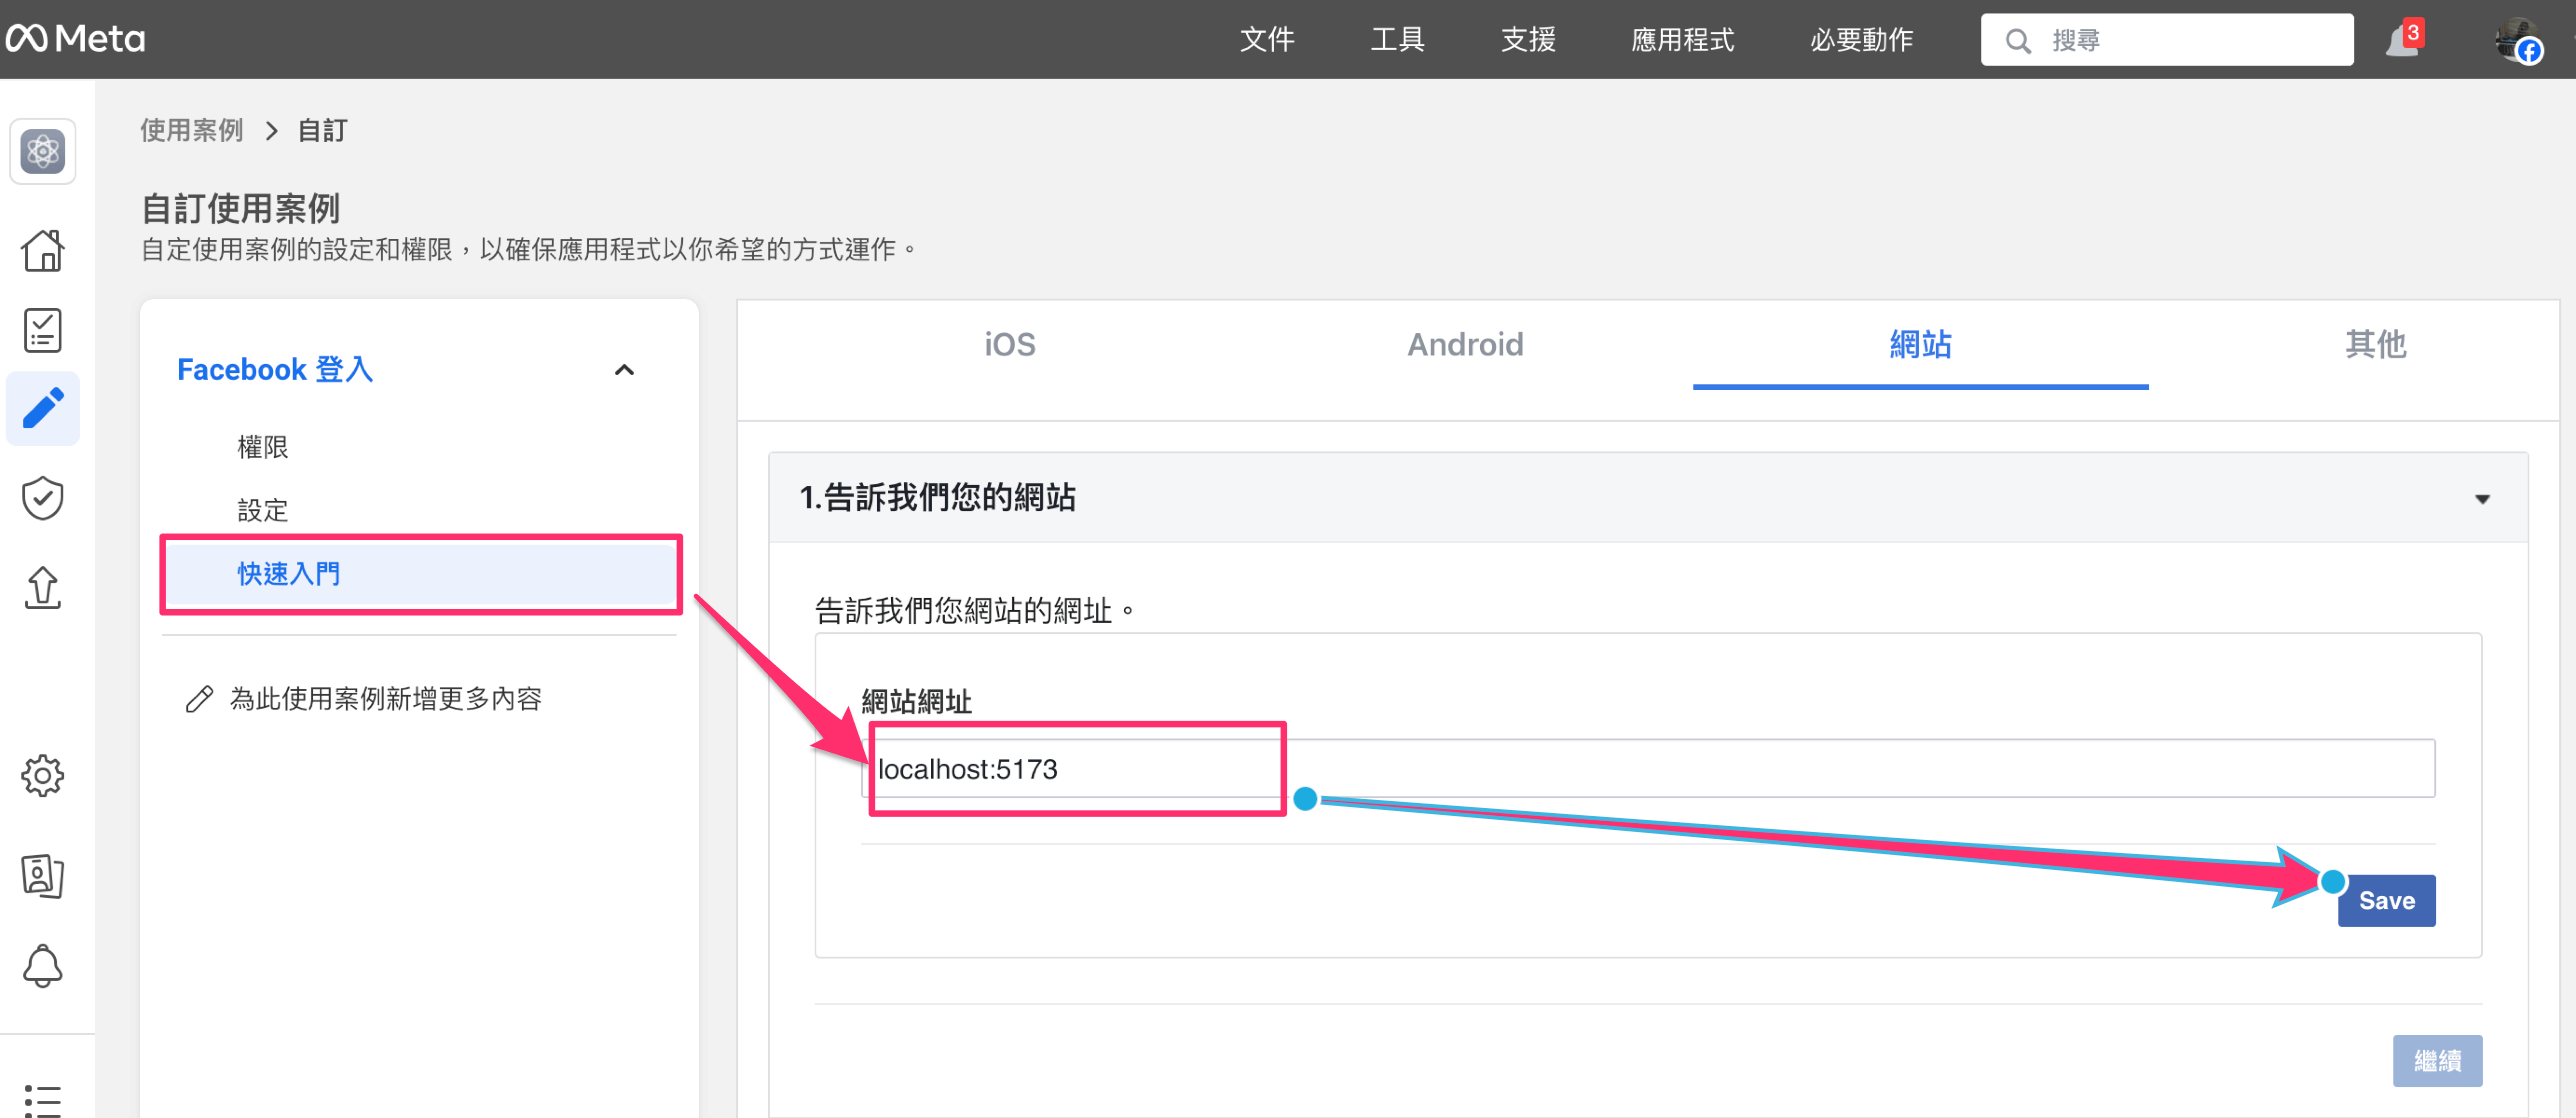
九. 『自訂使用案例』 => Facebook 『快速入門』
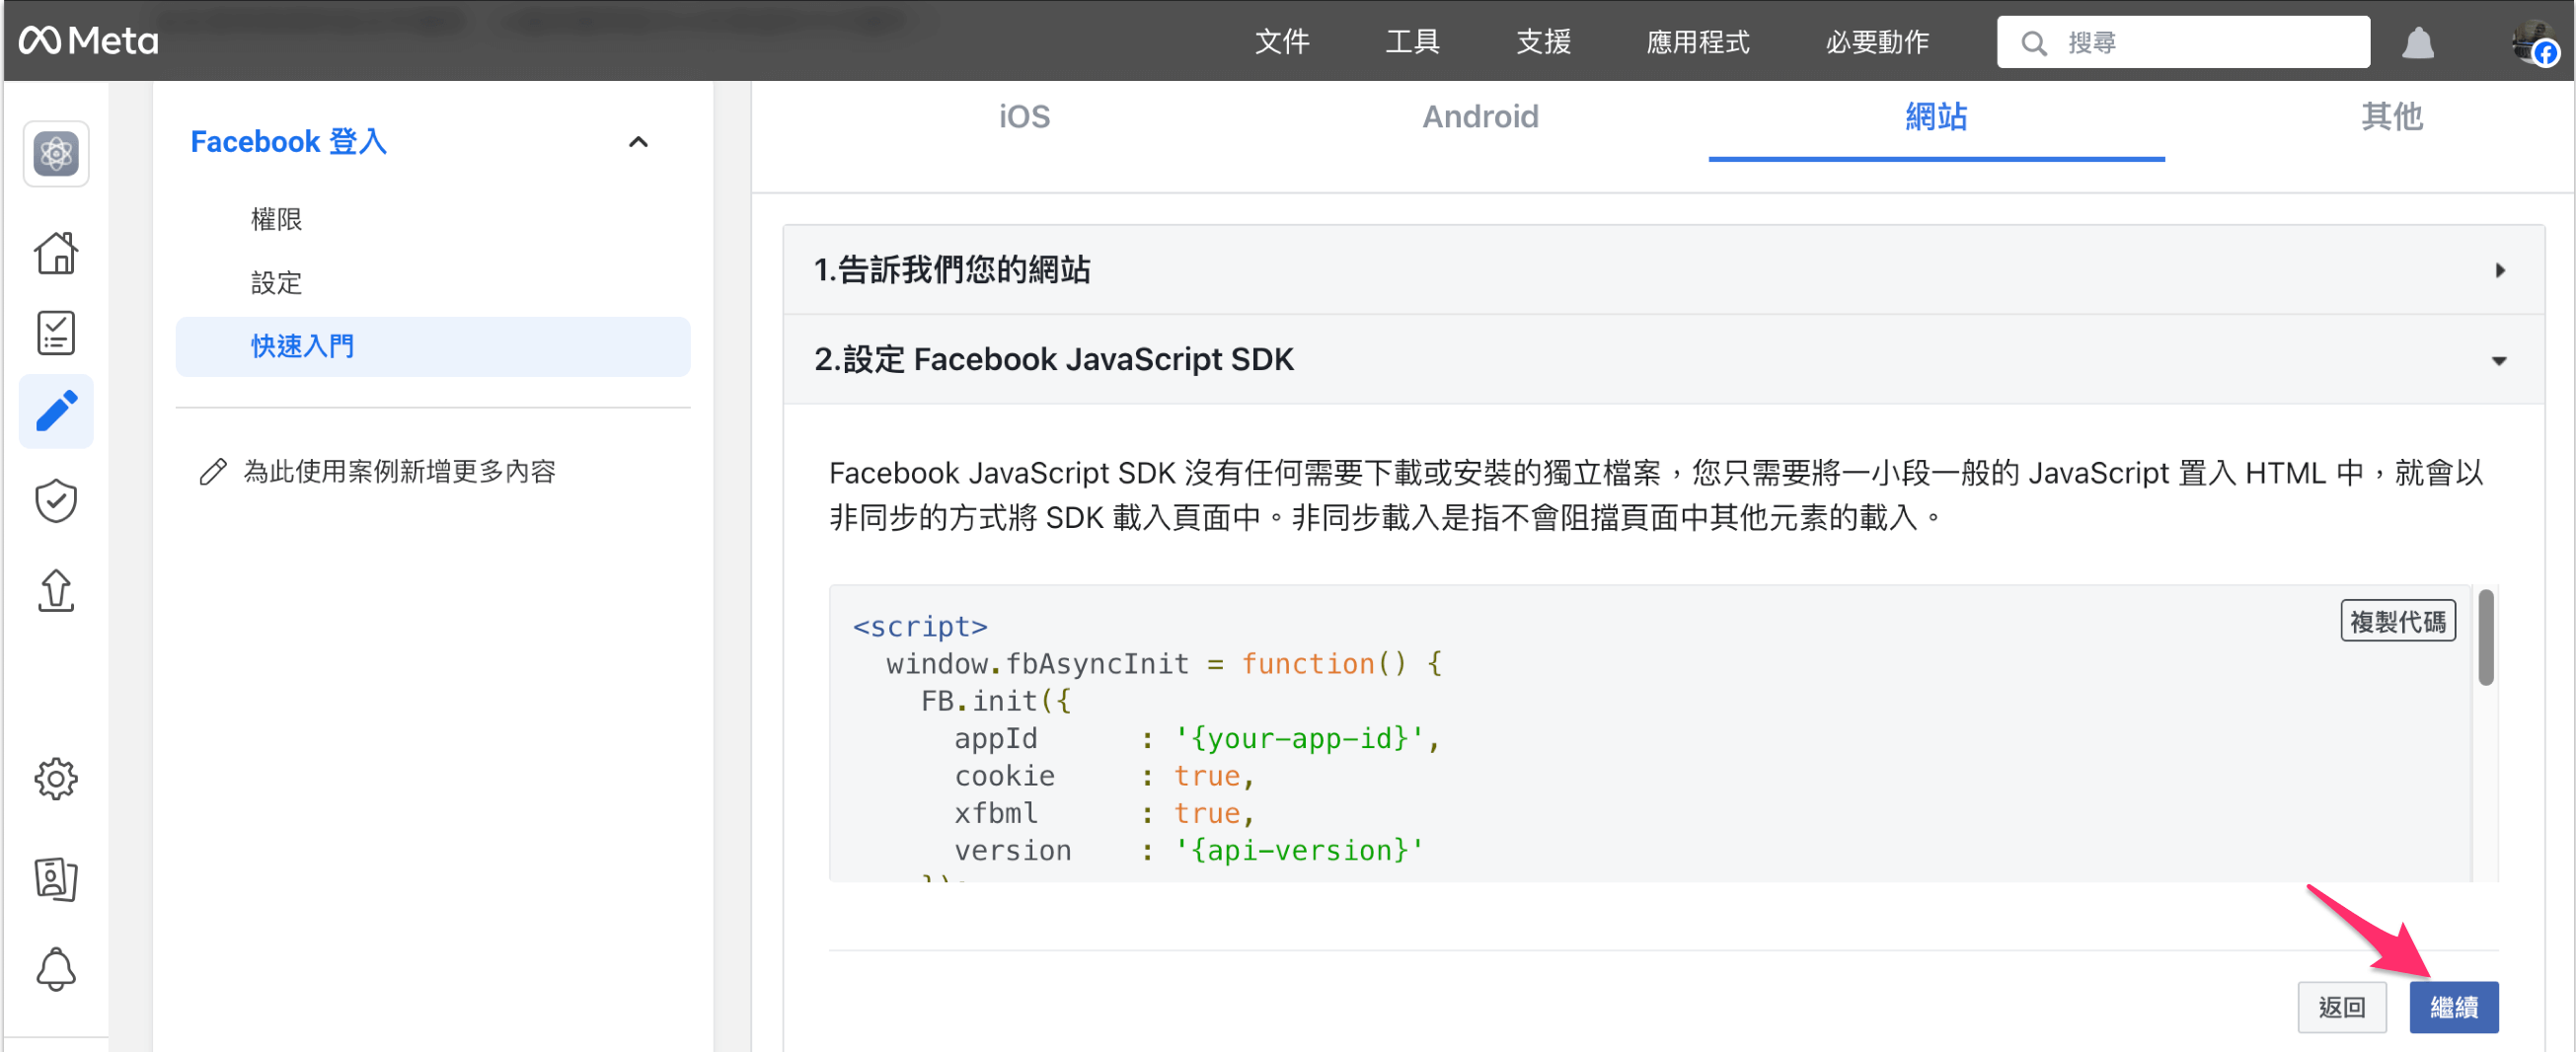
1.告訴我們您的網站 2.設定 Facebook JavaScript SDK
Facebook JavaScript SDK 沒有任何需要下載或安裝的獨立檔案,您只需要將一小段一般的 JavaScript 置入 HTML 中,就會以非同步的方式將 SDK 載入頁面中。非同步載入是指不會阻擋頁面中其他元素的載入。
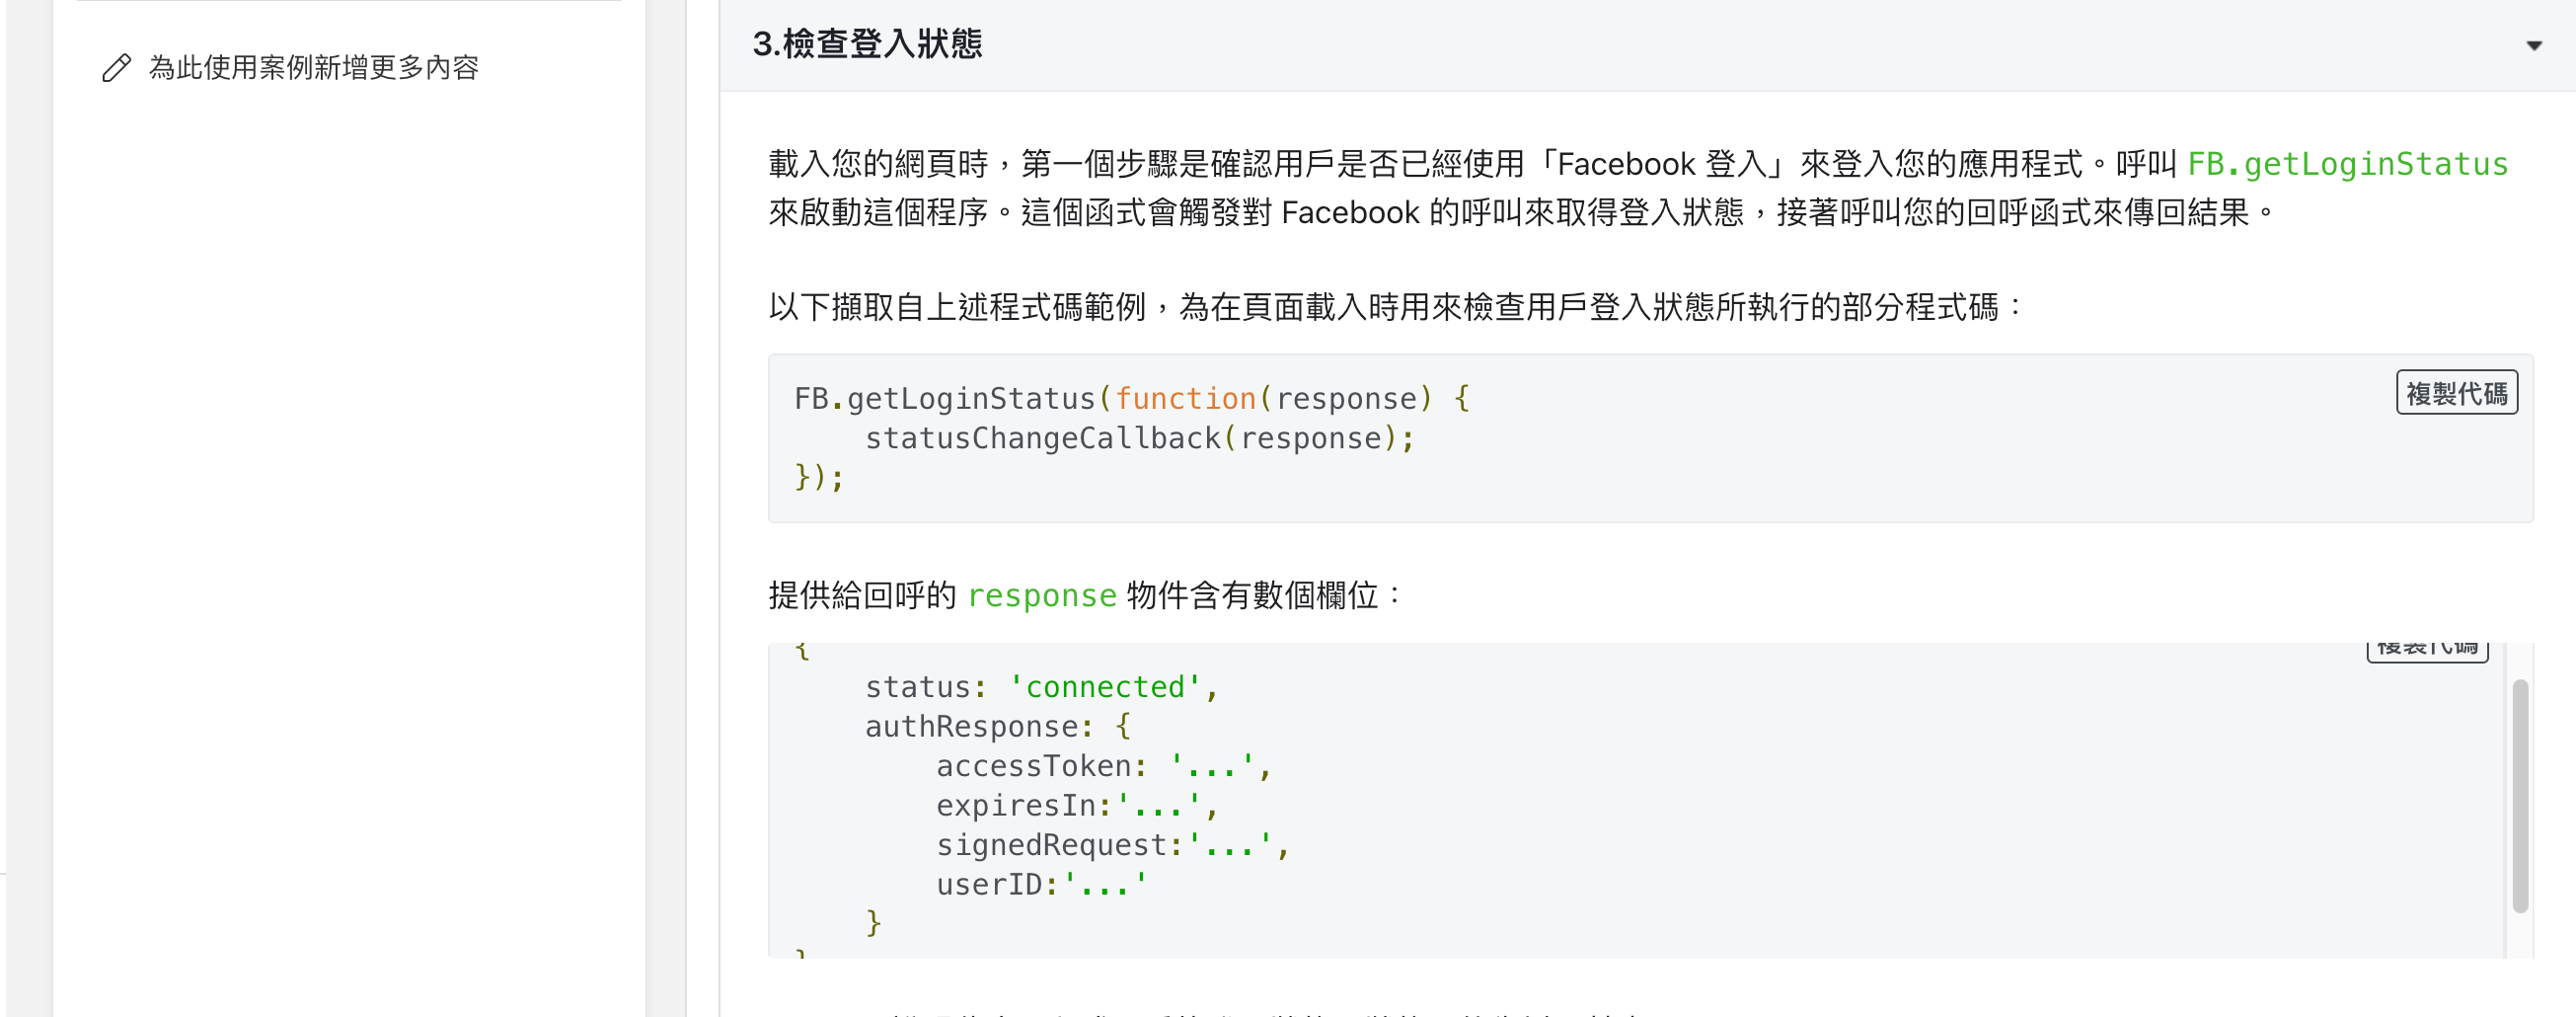
3.檢查登入狀態
載入您的網頁時,第一個步驟是確認用戶是否已經使用「Facebook 登入」來登入您的應用程式。呼叫 FB.getLoginStatus 來啟動這個程序。這個函式會觸發對 Facebook 的呼叫來取得登入狀態,接著呼叫您的回呼函式來傳回結果。
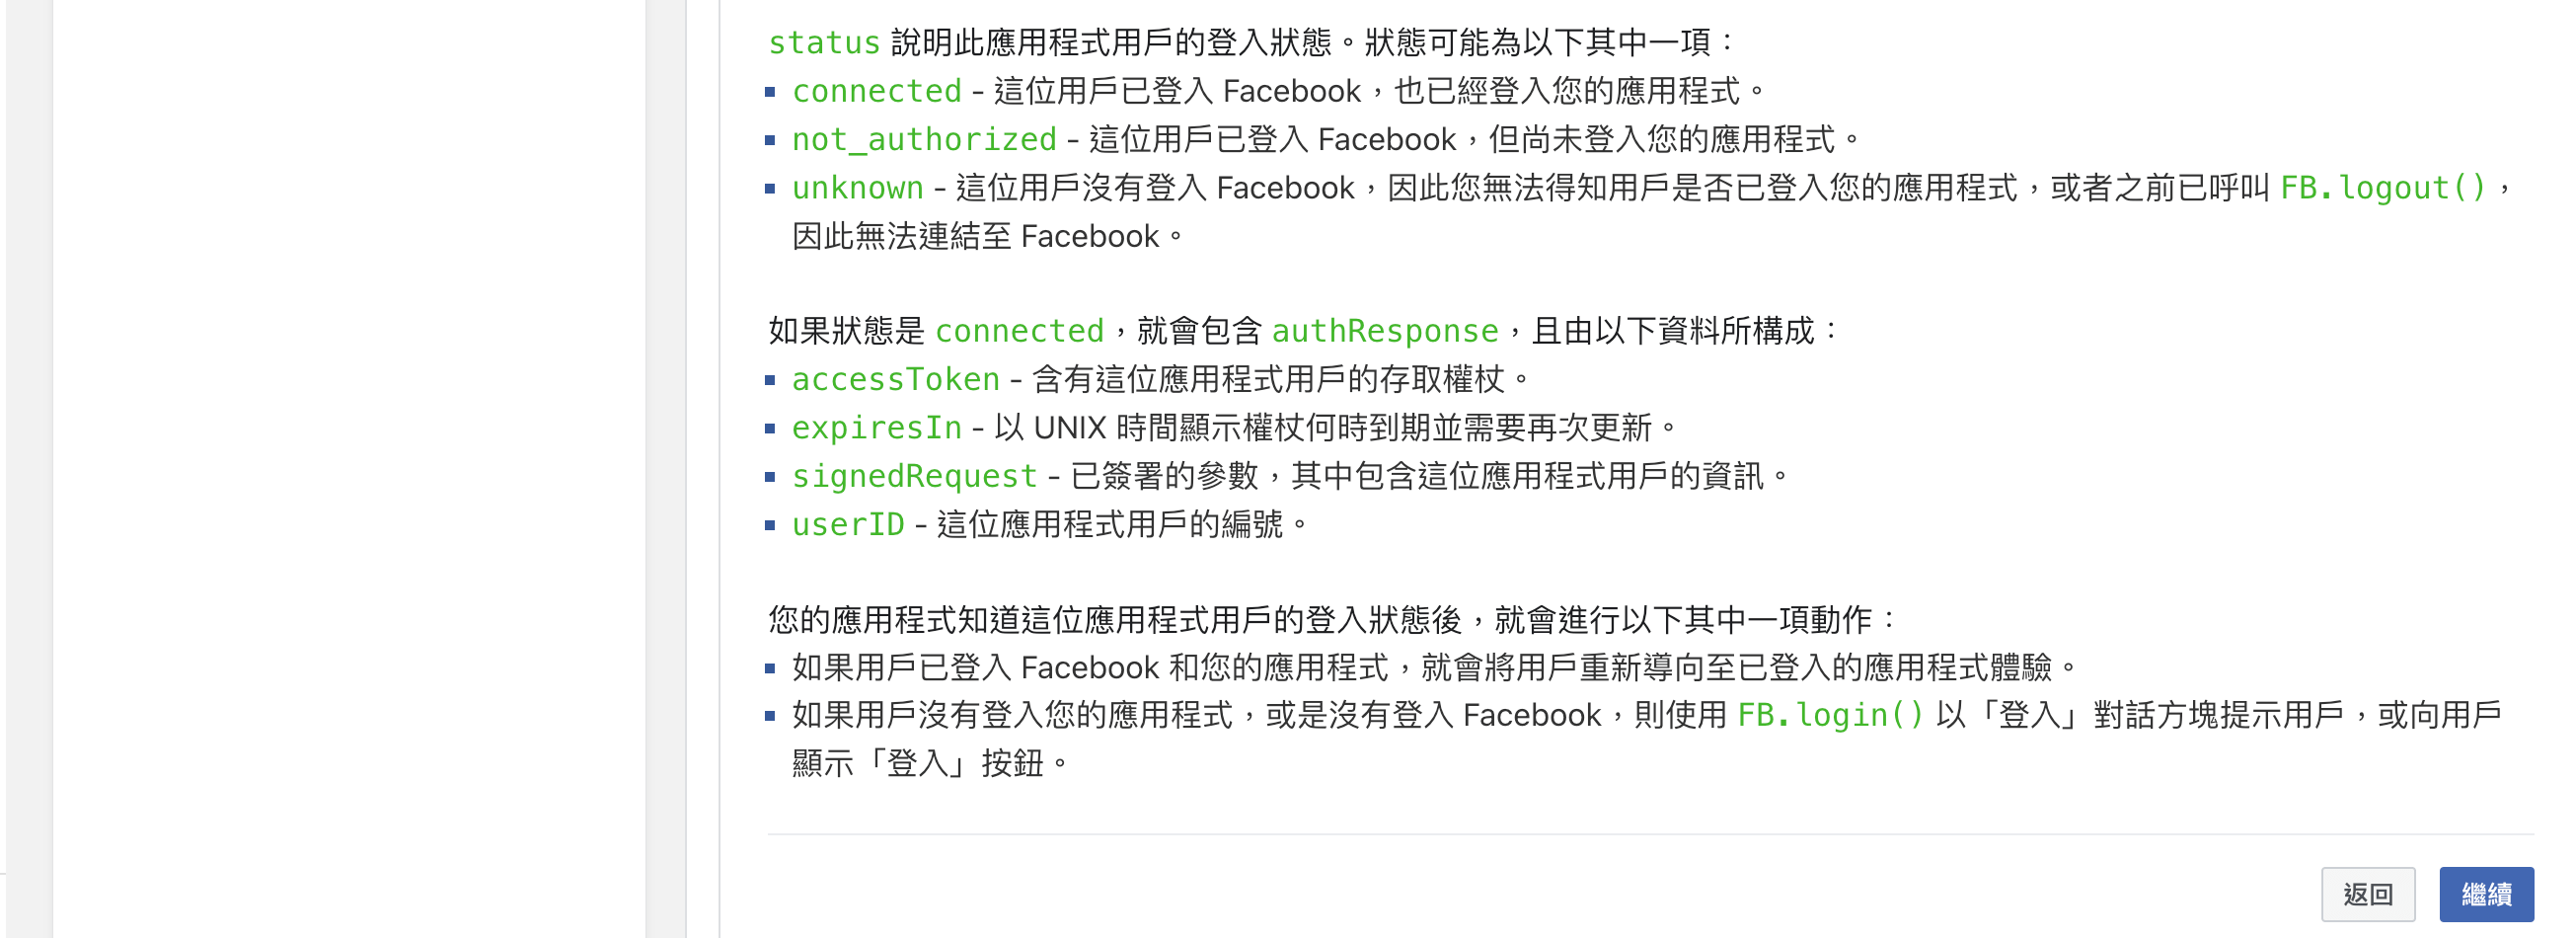
以下擷取自上述程式碼範例,為在頁面載入時用來檢查用戶登入狀態所執行的部分程式碼
九. 下圖Id 就是我要們獲取的重要參數
//

安裝

1
npm install --save @healerlab/vue3-facebook-login

Vue3 Facebook Login

1
2
3
4
5
6
7
8
9
10
11
12
13
14
15
16
17
18
19
20
21
22
23
24
25
<script setup lang="ts">
import { HFaceBookLogin } from '@healerlab/vue3-facebook-login';
const fbAppID = ref<string>(`${import.meta.env.VITE_FB_APP_ID}`)
const onSuccess = (response) => {
// get your auth token and info
// 取得你的身分驗證令牌和訊息
}

const onFailure = () => {
// logic if auth failed
// 身份驗證失敗時的邏輯
}
</script>

<style scoped lang="scss">
.fb-button {
display: inline-block;
margin: 10px 0 10 0;
color: white;
background-color: #1967d2;
border-radius: 8px;
padding: 16px;
cursor: pointer;
}
</style>
1
2
3
4
5
6
7
8
9
10
11
12
13
14
<template>
<HFaceBookLogin
v-slot="fbLogin"
:app-id="fbAppID"
@onSuccess="onSuccess"
@onFailure="onFailure"
scope="email,public_profile"
fields="id,name,email,first_name,last_name,birthday">
<i @click="fbLogin.initFBLogin" class="fa-brands fa-facebook"></i>
</HFaceBookLogin>
</template>


Angular Signal API

RxJS 是一個使用可觀察序列編寫非同步和基於事件的程式的函式庫。

它提供了一種核心型別,即 Observable、一些周邊型別(Observer、Scheduler、Subjects)和類似於 Array 方法(map、filter、reduce、every 等)的運算子,以便將非同步事件作為集合進行處理。

什麼是HttpClient

HttpClient 是Angular 內建專門處理AJAX的模組,負責處理用API 溝通取得資料的複雜流程。

匯入HttpClient

Angular 18 引進了一種觸發偵測變更的新方法。檢測更改完全由 Zone Js 處理。現在,偵測變化由框架本身直接觸發。
Angular 18 的新增功能
Angular 19版本

1
2
3
4
5
6
7
8
9
10
11
12
13
14
import { ApplicationConfig, provideZoneChangeDetection } from '@angular/core';
import { provideRouter } from '@angular/router';
+ import { provideHttpClient} from '@angular/common/http';
import { routes } from './app.routes';
import { provideClientHydration, withEventReplay } from '@angular/platform-browser';

export const appConfig: ApplicationConfig = {
providers: [
provideZoneChangeDetection({ eventCoalescing: true }),
+ provideHttpClient(),
provideRouter(routes),
provideClientHydration(withEventReplay())
]
};

Subscribe

推薦把它們用於事件處理、非同步程式設計以及處理多個值等場景。

接收可觀察物件通知的處理器要實現 Observer 介面

  • next:用來處理每個送達值。在開始執行後可能執行零次或多次。
  • error:用來處理錯誤通知。錯誤會中斷這個可觀察物件實例的執行過程。
  • complete:用來處理執行完畢(complete)通知。當執行完畢後,這些值就會繼續傳給下一個處理器。
1

Angular Signal API

「當我們真的有改變需要渲染的資料時,才進行渲染」,我們也可以稱他為一種「回應變化」的處理方式,也就是每次渲染,都一定會有一個主動的變化,也是我們常常講的「reactidve programming」的一種應用。
Angular 借用了 solid.js 提出的 signal 概念,我們可以把它想像成是一種資料的「訊號」,只有當這個「訊號」有發送的時候,我們才進行回應 (也就是畫面渲染),如此一來就可以提高整體應用程式的效率!

定義Signal

Signal Html

html

1
2
3
4
5
6
<div style="font-size: 80px;">{{count()}}</div>
<div class="btn_group">
<a (click)="set()" class="button set_button">設置</a>
<a (click)="add()" class="button add_button">+1</a>
<a (click)="minus()" class="button minus_button">-1</a>
</div>

Signal TS 設置更新邏輯

1
2
3
4
5
6
7
8
9
10
11
12
13
14
15
16
17
18
19
20
21
22
23
24
25
26
27
import { Component, signal } from '@angular/core';
import { CommonModule } from '@angular/common';
import { RouterOutlet } from '@angular/router';

@Component({
selector: 'app-root',
standalone: true,
imports: [CommonModule, RouterOutlet],
templateUrl: './app.component.html',
styleUrls: ['./app.component.css']
})
export class AppComponent {
count = signal(1)
// 設置初始數
set() {
this.count.set(1)
}
// Add增加
add() {
this.count.update(c => c + 1)
}
// Minus減少
minus() {
this.count.update(c => c - 1)
}
}

計算computed Singal

computed() 會回傳一個 readonly signal,且在呼叫時需要傳入一個 callback function,在此 function 內的 signal 發生變化時,這個 callback function 就會自動被呼叫,因此我們可以在 signal 有變化時,才去根據來源 signal 產生新結果,

引入 computed, signal

1
2
3
import { Component,computed, signal } from '@angular/core';
...
counter = signal(0);

TS

定義count=>signal(值)
computed(() => { return … })

1
2
3
4
5
6
7
8
9
10
11
12

import { Component,computed, signal } from '@angular/core';

export class HomeComponent {

count = signal(2)
countPlus = computed(() => { return this.count() * this.count() })

add() {
this.count.update(() => this.count() * this.count())
}
}

Html

1
2
3
4
5
6
7
8
9
10
11
<div class="container">
<div class="flex_center">
<p class="flex_center">compouted works!</p></div>
<div class="flex_center">
<div class="flex_center">{{ count() }}</div>
<div class="flex_center">{{ countPlus() }}</div>
</div>
<div class="flex_center" >
<a class="button add_button" (click)="add()">+1</a>
</div>
</div>

Angular 環境變數

嵌套路由

1
<router-outlet></router-outlet>

this.router.navigate([‘users’]); 切換至頁面

專案內 src 新增environment 資料夾內environment.ts 與 environment.development.ts
environment.ts檔案內新增

1
2
3
4
5
export const environment = {
production:false,
webSit:'網址',
weatherApiKey: '密碼',
};

environment.development.ts檔案內新增

1
2
3
4
5
export const environment = {
production: true
webSit:'網址',
weatherApiKey: '密碼',
};

在頁面中使用

src/app/app.component.ts 內

  • 引入environment
  • 引入environment
1
2
3
4
5
6
7
8
9
10
11
12
13
14
15
16
17
import { Component } from '@angular/core';
import { RouterOutlet } from '@angular/router';
+ import { environment } from '../environments/environment';
@Component({
selector: 'app-root',
imports: [RouterOutlet],
templateUrl: './app.component.html',
styleUrl: './app.component.scss'
})
export class AppComponent {
title = 'vite_angular19_todo_project';

+ ngOnInit(): void {
+ console.log(environment.production ? 'Production' : '開發中')
+ }
}

環境變數github

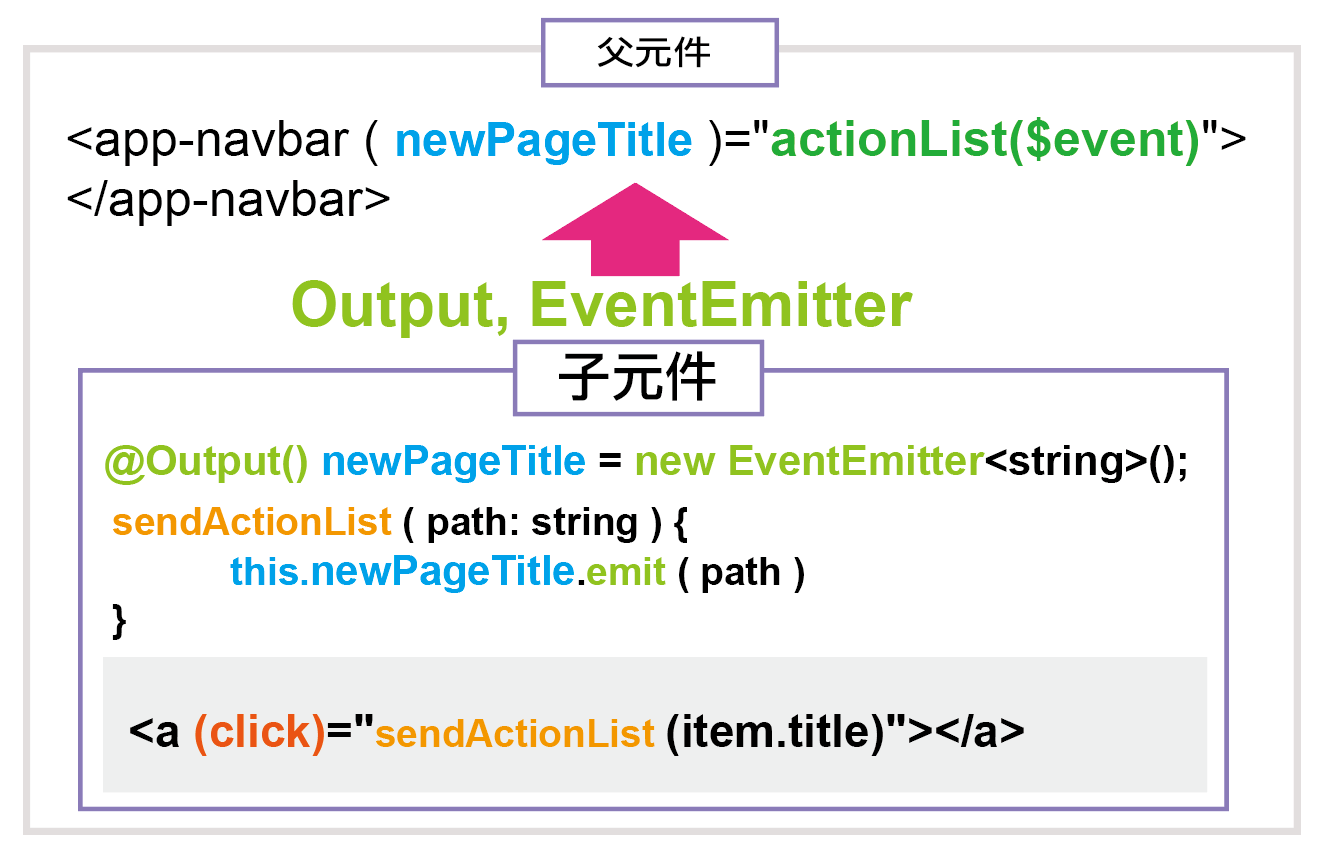
Angular 子傳父「傳值」

子元件藉由@Output裝飾器定義屬性,該屬性為EventEmitter實體,可以設定要傳送的資料型別,透過事件繫結(Event Binding)通知父元件有事件發生。

子元件

1在子元件類中匯入 Output 和 EventEmitter
1
import { Output, EventEmitter } from '@angular/core';
2@Output() newPageTitle = new EventEmitter();
1
2
3
4
5
6
export class NavbarComponent implements OnInit{
@Output() newPageTitle = new EventEmitter<string>();
sendActionList(path: string) {
+ this.newPageTitle.emit(path);
}
}
舉例 ex:Navbar
TS
在子元件類中匯入 Output 和 EventEmitter
NgFor 必須載入
1
2
3
4
5
6
7
8
9
10
11
12
13
14
15
16
17
18
19
20
21
22
23
24
25
26
27
28
29
30
31
32
+ import { Component, Input, OnInit,EventEmitter, Output } from '@angular/core';
+ import { NgFor } from '@angular/common';
import { CommonModule } from '@angular/common';
import { RouterLink } from '@angular/router';
import { navListType } from '../../Type/nav';
@Component({
selector: 'app-navbar',
imports: [
+ NgFor,
CommonModule,
RouterLink
],
templateUrl: './navbar.component.html',
styleUrl: './navbar.component.scss',
})

export class NavbarComponent implements OnInit{
// 子傳父
+ @Input() sendNavLists!: navListType[];
+ @Input() sendPageTitle!: string;
+ @Input() sendIsActive!: boolean;
// 父傳子 @Output() 欄位 = new EventEmitter<屬性>();
+ @Output() newPageTitle = new EventEmitter<string>();
//點擊頁面按鈕函式
sendActionList(path: string) {
//this.欄位.emit()
+ this.newPageTitle.emit(path);
}
ngOnInit(): void {

}
}
HTML
*ngFor 陣列方式迴圈
[ngClass] 動態Class
[routerLink] 動態Class
(click) 點擊函式
1
2
3
4
5
6
7
8
 <ul  class="nav">
<li *ngFor="let item of sendNavLists ; let i = index"
[ngClass]="sendPageTitle === item.title ? 'activeNav' : ''">
<a [routerLink]="item.path"
(click)="sendActionList(item.title)"
class="cursor-pointer">{{item.title}}</a>
</li>
</ul>
父元件
Html
(newPageTitle)="actionList($event)" => @Output() 藉由newPageTitle 通訊
1
2
3
4
5
6
7
8
9
10
<app-navbar
[sendNavLists]="navLists"
[sendPageTitle]="pageTitle"
[sendIsActive]="isActive"
+ (newPageTitle)="actionList($event)"
></app-navbar>

<main class="main">
<router-outlet />
</main>

TS

1
2
3
4
5
6
7
8
9
10
11
12
13
14
15
16
17
18
19
20
21
22
23
24
25
26
27
28
29
30
31
32
33
34
import { Component } from '@angular/core';
import { RouterOutlet } from '@angular/router';
import { FormsModule } from '@angular/forms';
import { environment } from '../environments/environment';
import { NavbarComponent } from "./components/navbar/navbar.component";
import { navListType } from "./Type/nav";

@Component({
selector: 'app-root',
imports: [
RouterOutlet,
FormsModule,
NavbarComponent,
],
templateUrl: './app.component.html',
styleUrl: './app.component.scss'
})

export class AppComponent {
title = "我的網站";
navLists: navListType[] = [
{ title: 'Home' ,path:'/'},
{ title: 'Users', path: 'user' },
{title:'Login',path:'login'}
]
pageTitle: string = 'Home';
isActive: boolean = false;
+ actionList(path: string) {
+ this.pageTitle = path;
+ }
ngOnInit(): void {
console.log(environment.production ? 'Production' : '開發中')
}
}

Angular 父傳子「傳值」

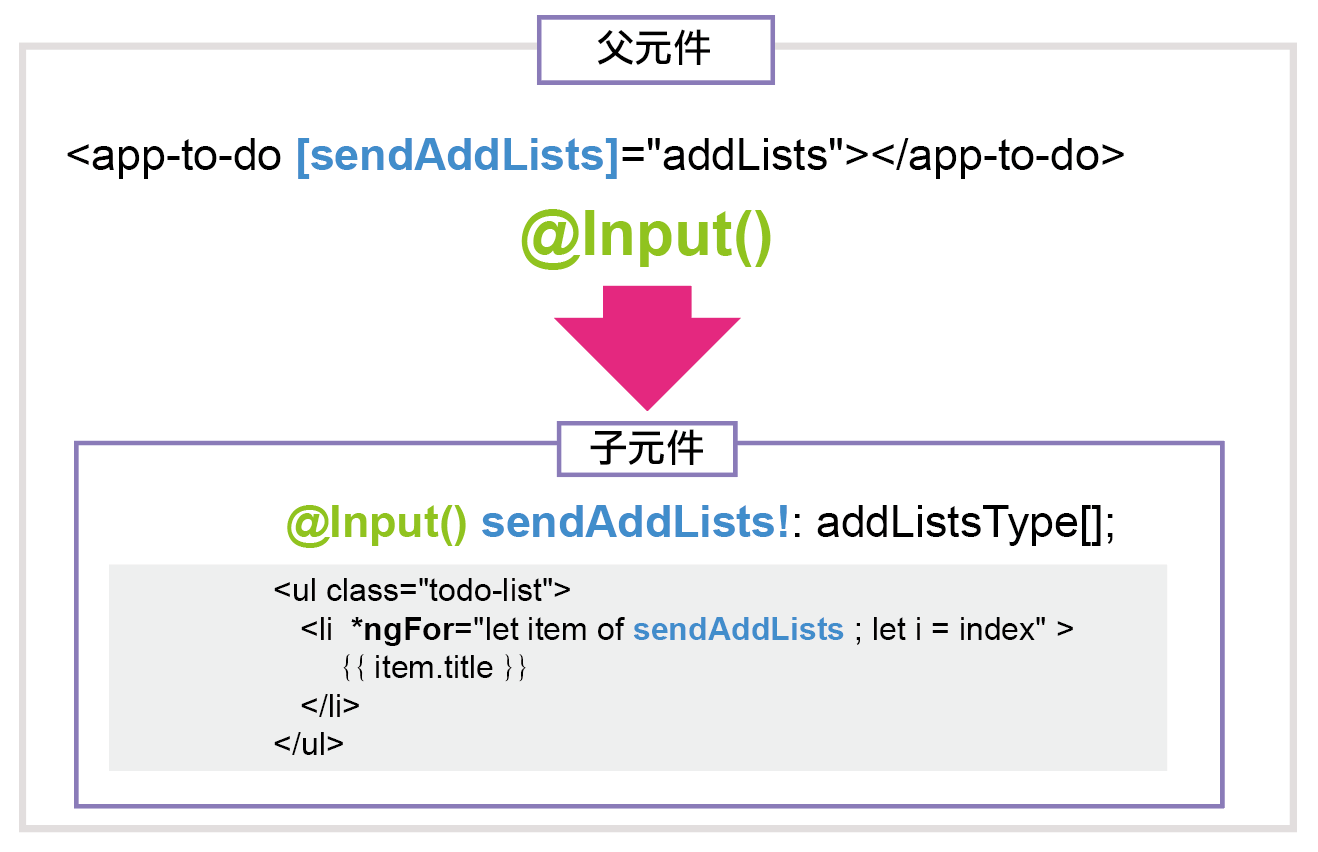
組件通訊 Component Communication with @Input

有時應用程式開發需要您將資料傳送到元件。這些資料可用於自訂元件或將資訊從父元件傳送到子元件。
Angular 使用一個稱為@Input輸入的概念。這與其他框架中的 props 類似。若要建立輸入屬性,請使用@Input 裝飾器。

在本活動中,您將學習如何使用@Input 裝飾器向組件發送訊息。

Angular 父傳子「傳值」

子元件Ts

  • 引入 Input, OnInit => 註解1
  • 引入 NgFor
  • 引入 RouterLink Navbar 因為有使用RouterLink 必須引入
  • @Component() => 註解2
  • export class NavbarComponent 改為 export class NavbarComponent implements OnInit
  • export class NavbarComponent implements OnInit 內
    @Input() Object 陣列 ex.sendNavLists!: navListType[]
    @Input() string 字串 ex.sendPageTitle!: string
    @Input() boolean布林值 ex.sendIsActive!: boolean
  • ngOnInit
    用來初始化頁面內容,顯示數據綁定、設置 directive 和輸入屬性
    在第一次 ngOnChanges 完成後呼叫,只執行一次

註解1:Input 與 OnInit 顧名思義就是進入與輸出,是使用在父子層傳遞資料使用

註解2:@Component() 裝飾器告訴 Angular 這個 class 是一個 Component,而這個裝飾器裡有三個屬性:
  • selector – 我們在其他 Component 的 HTML 檔中如何用標籤選中這個 Component 並渲染。
  • templateUrl - 要到哪裡去找 HTML 檔案,預設是同個資料夾中的 "元件名稱.component.html"
  • styleUrls - 要到哪裡去找專屬這個 Component 的 CSS 檔案,預設是同個資料夾中的 "元件名稱.
  • component.css"
  • imports- 引入其他的依賴(Dependency)

子元件 Html

  • *ngFor
    是Angular 的一個結構性指令,用於在HTML模板中迭代陣列或可迭代對象的元素。它允許我們將數據動態地呈現在HTML 中,並以迭代方式生成元素。
  • [ngClass]
    動態Class狀態
  • [routerLink]
    routerLink 是Angular 的路由機制實作的Directive指示 routerLink 說明參考

子元件 寫法

@Input() 參數欄位名稱!: 屬性;
@Input() 參數欄位名稱: 屬性 |undefined;

1
2
3
4
5
6
7
8
9
10
11
12
13
14
15
16
17
18
19
20
21
22
23
24
25
26
27
28
29
30
31
32
+ import { Component, Input, OnInit,Output,EventEmitter } from '@angular/core';
+ import { NgFor } from '@angular/common';
import { CommonModule } from '@angular/common';
import { RouterLink } from '@angular/router';
interface navListType{
title: string,
path: string,
}

@Component({
selector: 'app-navbar',
imports: [
+ NgFor,
+ CommonModule,
+ RouterLink
],
templateUrl: './navbar.component.html',
styleUrl: './navbar.component.scss',
})
// 實作初始化
+ export class NavbarComponent implements OnInit{
+ @Input() sendNavLists!: navListType[];
+ @Input() sendPageTitle!: string;
+ @Input() sendIsActive!: boolean;

@Output() newPageTitle = new EventEmitter<string>();
// 點擊頁面按鈕函式
actionList(titlePage: string) {
this.newPageTitle.emit(titlePag);
}
+ ngOnInit(): void {}
}

子元件 Html

1
2
3
4
5
6
7
8
<ul  class="nav">
<li *ngFor="let item of sendNavLists ; let i = index"
[ngClass]="sendPageTitle === item.title ? 'activeNav' : ''">
<a [routerLink]="item.path"
(click)="actionList(item.title)"
class="cursor-pointer">{{item.title}}</a>
</li>
</ul>

子元件 Scss

1
2
3
4
5
6
7
8
9
10
11
12
13
14
15
16
17
18
19
20
21
22
23
24
25
26
27
28
  .nav{
list-style-type: none;
display: flex;
margin:0px auto auto auto;
padding-inline-start: 0px;
background-color: #00bcd4;

width: 100%;
max-width: 100%;
display: flex;
justify-content: center;
height: 50px;

li{
list-style-type: none;
display: flex;
margin: auto 10px;
a{
cursor: pointer;
text-decoration: none;
color:white;
}
}
}

.activeNav{
border-bottom: 1px solid white;
}

父元件

  • 載入NavbarComponent
父元件 TS
=> 載入子元件 => 以下藉由子元件@input 欄位來傳值
1
2
3
4
5
6
7
8
9
10
11
12
13
14
15
16
17
18
19
20
21
22
23
24
25
26
27
28
29
30
31
32
import { Component } from '@angular/core';
import { RouterOutlet } from '@angular/router';
import { FormsModule } from '@angular/forms';
import { environment } from '../environments/environment';
+ import { NavbarComponent } from "./components/navbar/navbar.component";
interface navListType{
title: string,
path: string,
}
@Component({
selector: 'app-root',
imports: [
RouterOutlet,
FormsModule,
+ NavbarComponent,
],
templateUrl: './app.component.html',
styleUrl: './app.component.scss'
})
export class AppComponent {
// NavBar 數據
+ navLists: navListType[] = [
+ { title: 'Home' ,path:'/'},
+ { title: 'Users', path: 'user' },
+ {title:'Login',path:'login'}
+ ]
+ pageTitle: string = 'Home';
+ isActive: boolean = false;
ngOnInit(): void {
console.log(environment.production ? 'Production' : '開發中')
}
}
父元件 Html

以下藉由子元件@input 欄位來傳值

  • [sendNavLists]
    是Angular 父對子傳值中的一個
  • [sendPageTitle]
    是Angular 的一個結構性指令,用於在HTML模板中迭代陣列或可迭代對象的元素。它允許我們將數據動態地呈現在HTML 中,並以迭代方式生成元素。
  • [sendIsActive]
    是Angular 的一個結構性指令,用於在HTML模板中迭代陣列或可迭代對象的元素。它允許我們將數據動態地呈現在HTML 中,並以迭代方式生成元素。
1
2
3
4
5
6
7
8
9
10
<app-navbar
[sendNavLists]="navLists"
[sendPageTitle]="pageTitle"
[sendIsActive]="isActive"
></app-navbar>

<main class="main">
<router-outlet />
</main>

navLists功能